編輯:關於Android編程
在項目中,產品對於輸入方式會有特殊的要求,需要對輸入方式增加特定的限制,這就需要采用自定義鍵盤。本文主要講述數字鍵盤和字母鍵盤的自定義實現。
項目地址:https://github.com/xudjx/djkeyboard
鍵盤效果:
自定義鍵盤的實現步驟如下:
自定義CustomKeyboard
Android系統Keyboard的構造方法如下:
 /**
   * Creates a keyboard from the given xml key layout file.
   * @param context the application or service context
   * @param xmlLayoutResId the resource file that contains the keyboard layout and keys.
   */
  public Keyboard(Context context, int xmlLayoutResId) {
    this(context, xmlLayoutResId, 0);
  }

  /**
   * Creates a keyboard from the given xml key layout file. Weeds out rows
   * that have a keyboard mode defined but don't match the specified mode.
   * @param context the application or service context
   * @param xmlLayoutResId the resource file that contains the keyboard layout and keys.
   * @param modeId keyboard mode identifier
   * @param width sets width of keyboard
   * @param height sets height of keyboard
   */
  public Keyboard(Context context, @XmlRes int xmlLayoutResId, int modeId, int width,
      int height) {
      ...
  }
其中,參數xmlLayoutResId是必須的,另外還可以通過計算系統鍵盤的高度來設定自定義鍵盤的高度。
xmlLayoutRes的格式如下:
<?xml version="1.0" encoding="UTF-8"?>
<Keyboard android:keyWidth="24.9%p"
     android:keyHeight="49dp"
     android:horizontalGap="0.1333%p"
     android:verticalGap="1px"
     xmlns:android="http://schemas.android.com/apk/res/android">
  <Row>
    <Key android:codes="49" android:keyEdgeFlags="left"
       android:keyLabel="1" />
    <Key android:codes="50" android:keyLabel="2" />
    <Key android:codes="51" android:keyLabel="3" />
    <Key android:codes="-5" android:iconPreview="@drawable/key_num_del_bg"
       android:isRepeatable="true"/>
  </Row>
  ...
</Keyboard>
詳細的數字鍵盤和字母鍵盤xmlLayoutRes資源文件可以從以下鏈接獲取:
數字鍵盤xmlLayoutRes
字母鍵盤xmlLayoutRes
CustomKeyboard主要目的就是賦予xmlLayoutRes並實現特定按鍵的點擊處理,其主要重載的方法是onKey(int primaryCode, int[] keyCodes)。詳細代碼如下:
public abstract class BaseKeyboard extends Keyboard implements KeyboardView.OnKeyboardActionListener{

 @Override
 public void onKey(int primaryCode, int[] keyCodes) {
    if(null != mEditText && mEditText.hasFocus() && !handleSpecialKey(primaryCode)) {
      Editable editable = mEditText.getText();
      int start = mEditText.getSelectionStart();
      int end = mEditText.getSelectionEnd();
      if (end > start){
        editable.delete(start,end);
      }
      if(primaryCode == KEYCODE_DELETE) {
        if(!TextUtils.isEmpty(editable)) {
          if(start > 0) {
            editable.delete(start-1,start);
          }
        }
      }else if(primaryCode == getKeyCode(R.integer.hide_keyboard)){
        hideKeyboard();
      }else {
        editable.insert(start,Character.toString((char) primaryCode));
      }
    }
  }

 public abstract boolean handleSpecialKey(int primaryCode);
}
如上所示是BaseKeyboard,數字鍵盤和字母鍵盤需要繼承它,並實現public abstract boolean handleSpecialKey(int primaryCode)方法。
自定義CustomKeyboardView
KeyboardView 是承載不同的keyboard並繪制keyboard, 是鍵盤布局的繪制板, 並與系統交互。通過繼承KeyboardView自定義CustomKeyboardView,可以對按鍵樣式實現自定義。考察KeyboardView的源碼,發現其UI樣式都是private類型,這就需要通過反射的方式獲取特定的UI屬性,並重新進行賦值,同時重載onDraw()方法,在onDraw()中重新繪制。
詳細代碼可以參考github源碼: BaseKeyBoardView源碼
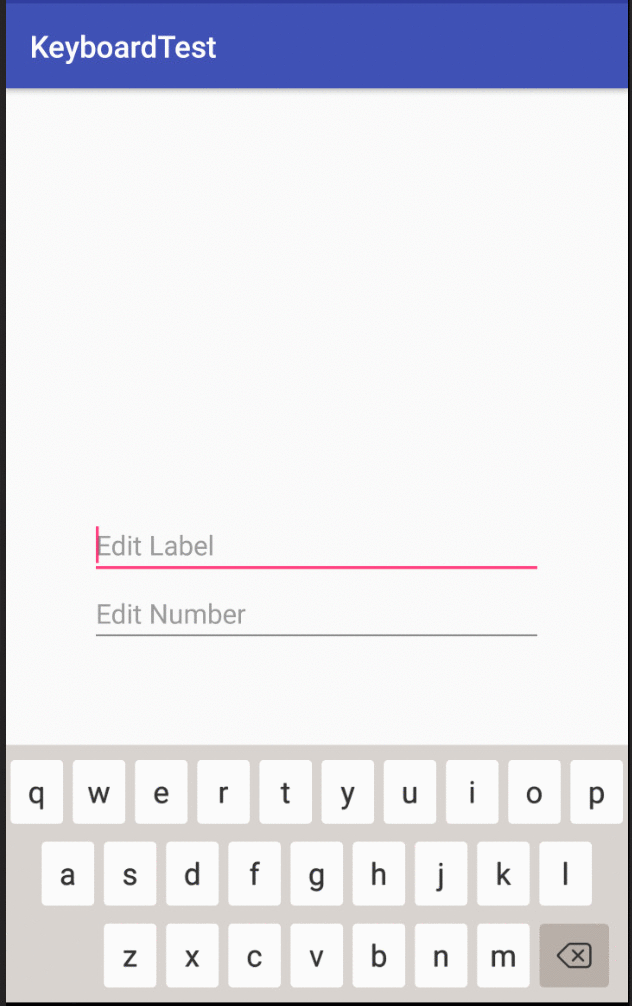
自定義鍵盤的UI效果如下:
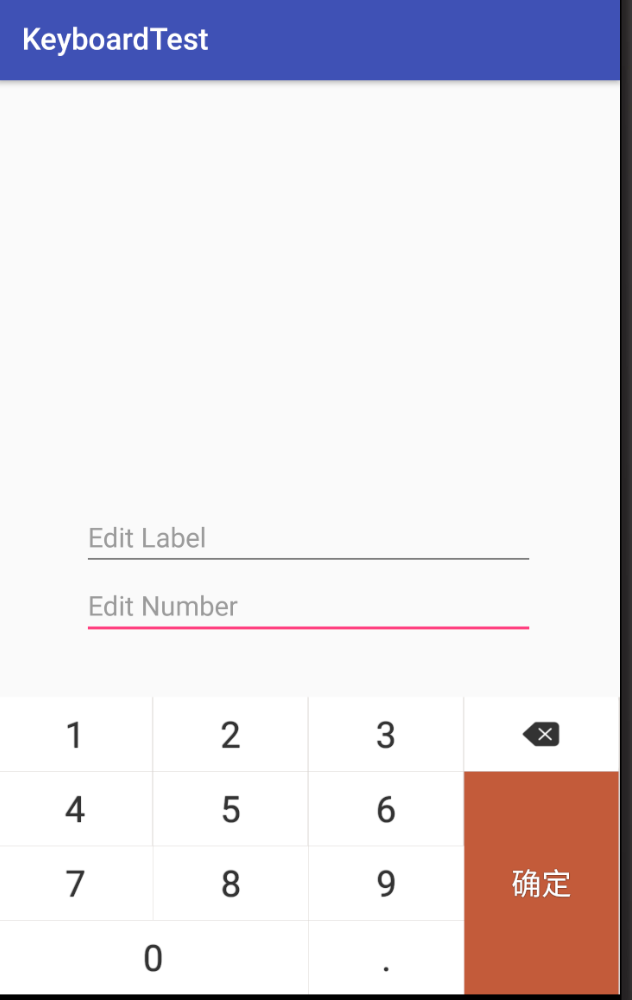
數字鍵盤
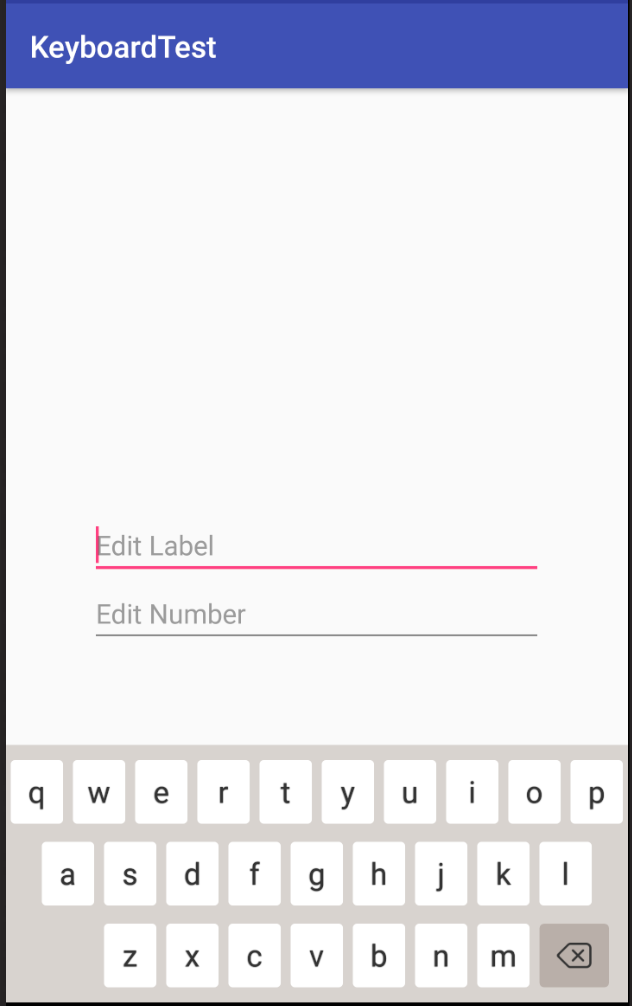
字母鍵盤
創建KeyboardManager
主要處理以下功能邏輯:
以綁定EditText為例:
public void bindToEditor(EditText editText, BaseKeyboard keyboard) {
  hideSystemSoftKeyboard(editText);
  editText.setTag(R.id.bind_keyboard_2_editor, keyboard);
  if (keyboard.getKeyStyle() == null) {
    keyboard.setKeyStyle(mDefaultKeyStyle);
  }
  editText.setOnFocusChangeListener(editorFocusChangeListener);
}

private final View.OnFocusChangeListener editorFocusChangeListener = new View.OnFocusChangeListener() {
  @Override
  public void onFocusChange(final View v, boolean hasFocus) {
    if (v instanceof EditText) {
      if (hasFocus) {
       v.postDelayed(new Runnable() {
          @Override
          public void run() {
            showSoftKeyboard((EditText) v);
          }
        },300);
      } else {
        hideSoftKeyboard();
      }
    }
  }
};

public void showSoftKeyboard(EditText editText) {
  mRootView.addOnLayoutChangeListener(mOnLayoutChangeListener);
  BaseKeyboard keyboard = getBindKeyboard(editText);
  if (keyboard == null) {
    Log.e(TAG, "edit text not bind to keyboard");
    return;
  }
  keyboard.setEditText(editText);
  keyboard.setNextFocusView(mKeyboardWithSearchView.getEditText());
  initKeyboard(keyboard);
  ...
}
鍵盤的使用方式非常簡單, 通過KeyboardManager實現調用
數字鍵盤:
KeyboardManager keyboardManagerNumber = new KeyboardManager(this);
keyboardManagerNumber.bindToEditor(editText2, new NumberKeyboard(context,NumberKeyboard.DEFAULT_NUMBER_XML_LAYOUT));
字母鍵盤:
KeyboardManager keyboardManagerAbc = new KeyboardManager(this);
keyboardManagerAbc.bindToEditor(editText1, new ABCKeyboard(context, ABCKeyboard.DEFAULT_ABC_XML_LAYOUT));
至此,自定義鍵盤的實現就介紹完了,文中介紹的更多還是實現的思路,具體實現可以參考github,有需要的用戶也可以直接修改項目的源碼。
以上就是本文的全部內容,希望對大家的學習有所幫助,也希望大家多多支持本站。
 Android編程實現自定義輸入法功能示例【輸入密碼時防止第三方竊取】
本文實例講述了Android編程實現自定義輸入法功能。分享給大家供大家參考,具體如下:對於Android用戶而言,一般都會使用第三方的輸入法。可是,在輸入密碼時(尤其是支
 自定義View之仿淘寶詳情頁
基本介紹現在的一些購物類App例如淘寶,京東等,在物品詳情頁,都采用了類似分層的模式,即上拉加載詳情的方式,節省了空間,使用戶的體驗更加的舒適。只要對於某個東西的介紹很多
 ViewPager+Fragment+ListView打造新聞列表
今天接觸到了Fragment碎片,也是現在編寫APP的主流道具。那麼今天我用ViewPager、Fragment和ListView做了一個新聞列表,分享給大家。效果圖裡上
 Android開發之使用VideoView播放視頻
Android提供了 VideoView組件,它的作用與ImageView類似,只是ImageView用於顯示圖片,而VideoView用於播放視頻。 使用