編輯:關於android開發
因為最近在更新我的項目,就想著把自己在項目中用到的一些的簡單的與網絡交互的方法總結一下,所以最近Android網絡編程方面的博文會比較多一些,我盡量以最簡單的方法給大家分享,讓大家明白易懂。如果有什麼不對的地方,還請大家留言指出。
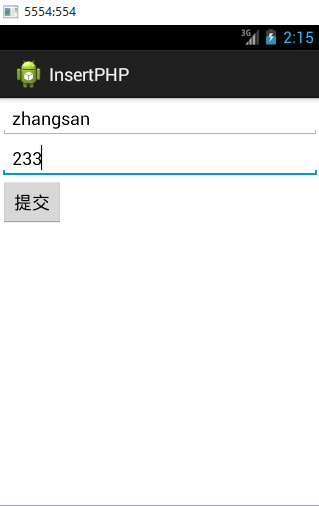
這次是利用PHP操作MySql,將Android上面輸入的數據插入到MySql中,這裡我已經給大家寫好了PHP端的代碼,如果大家想要自己測試,只需要將php端的代碼復制即可,Android端的代碼得換包。OK,下面我先給大家貼出來效果圖:
Android端:
MySql數據庫:
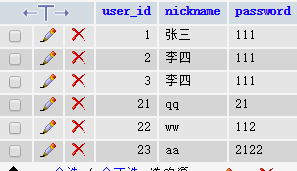
執行程序之後的數據庫:

Android端的代碼:
MainActivity類:
 1 package com.example.insertphp;
 2
 3 import java.util.ArrayList;
 4 import java.util.List;
 5
 6 import org.apache.http.NameValuePair;
 7 import org.apache.http.message.BasicNameValuePair;
 8 import org.json.JSONObject;
 9
10 import android.app.Activity;
11 import android.os.Bundle;
12 import android.os.StrictMode;
13 import android.util.Log;
14 import android.view.View;
15 import android.view.View.OnClickListener;
16 import android.widget.Button;
17 import android.widget.EditText;
18
19 public class MainActivity extends Activity {
20
21     //聲明接口地址
22     private String url = "http://10.17.64.8:8080/testregister/register.php";
23
24     private String a;
25     private String b;
26
27     private EditText et1;
28     private EditText et2;
29     private Button btn;
30
31
32
33     @Override
34     protected void onCreate(Bundle savedInstanceState) {
35         super.onCreate(savedInstanceState);
36         setContentView(R.layout.activity_main);
37
38         et1 = (EditText) findViewById(R.id.edtv);
39         et2 = (EditText) findViewById(R.id.edt);
40         btn = (Button) findViewById(R.id.bt);
41
42         btn.setOnClickListener(new OnClickListener() {
43
44             @Override
45             public void onClick(View arg0) {
46
47                 List<NameValuePair> params = new ArrayList<NameValuePair>();
48                 //獲取輸入框中的內容
49                 a = et1.getText().toString();
50                 b = et2.getText().toString();
51
52                 //替換鍵值對,這裡的鍵必須和接口中post傳遞的鍵一致
53                 params.add(new BasicNameValuePair("name", a));
54                 params.add(new BasicNameValuePair("password", b));
55
56                 JSONParser jsonParser = new JSONParser();
57
58                 try{
59                     JSONObject json = jsonParser.makeHttpRequest(url,"POST", params);
60                     Log.v("uploadsucceed", "uploadsucceed");
61
62                 }catch(Exception e){
63                     e.printStackTrace();
64                 }
65
66
67                 System.out.println("輸入的第一個內容:" + a);
68                 System.out.println("輸入的第二個內容:" + b);
69
70             }
71         });
72
73         //下面的代碼是必須加上的,具體的意義還需要大家去探索吧,這裡不是主要講的
74
75         StrictMode.setThreadPolicy(new StrictMode.ThreadPolicy.Builder()
76         .detectDiskReads()
77         .detectDiskWrites()
78         .detectNetwork()   // or .detectAll() for all detectable problems
79         .penaltyLog()
80         .build());
81
82         StrictMode.setVmPolicy(new StrictMode.VmPolicy.Builder()
83         .detectLeakedSqlLiteObjects()
84         .detectLeakedClosableObjects()
85         .penaltyLog()
86         .penaltyDeath()
87         .build());
88
89     }
90
91 }
注意:這裡的接口地址是我個人的本地服務器的地址,你如果在自己電腦上測試必須更改地址,查看自己本地的地址方法:win鍵+R 然後輸入cmd,之後在執行框中輸入ipconfig/all,在執行之後的結果中招IPv4就可以了。testregister是我的項目包,register.php是我的php文件。
特別注意:在將數據添加在list中時,鍵值對中的鍵名必須與接口中POST傳遞的名稱一致才可以,不然會出現空數據的情況。
下面的代碼是使用網絡編程連接服務端的,其中裡面代碼的意義我在http://www.cnblogs.com/bingbingliang-xiaomonv/p/5247223.html已經介紹過。
JSONParser類代碼:
 1 package com.example.insertphp;
 2
 3 import java.io.BufferedReader;
 4 import java.io.IOException;
 5 import java.io.InputStream;
 6 import java.io.InputStreamReader;
 7 import java.io.UnsupportedEncodingException;
 8 import java.util.List;
 9
10 import org.apache.http.HttpEntity;
11 import org.apache.http.HttpResponse;
12 import org.apache.http.NameValuePair;
13 import org.apache.http.client.ClientProtocolException;
14 import org.apache.http.client.entity.UrlEncodedFormEntity;
15 import org.apache.http.client.methods.HttpPost;
16 import org.apache.http.impl.client.DefaultHttpClient;
17 import org.apache.http.protocol.HTTP;
18 import org.json.JSONException;
19 import org.json.JSONObject;
20
21 import android.util.Log;
22
23 public class JSONParser {
24
25     static InputStream is = null;
26     static JSONObject jObj = null;
27     static String json = "";
28     // constructor
29     public JSONParser() {
30     }
31     public JSONObject makeHttpRequest(String url, String method,
32     List<NameValuePair> params) {
33         // Making HTTP request
34         try {
35             //使用POST請求
36             DefaultHttpClient httpClient = new DefaultHttpClient();
37             HttpPost httpPost = new HttpPost(url);
38             httpPost.setEntity(new UrlEncodedFormEntity(params,HTTP.UTF_8));
39             HttpResponse httpResponse = httpClient.execute(httpPost);
40             HttpEntity httpEntity = httpResponse.getEntity();
41             is = httpEntity.getContent();
42         } catch (UnsupportedEncodingException e) {
43             e.printStackTrace();
44         } catch (ClientProtocolException e) {
45             e.printStackTrace();
46         } catch (IOException e) {
47             e.printStackTrace();
48         }
49         try {
50             BufferedReader reader = new BufferedReader(new InputStreamReader(
51             is, "UTF-8"));
52             StringBuilder sb = new StringBuilder();
53             String line = null;
54             while ((line = reader.readLine()) != null) {
55             sb.append(line + "\n");
56         }
57             is.close();
58             json = sb.toString();
59         } catch (Exception e) {
60             Log.e("Buffer Error", "Error converting result " + e.toString());
61             Log.d("json", json.toString());
62         }
63             //轉變為Json類型
64         try {
65             jObj = new JSONObject(json);
66         } catch (JSONException e) {
67             Log.e("JSON Parser", "Error parsing data " + e.toString());
68         }
69             // return JSON String
70             return jObj;
71     }
72
73 }
注意:必要忘了在配置文件添加訪問網絡權限的代碼:
1 <uses-permission android:name="android.permission.INTERNET"/>
布局代碼XML:
 1 <LinearLayout xmlns:android="http://schemas.android.com/apk/res/android"
 2     xmlns:tools="http://schemas.android.com/tools"
 3     android:id="@+id/LinearLayout1"
 4     android:layout_width="match_parent"
 5     android:layout_height="match_parent"
 6     android:orientation="vertical"
 7     tools:context=".MainActivity" >
 8
 9
10     <EditText
11         android:id="@+id/edtv"
12         android:layout_width="match_parent"
13         android:layout_height="wrap_content"
14         android:ems="10" >
15
16         <requestFocus />
17     </EditText>
18
19     <EditText
20         android:id="@+id/edt"
21         android:layout_width="match_parent"
22         android:layout_height="wrap_content"
23         android:ems="10" />
24
25     <Button
26         android:id="@+id/bt"
27         android:layout_width="wrap_content"
28         android:layout_height="wrap_content"
29         android:text="提交" />
30
31 </LinearLayout>
服務端代碼:
Conn.php(連接數據庫的代碼):
 1 <?php
 2     //連接本地數據庫localhost以及數據庫賬戶root密碼為空
 3     $con = mysql_connect("localhost","root","");
 4
 5     //設置字符集
 6     mysql_query("SET NAMES 'utf8'");
 7     mysql_query("SET CHARACTER SET utf8");
 8
 9     if(!$con){
10         die(mysql_error());
11     }
12     mysql_select_db("testregister",$con);
13     // echo "測試成功";
14
15 ?>
操作數據庫的代碼:
register.php:
 1 <?php
 2
 3     require 'Conn.php';
 4
 5     $response = array();
 6
 7     //注意:這裡的POST傳遞的name必須和android端的鍵一致,否則不會插入數據
 8     if(isset($_POST['name'])){
 9         $nickname = $_POST['name'];
10         $password = $_POST['password'];
11         //執行Mysql插入語句
12         $query = mysql_query("INSERT INTO test_register(nickname,password) VALUES ('$nickname','$password')");
13     // echo $query;
14     // echo "測試query";
15         if ($query) {
16                 // successfully inserted into database
17                 $response["success"] = 1;
18                 $response["message"] = "Product successfully created.";
19                 echo json_encode($response);
20
21                 } else {
22                     // failed to insert row
23                     $response["success"] = 0;
24                     $response["message"] = "Oops! An error occurred.";
25                     // echoing JSON response
26                     echo json_encode($response);
27                 }
28
29     }
30
31 ?>
說明:echo只是為了當時測試用的。
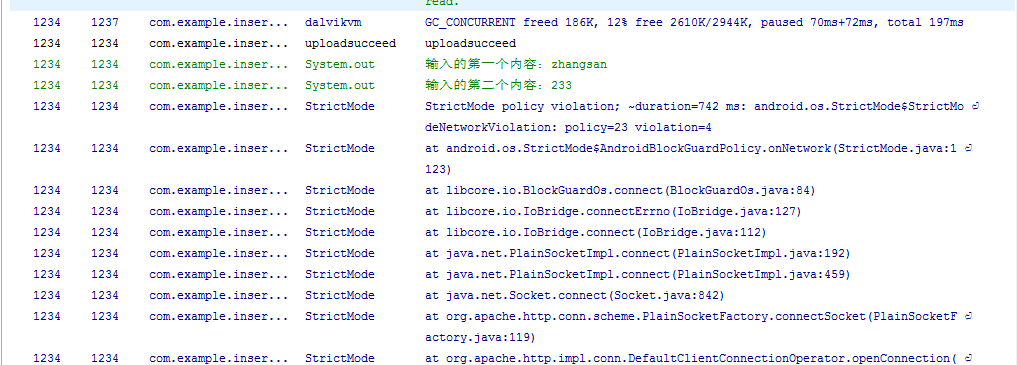
如果在執行程序的過程中Logcat中出現下面情況,就差不多對了。
為了測試方便我使用的是英文,如果有使用中文的,上述代碼也可以,如果你的不可以的話,你就更改你的編碼方式,我這裡是用的UTF-8,這是最普遍的,一般不會出現問題。
本人的水平有限,就先寫這些了,如果有什麼問題,或者更好的方法,還需要大神留言。我感激不盡。
 Android中Fragment的兩種創建方式,androidfragment
Android中Fragment的兩種創建方式,androidfragmentfragment是Activity中用戶界面的一個行為或者是一部分。你可以在一個單獨的Act
 Android特效專輯(十二)——如何仿支付寶咻一咻功能實現波紋擴散特效
Android特效專輯(十二)——如何仿支付寶咻一咻功能實現波紋擴散特效 Android特效專輯(十二)——仿支付寶咻一咻功能實現波紋擴散特效
 Android--JNI簡單的實例解析
Android--JNI簡單的實例解析 最近項目迭代了幾個版本,目前比較輕松,雖然項目閒了,但是人不能太閒,否則就廢了。千裡之行始於足下、量變引起質變、學而不思則罔.
 來自GitHub的Android UI開源項目,githubandroid
來自GitHub的Android UI開源項目,githubandroid最近在搞Android開發,做了一個項目後感覺,Android開發入門很是簡單,但要能做出用戶體