編輯:關於Android編程
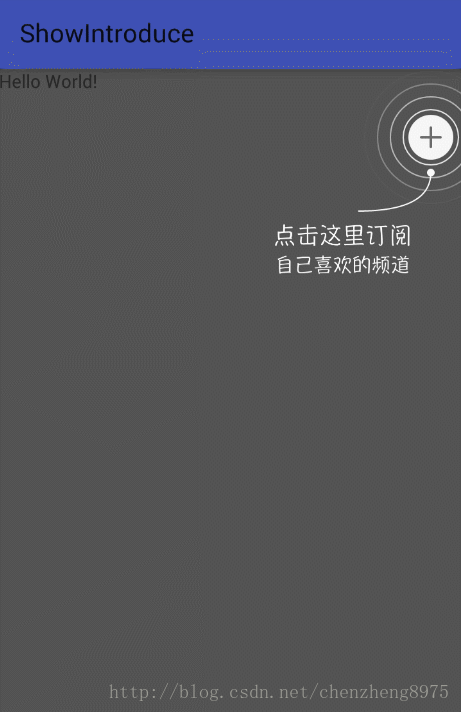
一、實現效果圖
二、實現代碼
1.自定義view
package com.czhappy.showintroduce.view;
import android.content.Context;
import android.graphics.Bitmap;
import android.graphics.Canvas;
import android.graphics.Color;
import android.graphics.Paint;
import android.graphics.Path;
import android.util.AttributeSet;
import android.view.View;
import android.widget.RelativeLayout;
/**
 * Description: 水波紋動畫引導view
 * User: chenzheng
 * Date: 2017/1/14 0014
 * Time: 18:01
 */
public class RippleIntroView extends RelativeLayout implements Runnable {
  private int mMaxRadius = 70;
  private int mInterval = 20;
  private int count = 0;
  private Bitmap mCacheBitmap;
  private Paint mRipplePaint;
  private Paint mCirclePaint;
  private Path mArcPath;
  public RippleIntroView(Context context) {
    this(context, null);
  }
  public RippleIntroView(Context context, AttributeSet attrs) {
    this(context, attrs, 0);
  }
  public RippleIntroView(Context context, AttributeSet attrs, int defStyleAttr) {
    super(context, attrs, defStyleAttr);
    init();
  }
  private void init() {
    mRipplePaint = new Paint();
    mRipplePaint.setAntiAlias(true);
    mRipplePaint.setStyle(Paint.Style.STROKE);
    mRipplePaint.setColor(Color.WHITE);
    mRipplePaint.setStrokeWidth(2.f);
    mCirclePaint = new Paint();
    mCirclePaint.setAntiAlias(true);
    mCirclePaint.setStyle(Paint.Style.FILL);
    mCirclePaint.setColor(Color.WHITE);
    mArcPath = new Path();
  }
  /**
   * view大小變化時系統調用
   * @param w
   * @param h
   * @param oldw
   * @param oldh
   */
  @Override
  protected void onSizeChanged(int w, int h, int oldw, int oldh) {
    super.onSizeChanged(w, h, oldw, oldh);
    if (mCacheBitmap != null) {
      mCacheBitmap.recycle();
      mCacheBitmap = null;
    }
  }
  @Override
  protected void onDraw(Canvas canvas) {
    //獲取加號圖片view
    View mPlusChild = getChildAt(0);
    //獲取提示圖片view
    View mRefsChild = getChildAt(1);
    if (mPlusChild == null || mRefsChild == null) return;
    //獲取加號圖片大小
    final int pw = mPlusChild.getWidth();
    final int ph = mPlusChild.getHeight();
    //獲取提示圖片大小
    final int fw = mRefsChild.getWidth();
    final int fh = mRefsChild.getHeight();
    if (pw == 0 || ph == 0) return;
    //加號圖片中心點坐標
    final float px = mPlusChild.getX() + pw / 2;
    final float py = mPlusChild.getY() + ph / 2;
    //提示圖片左上角坐標
    final float fx = mRefsChild.getX();
    final float fy = mRefsChild.getY();
    final int rw = pw / 2;
    final int rh = ph / 2;
    if (mCacheBitmap == null) {
      mCacheBitmap = Bitmap.createBitmap(getWidth(), getHeight(), Bitmap.Config.ARGB_8888);
      Canvas cv = new Canvas(mCacheBitmap);
      super.onDraw(cv);
      //清空所有已經畫過的path至原始狀態
      mArcPath.reset();
      //起始輪廓點移至x,y坐標點,即加號圖片正下方再往下20位置
      mArcPath.moveTo(px, py + rh + mInterval);
      //設置二次貝塞爾,實現平滑曲線,前兩個參數為操作點坐標,後兩個參數為結束點坐標
      mArcPath.quadTo(px, fy - mInterval, fx + fw * 0.618f, fy - mInterval);
      //0~255,數值越小越透明
      mRipplePaint.setAlpha(255);
      cv.drawPath(mArcPath, mRipplePaint);
      //繪制半徑為6的實心圓點
      cv.drawCircle(px, py + rh + mInterval, 6, mCirclePaint);
    }
    //繪制背景圖片
    canvas.drawBitmap(mCacheBitmap, 0, 0, mCirclePaint);
    //保存畫布當前的狀態
    int save = canvas.save();
    for (int step = count; step <= mMaxRadius; step += mInterval) {
      //step越大越靠外就越透明
      mRipplePaint.setAlpha(255 * (mMaxRadius - step) / mMaxRadius);
      canvas.drawCircle(px, py, (float) (rw + step), mRipplePaint);
    }
    //恢復Canvas的狀態
    canvas.restoreToCount(save);
    //延遲80毫秒後開始運行
    postDelayed(this, 80);
  }
  @Override
  public void run() {
    //把run對象的引用從隊列裡拿出來,這樣,他就不會執行了,但 run 沒有銷毀
    removeCallbacks(this);
    count += 2;
    count %= mInterval;
    invalidate();//重繪
  }
  /**
   * 銷毀view時調用,收尾工作
   */
  @Override
  protected void onDetachedFromWindow() {
    super.onDetachedFromWindow();
    if (mCacheBitmap != null) {
      mCacheBitmap.recycle();
      mCacheBitmap = null;
    }
  }
}
2.MainActivity.Java
package com.czhappy.showintroduce.activity;
import android.os.Bundle;
import android.support.v7.app.AppCompatActivity;
import android.view.View;
import android.view.ViewGroup;
import com.czhappy.showintroduce.R;
public class MainActivity extends AppCompatActivity {
  @Override
  protected void onCreate(Bundle savedInstanceState) {
    super.onCreate(savedInstanceState);
    setContentView(R.layout.activity_main);
    View view = findViewById(R.id.layout_ripple);
    view.setOnClickListener(new View.OnClickListener() {
      @Override
      public void onClick(View v) {
        ((ViewGroup) v.getParent()).removeView(v);
      }
    });
  }
}
3.activity_main.xml
<?xml version="1.0" encoding="utf-8"?>
<FrameLayout xmlns:android="http://schemas.android.com/apk/res/android"
  android:layout_width="match_parent"
  android:layout_height="match_parent">
  <TextView
    android:layout_width="wrap_content"
    android:layout_height="wrap_content"
    android:text="Hello World!" />
  <com.czhappy.showintroduce.view.RippleIntroView
    android:id="@+id/layout_ripple"
    android:layout_width="match_parent"
    android:layout_height="match_parent"
    android:clickable="true"
    android:fitsSystemWindows="true"
    android:background="#AA000000">
    <ImageView
      android:id="@+id/iv_plus"
      android:layout_marginTop="36dp"
      android:src="@mipmap/ic_add"
      android:layout_alignParentRight="true"
      android:layout_marginRight="6dp"
      android:layout_width="wrap_content"
      android:layout_height="wrap_content"/>
    <ImageView
      android:src="@mipmap/tips_subscribe"
      android:id="@+id/tv_title"
      android:layout_below="@id/iv_plus"
      android:layout_marginTop="50dp"
      android:layout_alignParentRight="true"
      android:layout_marginRight="40dp"
      android:layout_width="wrap_content"
      android:layout_height="wrap_content"/>
  </com.czhappy.showintroduce.view.RippleIntroView>
</FrameLayout>
以上所述是小編給大家介紹的Android自定義View 實現水波紋動畫引導效果,希望對大家有所幫助,如果大家有任何疑問請給我留言,小編會及時回復大家的。在此也非常感謝大家對本站網站的支持!
 Android自定義帶增長動畫和點擊彈窗提示效果的柱狀圖DEMO
項目中最近用到各種圖表,本來打算用第三方的,例如MPAndroid,這是一個十分強大的圖表庫,應用起來十分方便,但是最終發現和設計不太一樣,沒辦法,只能自己寫了。今天將寫
 Android中進程間通信 (一)
在Android系統中,每一個應用程序都是由一些Activity和Service組成的,這些Activity和Service有可能運行在同一個進程中,也有可能運行在不同的
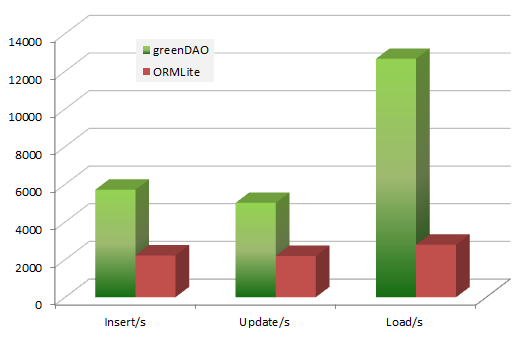 Android ORM數據庫之GreenDao使用教程及源碼分析
一、簡介1.Android ORM介紹?在平時的開發過程中,大家一定會或多或少地接觸到 SQLite。然而在使用它時,我們往往需要做許多額外的工作,像編寫 SQL 語句與
 [安卓開發] 自定義View之一: 組合View
一、自定義View的分類1、組合View2、繼承重寫View3、全寫View二、簡介組合View,就是組合一些View來形成一個新的View。例如QQ的頭部欄三、了解**