編輯:關於Android編程
1、概述
本文主要講解的是如何自定義一個時間鐘表,通過簡單的練習可以簡單學習Android當中自定義view的一些常用繪圖技巧,優化android繪圖操作。言歸正傳,首先看下我們需要實現的效果:

當我們看到這個效果的時候腦子裡應該有一定的思路了,我們應該把它分解成以下幾個步驟:
1、儀表盤(圓)
2、刻度線(長 中 短)
3、刻度值(1-12)
4、指針(時 分 秒)
5、移動指針,計算指針位置
現在我們已經很清楚自己的思路了,那麼我們一個一個來。
第一步:1、自定義View的屬性,首先在res/values/ 下建立一個attrs.xml , 在裡面定義我們的屬性和聲明我們的整個樣式。
<span > <declare-styleable name="ClockView">

  <attr name="mRadius" format="dimension"/>
  <attr name="mCircleColor" format="color"/>
  <attr name="mCircleWidth" format="dimension"/>
  <attr name="mTextSize" format="dimension"/>
  <attr name="mTextColor" format="color"/>
  <attr name="mBigScaleColor" format="color"/>
  <attr name="mMiddlecaleColor" format="color"/>
  <attr name="mSmallScaleColor" format="color"/>
  <attr name="mHourHandColor" format="color"/>
  <attr name="mMinuteHandColor" format="color"/>
  <attr name="mSecondHandColor" format="color"/>
  <attr name="mHourHandWidth" format="dimension"/>
  <attr name="mMinuteHandWidth" format="dimension"/>
  <attr name="mSecondHandWidth" format="dimension"/>

 </declare-styleable></span>
我們定義了鐘表的半徑,背景顏色 ,刻度值(大,中,小)的顏色及指針(時分秒)的顏色和寬度。
然後自定義一個class類 為ClockView,在MainActivity的布局中引用:
<span > <com.dalong.customviewstudy.view.ClockView
  app:mSecondHandColor="@color/colorAccent"
  app:mCircleColor="@android:color/white"
  app:mBigScaleColor="@android:color/black"
  app:mMiddlecaleColor="@android:color/black"
  app:mSmallScaleColor="@color/colorAccent"
  app:mHourHandColor="@android:color/black"
  app:mMinuteHandColor="@android:color/black"
  app:mTextColor="@android:color/black"
  app:mHourHandWidth="13dp"
  app:mSecondHandWidth="5dp"
  app:mMinuteHandWidth="8dp"
  app:mTextSize="16sp"
  android:layout_centerInParent="true"
  android:layout_width="match_parent"
  android:layout_height="match_parent" /></span>
2、在自定義View的構造方法中,獲得我們的自定義的樣式
<span > //文字畫筆對象
 private Paint mTextPaint;

 //圓,指針,刻度畫筆
 private Paint mPaint;

 //半徑
 public float mRadius;

 //外圓的顏色
 public int mCircleColor;

 // 外圓的寬度
 public float mCircleWidth;

 //文字的大小
 public float mTextSize;

 //文字的顏色
 public int mTextColor;

 //大刻度顏色
 public int mBigScaleColor;

 //中刻度
 public int mMiddlecaleColor;

 //小刻度顏色
 public int mSmallScaleColor;

 //時針顏色
 public int mHourHandColor;

 //分針顏色
 public int mMinuteHandColor;

 //秒針顏色
 public int mSecondHandColor;

 //時針寬度
 public float mHourHandWidth;

 //分針寬度
 public float mMinuteHandWidth;

 //秒針寬度
 public float mSecondHandWidth;

 //控件寬度
 public int mWidth;

 //控件高度
 public int mHeght;

 public ClockView(Context context) {
  this(context,null);
 }

 public ClockView(Context context, AttributeSet attrs) {
  this(context, attrs,0);
 }

 public ClockView(Context context, AttributeSet attrs, int defStyleAttr) {
  super(context, attrs, defStyleAttr);

  TypedArray typedArray=context.obtainStyledAttributes(attrs, R.styleable.ClockView);
  mRadius=typedArray.getDimension(R.styleable.ClockView_mRadius,400);
  mCircleColor=typedArray.getColor(R.styleable.ClockView_mCircleColor, Color.WHITE);
  mCircleWidth=typedArray.getDimension(R.styleable.ClockView_mCircleWidth,20);
  mTextSize=typedArray.getDimension(R.styleable.ClockView_mCircleWidth,40);
  mTextColor=typedArray.getColor(R.styleable.ClockView_mTextColor,Color.DKGRAY);
  mBigScaleColor=typedArray.getColor(R.styleable.ClockView_mBigScaleColor,Color.BLACK);
  mSmallScaleColor=typedArray.getColor(R.styleable.ClockView_mSmallScaleColor,Color.RED);
  mMiddlecaleColor=typedArray.getColor(R.styleable.ClockView_mMiddlecaleColor,Color.BLACK);
  mHourHandColor=typedArray.getColor(R.styleable.ClockView_mHourHandColor,Color.BLACK);
  mMinuteHandColor=typedArray.getColor(R.styleable.ClockView_mMinuteHandColor,Color.BLACK);
  mSecondHandColor=typedArray.getColor(R.styleable.ClockView_mSecondHandColor,Color.BLACK);
  mHourHandWidth=typedArray.getDimension(R.styleable.ClockView_mHourHandWidth,20);
  mMinuteHandWidth=typedArray.getDimension(R.styleable.ClockView_mMinuteHandWidth,10);
  mSecondHandWidth=typedArray.getDimension(R.styleable.ClockView_mSecondHandWidth,5);

  mPaint=new Paint();
  mPaint.setAntiAlias(true);
  mPaint.setStyle(Paint.Style.STROKE);

  mTextPaint=new Paint();
  mTextPaint.setAntiAlias(true);
  mTextPaint.setStyle(Paint.Style.STROKE);
  mTextPaint.setTextSize(mTextSize);
  mTextPaint.setColor(mTextColor);

 }
</span>
3、我們重寫onDraw,onMesure調用系統提供的:
onMeure方法
<span > @Override
 protected void onMeasure(int widthMeasureSpec, int heightMeasureSpec) {
  setMeasuredDimension(measureSize(widthMeasureSpec),measureSize(heightMeasureSpec));
 }

 private int measureSize(int mMeasureSpec) {
  int result;
  int mode=MeasureSpec.getMode(mMeasureSpec);
  int size=MeasureSpec.getSize(mMeasureSpec);
  if(mode==MeasureSpec.EXACTLY){
   result=size;
  }else{
   result=400;
   if(mode==MeasureSpec.AT_MOST){
    result=Math.min(result,size);
   }
  }
  return result;
 }</span>
onDraw方法
<span > @Override
 protected void onDraw(Canvas canvas) {
  super.onDraw(canvas);
  //設置寬高、半徑
  mWidth=getMeasuredWidth()-getPaddingLeft()-getPaddingRight();
  mHeght=getMeasuredHeight()-getPaddingBottom()-getPaddingTop();
  mRadius=Math.min(mWidth/2,mHeght/2);
  //首先繪制圓
  drawCircle(canvas);
  //繪制刻度
  drawScale(canvas);
  //繪制指針
  drawPointer(canvas);
  //發送消息刷新ui
  handler.sendEmptyMessageDelayed(START_CLOCK,1000);
 }
</span>
其中最核心的代碼就是這三個方法:
<span >  //首先繪制圓
  drawCircle(canvas);
  //繪制刻度
  drawScale(canvas);
  //繪制指針
  drawPointer(canvas);</span>
首先講第一個方法:
<span > /**
  * 畫圓
  * @param canvas
  */
 private void drawCircle(Canvas canvas) {
  mPaint.setStrokeWidth(mCircleWidth);
  mPaint.setStyle(Paint.Style.FILL);
  mPaint.setColor(mCircleColor);
  canvas.drawCircle(mWidth/2,mHeght/2,mRadius,mPaint);
 }</span>
這個方法其實很簡單給我們的畫筆設置我們自定義的樣式之後取中心為圓心,以我們設定的半徑畫圓,這裡設置的是Paint.Style.FILL一個實心的。也可以設置一個空心的。看下我們執行這個方法後的效果:

第二方法:
<span > /**
  * 刻度和文字
  * @param canvas
  */
 private void drawScale(Canvas canvas) {

  for (int i=0;i<60;i++){
   //設置大刻度
   if(i==0||i==15||i==30||i==45){
    mPaint.setStrokeWidth(6);
    mPaint.setColor(mBigScaleColor);
    canvas.drawLine(mWidth/2,mHeght/2-mWidth/2+mCircleWidth/2,
      mWidth/2,mHeght/2-mWidth/2+mCircleWidth/2+60,mPaint);
    String scaleTv=String.valueOf(i==0?12:i/5);
    canvas.drawText(scaleTv,mWidth/2-mTextPaint.measureText(scaleTv)/2,
      mHeght/2-mWidth/2+mCircleWidth/2+95,mTextPaint);
   }else if (i==5||i==10||i==20||i==25||i==35||i==40||i==50||i==55)
   //設置中刻度
   {
    mPaint.setStrokeWidth(4);
    mPaint.setColor(mMiddlecaleColor);
    canvas.drawLine(mWidth/2,mHeght/2-mWidth/2+mCircleWidth/2,
      mWidth/2,mHeght/2-mWidth/2+mCircleWidth/2+40,mPaint);
    String scaleTv=String.valueOf(i/5);
    canvas.drawText(scaleTv,mWidth/2-mTextPaint.measureText(scaleTv)/2,
      mHeght/2-mWidth/2+mCircleWidth/2+75,mTextPaint);

   }else
   //設置小刻度
   {
    mPaint.setColor(mSmallScaleColor);
    mPaint.setStrokeWidth(2);
    canvas.drawLine(mWidth/2,mHeght/2-mWidth/2+mCircleWidth/2,
      mWidth/2,mHeght/2-mWidth/2+mCircleWidth+30,mPaint);
   }
   canvas.rotate(6,mWidth/2,mHeght/2);
  }
 }</span>
這個方法代碼看起來也沒有什麼主要是把一個圓分成60份,因為我們鐘表上是有60個刻度,其中設置了4個大刻度分別為0,15,30,45.分別對應的鐘表中12點 3點 6點和9點,如果這個地方你有什麼疑惑的吧你可以看看你的手表或者鐘表就明白了,同時裡面也設置了8個中等刻度分別為5,10,20,25,35,40,50,55為中刻度,其實對應的就是1,2,4,5,7,8,10,11點。這裡主要是自己覺得這樣分明好看而已,如果沒有強迫症的你可以直接設置都是大刻度就可以了。其他的都為小刻度,根據自己在attr設置的顏色和尺寸分別設置畫筆paint來繪制就可以了。看下我們的效果變成了這樣子:

第三個方法就是繪制指針:
<span > /**
  * 繪制指針
  * @param canvas
  */
 private void drawPointer(Canvas canvas) {
  Calendar mCalendar=Calendar.getInstance();
  //獲取當前小時數
  int hours = mCalendar.get(Calendar.HOUR);
  //獲取當前分鐘數
  int minutes = mCalendar.get(Calendar.MINUTE);
  //獲取當前秒數
  int seconds=mCalendar.get(Calendar.SECOND);

  mPaint.setStrokeCap(Paint.Cap.ROUND);
  //繪制時針
  canvas.save();
  mPaint.setColor(mHourHandColor);
  mPaint.setStrokeWidth(mHourHandWidth);
  //這裡計算時針需要旋轉的角度 實現原理是計算出一共多少分鐘除以60計算出真實的小時數(帶有小數,為了更加准確計算度數),已知12小時是360度,現在求出了實際小時數比例求出角度
  Float hoursAngle = (hours * 60 + minutes) / 60f / 12f * 360;
  canvas.rotate(hoursAngle, mWidth / 2, mHeght / 2);
  canvas.drawLine(mWidth / 2, mHeght / 2 - mWidth/2f*0.5f, mWidth / 2, mHeght / 2 + mWidth/2f*0.15f, mPaint);
  canvas.restore();


  //繪制分針
  canvas.save();
  mPaint.setColor(mMinuteHandColor);
  mPaint.setStrokeWidth(mMinuteHandWidth);
  //這裡計算分針需要旋轉的角度 60分鐘360度,求出實際分鐘數所占的度數
  Float minutesAngle = (minutes*60+seconds) / 60f/ 60f * 360;
  canvas.rotate(minutesAngle, mWidth / 2, mHeght / 2);
  canvas.drawLine(mWidth / 2, mHeght / 2 - mWidth/2f*0.7f, mWidth / 2, mHeght / 2 + mWidth/2f*0.15f, mPaint);
  canvas.restore();

  //繪制中間的圓圈
  canvas.save();
  mPaint.setColor(mSecondHandColor);
  mPaint.setStrokeWidth(mSecondHandWidth);
  mPaint.setStyle(Paint.Style.FILL);
  canvas.drawCircle(mWidth/2,mHeght/2,20,mPaint);
  canvas.restore();


  //繪制秒針
  canvas.save();
  mPaint.setColor(mSecondHandColor);
  mPaint.setStrokeWidth(mSecondHandWidth);
  mPaint.setStyle(Paint.Style.STROKE);
  //這裡計算秒針需要旋轉的角度 60秒360度,求出實際秒數所占的度數
  Float secondAngle = seconds/60f*360;
  canvas.rotate(secondAngle, mWidth / 2, mHeght / 2);
  canvas.drawLine(mWidth / 2, mHeght / 2 - mWidth/2f*0.8f, mWidth / 2, mHeght / 2 + mWidth/2f*0.2f, mPaint);
  canvas.restore();


 }</span>
其實這個方法我注釋已經寫的很詳細了,首先我們需要獲取到當前的時間,這個大家都是經常寫的沒啥問題。主要就是如何設定時分秒指針的位置才是關鍵。這裡我使用一個很巧妙的方法,讓繪制變得簡單了些。
先看下繪制時針:
<span > //繪制時針
    canvas.save();
    mPaint.setColor(mHourHandColor);
    mPaint.setStrokeWidth(mHourHandWidth);
    //這裡計算時針需要旋轉的角度 實現原理是計算出一共多少分鐘除以60計算出真實的小時數(帶有小數,為了更加准確計算度數),已知12小時是360度,現在求出了實際小時數比例求出角度
    Float hoursAngle = (hours * 60 + minutes) / 60f / 12f * 360;
    canvas.rotate(hoursAngle, mWidth / 2, mHeght / 2);
    canvas.drawLine(mWidth / 2, mHeght / 2 - mWidth/2f*0.5f, mWidth / 2, mHeght / 2 + mWidth/2f*0.15f, mPaint);
    canvas.restore();</span>
前面三行代碼就不詳細說了,Canvas.save方法作用就是將之前所有已經繪制的圖片保存起來。為後續操作在新的圖層上操作。和photoshop有點一個意思。大家都知道當我們獲取到當前小時數了以後我們就應該直接把時針指到對應的時數上嗎?肯定不是吧,比如是3點半時針是指到3與4之間的位置對吧。所以我們這裡需要獲取到當前的分鐘數再加上小時數才是真實的當前小時數(這裡其實秒針也需要計算的,但是這裡忽略不計了,如果你比我還強迫症的話可以加上)。當我們知道當前實際的小時數的時候,就很簡單了,因為我們知道一圈360度平均分了12小時,這個別告訴我不知道啊,要是這個常識都不知道,你去面壁吧,所以只要360/12*真實的小時數就是需要旋轉的角度。這麼想是不是很簡單了。計算出角度以後先吧canvas.rotate旋轉這個角度在繪制一個直線就ok了,哈哈哈,是不是so esey,其他分針和秒針一樣的道理,這裡就不多說了,看代碼直接能看懂的。
<span >
    //繪制分針
    canvas.save();
    mPaint.setColor(mMinuteHandColor);
    mPaint.setStrokeWidth(mMinuteHandWidth);
    //這裡計算分針需要旋轉的角度 60分鐘360度,求出實際分鐘數所占的度數
    Float minutesAngle = (minutes*60+seconds) / 60f/ 60f * 360;
    canvas.rotate(minutesAngle, mWidth / 2, mHeght / 2);
    canvas.drawLine(mWidth / 2, mHeght / 2 - mWidth/2f*0.7f, mWidth / 2, mHeght / 2 + mWidth/2f*0.15f, mPaint);
    canvas.restore();

    //繪制中間的圓圈
    canvas.save();
    mPaint.setColor(mSecondHandColor);
    mPaint.setStrokeWidth(mSecondHandWidth);
    mPaint.setStyle(Paint.Style.FILL);
    canvas.drawCircle(mWidth/2,mHeght/2,20,mPaint);
    canvas.restore();


    //繪制秒針
    canvas.save();
    mPaint.setColor(mSecondHandColor);
    mPaint.setStrokeWidth(mSecondHandWidth);
    mPaint.setStyle(Paint.Style.STROKE);
    //這裡計算秒針需要旋轉的角度 60秒360度,求出實際秒數所占的度數
    Float secondAngle = seconds/60f*360;
    canvas.rotate(secondAngle, mWidth / 2, mHeght / 2);
    canvas.drawLine(mWidth / 2, mHeght / 2 - mWidth/2f*0.8f, mWidth / 2, mHeght / 2 + mWidth/2f*0.2f, mPaint);
    canvas.restore();</span>
其中有個繪制中間的圓圈是我的強迫症所致,覺得中間加個圓圈好看點。執行這個方法後我們的效果就成這樣了:

哈哈下面就剩下最後一步了,就是讓指針動起來,沒錯就是動起來,其實大家也在意了我們繪制指針的時候是在方法裡直接獲取了當前時間設置指針的位置的,所以說只要我們搞個定時器一秒刷新下ui就大功告成了,這裡就搞個hander發個空消息。
private Handler handler=new Handler(){
  @Override
  public void handleMessage(Message msg) {
    super.handleMessage(msg);
    switch (msg.what){
      case START_CLOCK:
        //更新時分秒
        invalidate();
        //每隔1秒更新一次
        handler.sendEmptyMessageDelayed(START_CLOCK,1000);
        break;
    }

  }
};
就成了下面的效果了:
是不是很簡單呢?附上github:https://github.com/dalong982242260/CustomViewStudy
以上就是本文的全部內容,希望對大家的學習有所幫助,也希望大家多多支持本站。
 【Android】RecyclerView詳解(一)
1.介紹RecyclerView是比 ListView 更高級且更具靈活性的組件。 此組件是一個用於顯示龐大數據集的容器,可通過保持有限數量的視圖進行非常有效的滾動操作。
 詳解代理模式
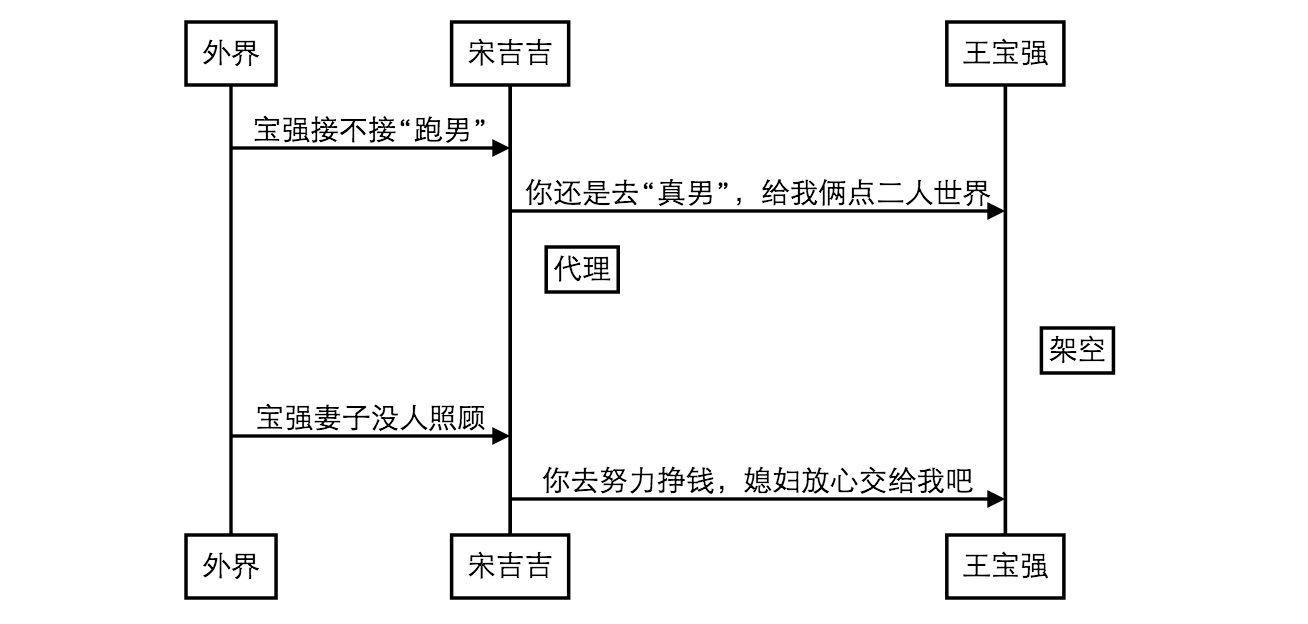
一 摘要晚上看了關於代理模式的一篇文章,寫的非常生動,來過來分享給大家.這裡我就PHP代理模式給大家進行詳細說明.下面我們來看一看這幾天王寶強妻子出軌經紀人事件惹盡了眼球
 Android應用中使用及實現系統“分享”接口實例
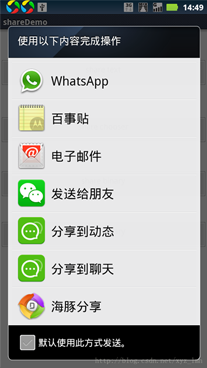
為了應用的推廣、傳播,很多的應用中都有“分享”功能,一個按鈕,點擊後會出現短信、微博等等一切實現了分享功能的應用列表。這一篇文章主要介紹怎麼調用分享功能和怎麼實現分享接口
 Android PackageManager Service詳解(5.1源碼)(三)
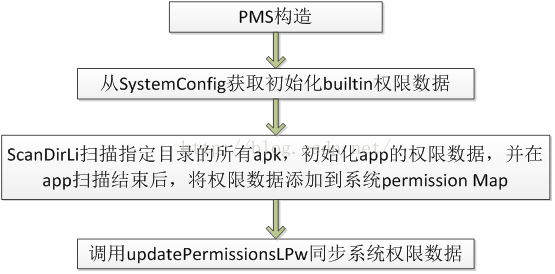
2:PackageManagerServiceAndroid既然基於linux,那我們能不能將c/c++代碼交叉編譯成可執行文件然後放到目標機器上跑呢?當然可以,不過前提