編輯:關於Android編程
昨天看了下RenderScript的官方文檔,發現RenderScript這厮有點牛逼。無意中發現ScriptIntrinsic這個抽象類,有些很有用的子類。其中有個子類叫ScriptIntrinsicBlur類,大致就是將圖片實現高斯模糊。
ScriptIntrinsic的申明:
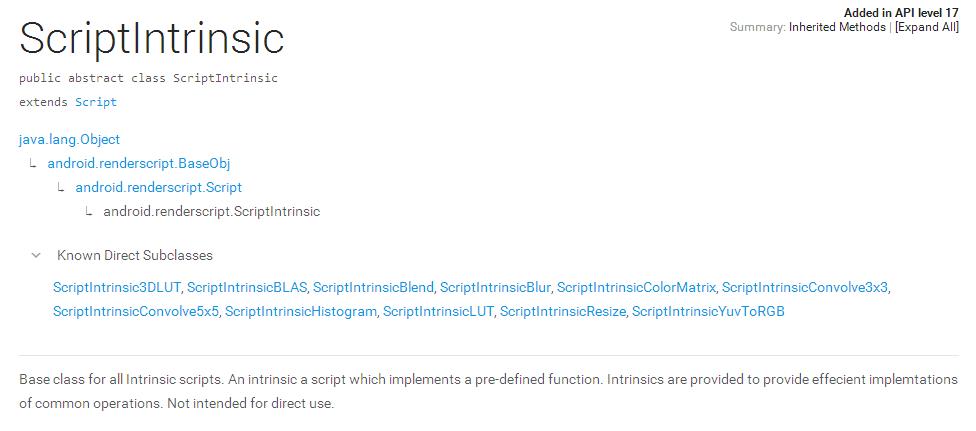
ScriptIntrinsicBlur類的申明:

加上結合著看了下SDK中的samples,自己寫了個高斯模糊。
( sample的具體位置為:
SDK目錄/samples/android-19/renderscript/RenderScriptIntrinsic/RenderScriptIntrinsicSample/
)。
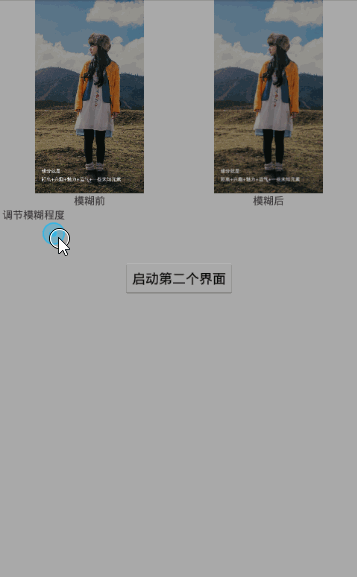
先上圖。效果如下:
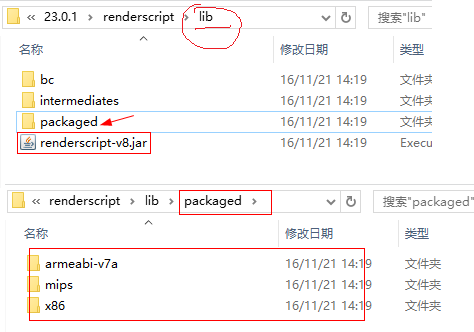
【注意!! 開始之前,我們需要導入需要的支持包。
支持包的具體路徑為: sdk目錄/buildtools/任意一個版本號/renderscript/lib/renderscript-v8.jar
另外:為了防止出現有的機型兼容問題,最好將renderscript-v8.jar同目錄下的packaged目錄下的所有庫也一並拷貝到lib文件夾下】
例如:
好了。開始寫代碼。。
1、先申明常用成員變量。
private SeekBar blurSeekBar;//拖動條
private ImageView img_blur;//顯示模糊後bitmap的ImageView
//原bitmap和高斯模糊後的bitmap
private Bitmap bitmap_original, bitmap_blur;
//高斯模糊處理的AsyncTask
private RenderScriptTask mLatestTask = null;
//RenderScript 對象(Google的高性能並行計算類,他可以利用設備的GPU/CPU等計算資源)
private RenderScript mRS;
//下面是兩個RenderScript的傳入參數對象
private Allocation mInAllocation;
private Allocation mOutAllocation;
//高斯模糊處理實例
private ScriptIntrinsicBlur mScriptBlur;
2、加載兩份bitmap,並初始化高斯模糊相關的對象。
@Override
protected void onCreate(Bundle savedInstanceState) {
  super.onCreate(savedInstanceState);
  setContentView(R.layout.activity_main);
  blurSeekBar = (SeekBar) findViewById(R.id.aty_main_seekBar);
  img_blur = (ImageView) findViewById(R.id.aty_main_img_blur);

  bitmap_original = loadBitmap(R.drawable.meet_entry_guide_3);
  // 復制一份
  bitmap_blur = Bitmap.createBitmap(bitmap_original.getWidth(),
      bitmap_original.getHeight(), bitmap_original.getConfig());
  createBlureScript();
  setSeekBarListening();//為SeekBar設置拖拽監聽
}

/**
 * Helper to load Bitmap from resource
 */
private Bitmap loadBitmap(int resource) {
  final BitmapFactory.Options options = new BitmapFactory.Options();
  options.inPreferredConfig = Bitmap.Config.ARGB_8888;
  return BitmapFactory.decodeResource(getResources(), resource, options);
}

/**
 * 創建Script
 */
private void createBlureScript() {
  mRS = RenderScript.create(this);
  mInAllocation = Allocation.createFromBitmap(mRS, bitmap_original);
  mOutAllocation = Allocation.createFromBitmap(mRS, bitmap_blur);

  /*
   * Create intrinsics. RenderScript has built-in features such as blur,
   * convolve filter etc. These intrinsics are handy for specific
   * operations without writing RenderScript kernel. In the sample, it's
   * creating blur, convolve and matrix intrinsics.
   */
  mScriptBlur = ScriptIntrinsicBlur.create(mRS, Element.U8_4(mRS));
}
3、完成高斯模糊處理代碼。
private void performFilter(Allocation inAllocation,
      Allocation outAllocation, Bitmap bitmapOut, float value) {
  /*
   * 設置模糊程度。范圍在0~25之間。否則會出錯
   */
  mScriptBlur.setRadius(value);

  /*
   * Invoke filter kernel
   */
  mScriptBlur.setInput(inAllocation);
  mScriptBlur.forEach(outAllocation);

  outAllocation.copyTo(bitmapOut);
}
4、將處理後的bitmap設置到ImageView中。
// Request UI update
img_blur.setImageBitmap(bitmap_blur);
img_blur.invalidate();
基本工作也就完成了。剩下就是代碼的相互調用了。
【 總 結 】
其實總起來,使用RenderScript進行高斯模糊主要是分為三步:
1、創建並初始化需要的對象(初始化一次就OK)。
mRS = RenderScript.create(this);
mScriptBlur = ScriptIntrinsicBlur.create(mRS, Element.U8_4(mRS));
//RenderScript的輸入和輸出參數對象
mInAllocation = Allocation.createFromBitmap(mRS, bitmap_original);
mOutAllocation = Allocation.createFromBitmap(mRS, bitmap_blur);
2、執行高斯模糊,並將結果拷貝出來。
/*
 * 設置模糊程度。范圍在0~25之間。否則會出錯(這個也可以只設置一次)
 */
mScriptBlur.setRadius(value);

/*
 * Invoke filter kernel
 */
mScriptBlur.setInput(inAllocation);
mScriptBlur.forEach(outAllocation);
//將結果拷貝出來,拷貝到bitmapOut對象中
outAllocation.copyTo(bitmapOut);
3、回收RenderScript對象
mRS.destory();
mRs = null;
文章到此結束。
按照慣例:下面是我的完整的代碼實現。
public class MainActivity extends Activity {

  private SeekBar blurSeekBar;
  private ImageView img_blur;
  private Bitmap bitmap_original, bitmap_blur;

  private RenderScriptTask mLatestTask = null;

  private RenderScript mRS;
  private Allocation mInAllocation;
  private Allocation mOutAllocation;
  private ScriptIntrinsicBlur mScriptBlur;

  @Override
  protected void onCreate(Bundle savedInstanceState) {
    super.onCreate(savedInstanceState);
    setContentView(R.layout.activity_main);
    blurSeekBar = (SeekBar) findViewById(R.id.aty_main_seekBar);
    img_blur = (ImageView) findViewById(R.id.aty_main_img_blur);
    bitmap_original = loadBitmap(R.drawable.meet_entry_guide_3);
    // 復制一份
    bitmap_blur = Bitmap.createBitmap(bitmap_original.getWidth(),
        bitmap_original.getHeight(), bitmap_original.getConfig());
    createBlureScript();
    setSeekBarListening();
  }

  /**
   * 設置SeekBar的監聽
   */
  private void setSeekBarListening() {
    blurSeekBar.setOnSeekBarChangeListener(new OnSeekBarChangeListener() {

      @Override
      public void onStopTrackingTouch(SeekBar seekBar) {
      }

      @Override
      public void onStartTrackingTouch(SeekBar seekBar) {

      }

      @Override
      public void onProgressChanged(SeekBar seekBar, int progress,
          boolean fromUser) {
        updateImage(progress);
      }
    });
  }

  /**
   * 創建Script
   */
  private void createBlureScript() {
    mRS = RenderScript.create(this);
    mInAllocation = Allocation.createFromBitmap(mRS, bitmap_original);
    mOutAllocation = Allocation.createFromBitmap(mRS, bitmap_blur);

    /*
     * Create intrinsics. RenderScript has built-in features such as blur,
     * convolve filter etc. These intrinsics are handy for specific
     * operations without writing RenderScript kernel. In the sample, it's
     * creating blur, convolve and matrix intrinsics.
     */
    mScriptBlur = ScriptIntrinsicBlur.create(mRS, Element.U8_4(mRS));
  }

  private void performFilter(Allocation inAllocation,
      Allocation outAllocation, Bitmap bitmapOut, float value) {
    /*
     * Set blur kernel size
     */
    mScriptBlur.setRadius(value);

    /*
     * Invoke filter kernel
     */
    mScriptBlur.setInput(inAllocation);
    mScriptBlur.forEach(outAllocation);

    outAllocation.copyTo(bitmapOut);
  }

  /*
   * In the AsyncTask, it invokes RenderScript intrinsics to do a filtering.
   * After the filtering is done, an operation blocks at Allication.copyTo()
   * in AsyncTask thread. Once all operation is finished at onPostExecute() in
   * UI thread, it can invalidate and update ImageView UI.
   */
  private class RenderScriptTask extends AsyncTask<Float, Integer, Integer> {
    Boolean issued = false;

    protected Integer doInBackground(Float... values) {
      if (isCancelled() == false) {
        issued = true;
        performFilter(mInAllocation, mOutAllocation, bitmap_blur,
            values[0]);
      }
      return 0;
    }

    void updateView(Integer result) {
      // Request UI update
      img_blur.setImageBitmap(bitmap_blur);
      img_blur.invalidate();
    }

    protected void onPostExecute(Integer result) {
      updateView(result);
    }

    protected void onCancelled(Integer result) {
      if (issued) {
        updateView(result);
      }
    }
  }

  /*
   * Invoke AsynchTask and cancel previous task. When AsyncTasks are piled up
   * (typically in slow device with heavy kernel), Only the latest (and
   * already started) task invokes RenderScript operation.
   */
  private void updateImage(int progress) {
    float f = getBlureParam(progress);

    if (mLatestTask != null)
      mLatestTask.cancel(false);
    mLatestTask = new RenderScriptTask();
    mLatestTask.execute(f);
  }

  /**
   * 模糊的值在1 ~ 25之間
   *
   * @param progress
   *      SeekBar的進度值(0 ~ 100)
   * @return 模糊值
   */
  private float getBlureParam(int progress) {
    final float max = 25.0f;
    final float min = 1.f;
    return (float) ((max - min) * (progress / 100.0) + min);
  }

  /**
   * Helper to load Bitmap from resource
   */
  private Bitmap loadBitmap(int resource) {
    final BitmapFactory.Options options = new BitmapFactory.Options();
    options.inPreferredConfig = Bitmap.Config.ARGB_8888;
    return BitmapFactory.decodeResource(getResources(), resource, options);
  }
}
以上就是本文的全部內容,希望對大家的學習有所幫助,也希望大家多多支持本站。
 【Android】 給我一個Path,還你一個動畫
一 概述原本只是想模仿一下我魂牽夢萦的StoreHouse效果,沒想到意外撸出來一個工具庫。最簡單用法,給我一個path(可以有多段),我還你一個動畫。I have a
 Android CalendarView,DatePicker,TimePicker,以及NumberPicker的使用
Android CalendarView,DatePicker,TimePicker,以及NumberPicker的使用簡單復習下基礎UI組件,做個簡單的總結
 我寫的Android圖表庫XCL-Charts,整理好現在開源了!!!
XCL-Charts v0.1 Android開源圖表庫,基於原生的Canvas來繪制各種圖表。目前支持3D/非3D柱形圖、3D/非3D餅圖、堆疊圖、面積圖、折線圖、曲線
 Android App開發中使用RecyclerView實現Gallery畫廊的實例
什麼是RecyclerView RecyclerView是Android 5.0 ma