編輯:關於Android編程
本文實例為大家分享了Android實現藍牙原理代碼,供大家參考,具體內容如下
package com.example.se7en.testbluetooth;

import android.app.Activity;
import android.bluetooth.BluetoothAdapter;
import android.bluetooth.BluetoothDevice;
import android.bluetooth.BluetoothServerSocket;
import android.bluetooth.BluetoothSocket;
import android.content.BroadcastReceiver;
import android.content.Context;
import android.content.Intent;
import android.content.IntentFilter;
import android.os.Bundle;
import android.util.Log;
import android.view.View;
import android.widget.AdapterView;
import android.widget.EditText;
import android.widget.ListView;
import android.widget.Toast;

import java.io.IOException;
import java.util.ArrayList;
import java.util.List;
import java.util.UUID;

public class MainActivity extends Activity
{

  private BluetoothAdapter adapter;

  private MyReceiver receiver;

  private ListView mListView;

  private List<BluetoothDevice> mDevices;

  private com.example.se7en.testbluetooth.DeviceAdapter mDeviceAdapter;

  private BluetoothSocket mSocket;

  private EditText et;

  @Override
  protected void onCreate(Bundle savedInstanceState)
  {
    super.onCreate(savedInstanceState);
    setContentView(R.layout.activity_main);
    mListView = (ListView) findViewById(R.id.lv);
    et = (EditText) findViewById(R.id.et);
    adapter = BluetoothAdapter.getDefaultAdapter();
    BlueToothHandler.getInstance().setContext(this);
    init();
  }

  private void init()
  {
    initListView();
    // 判斷是否支持藍牙功能
    if (adapter == null)
    {
      Toast.makeText(this, "該手機不支持藍牙功能", Toast.LENGTH_LONG).show();
      return;
    }
    // 判斷藍牙功能是否打開
    if (!adapter.isEnabled())
    {
      // 強行打開
//      adapter.enable();
      Intent intent=new Intent(BluetoothAdapter.ACTION_REQUEST_ENABLE);
      startActivity(intent);
    }

    IntentFilter filter = new IntentFilter();
    // 注冊掃描開始的廣播
    filter.addAction(BluetoothAdapter.ACTION_DISCOVERY_STARTED);
    // 注冊掃描結束的廣播
    filter.addAction(BluetoothAdapter.ACTION_DISCOVERY_FINISHED);
    // 注冊掃描已經找到設備的廣播
    filter.addAction(BluetoothDevice.ACTION_FOUND);
    receiver = new MyReceiver();
    registerReceiver(receiver, filter);
    startBlueServer();
  }

  /**
   * 啟動藍牙服務
   */
  private void startBlueServer()
  {
    new Thread()
    {
      @Override
      public void run()
      {
        while (true)
        {
          try
          {
            BluetoothServerSocket serverSocket = adapter
                .listenUsingRfcommWithServiceRecord(
                    "藍牙服務",
                    UUID.fromString("997f1b20-b4a0-45ea-a7dd-b2097299b1f6"));
            mSocket = serverSocket.accept();//阻塞
            BlueToothHandler.getInstance().setSocket(mSocket);
          }
          catch (IOException e)
          {
            e.printStackTrace();
          }
        }
      }
    }.start();
  }

  public void doClick(View view)
  {
    switch (view.getId())
    {
      case R.id.btn:
        mDevices.clear();
        mDeviceAdapter.notifyDataSetChanged();
        // 判斷是否正在掃描,如果沒在掃描那麼就開始掃描
        if (!adapter.isDiscovering() && adapter.startDiscovery())
        {
          Toast.makeText(this, "開始掃描周圍的藍牙設備", Toast.LENGTH_LONG)
              .show();
        }
        break;
      case R.id.send:
        if ("".equals(et.getText().toString()))
        {
          Toast.makeText(this, "內容不能為空", Toast.LENGTH_SHORT).show();
          return;
        }
        if (BlueToothHandler.getInstance().getSocket() == null)
        {
          Toast.makeText(this, "還未連接設備", Toast.LENGTH_SHORT).show();
          return;
        }
        new Thread()
        {
          @Override
          public void run()
          {
            BlueToothHandler.getInstance().sendMessage(
                et.getText().toString());
          }
        }.start();
        break;
      case R.id.dis:
        BlueToothHandler.getInstance().closeSocket();
        break;
    }
  }

  @Override
  protected void onDestroy()
  {
    super.onDestroy();
    if (receiver != null)
    {
      // 注銷廣播
      unregisterReceiver(receiver);
    }
  }

  private void initListView()
  {
    mDevices = new ArrayList<BluetoothDevice>();
    mDeviceAdapter = new com.example.se7en.testbluetooth.DeviceAdapter(this, mDevices);
    mListView.setAdapter(mDeviceAdapter);
    mListView.setOnItemClickListener(new AdapterView.OnItemClickListener()
    {
      @Override
      public void onItemClick(AdapterView<?> parent, View view,
          int position, long id)
      {
        try
        {
          mSocket = mDevices
              .get(position)
              .createRfcommSocketToServiceRecord(
                  UUID.fromString("997f1b20-b4a0-45ea-a7dd-b2097299b1f6"));
          mSocket.connect();//阻塞
          Toast.makeText(MainActivity.this, "連接成功",
              Toast.LENGTH_SHORT).show();
          BlueToothHandler.getInstance().setSocket(mSocket);
        }
        catch (IOException e)
        {
          e.printStackTrace();
        }

      }
    });
  }

  public class MyReceiver extends BroadcastReceiver
  {

    @Override
    public void onReceive(Context context, Intent intent)
    {
      String action = intent.getAction();
      if (action.equals(BluetoothAdapter.ACTION_DISCOVERY_STARTED))
      {
        Log.i("info", "開始掃描");
      }
      else if (action.equals(BluetoothAdapter.ACTION_DISCOVERY_FINISHED))
      {
        Log.i("info", "掃描結束");
      }
      else if (action.equals(BluetoothDevice.ACTION_FOUND))
      {
        BluetoothDevice device = intent
            .getParcelableExtra(BluetoothDevice.EXTRA_DEVICE);
        Log.i("info", device.getName() + ":" + device.getAddress());
        if (mDevices != null)
        {
          for (int i = 0; i < mDevices.size(); i++)
          {
            if (device.getAddress()
                .equals(mDevices.get(i).getAddress()))
            {
              return;
            }
          }
          mDevices.add(device);
          mDeviceAdapter.notifyDataSetChanged();
        }
      }
    }

  }
}
以上就是本文的全部內容,希望對大家的學習有所幫助,也希望大家多多支持本站。
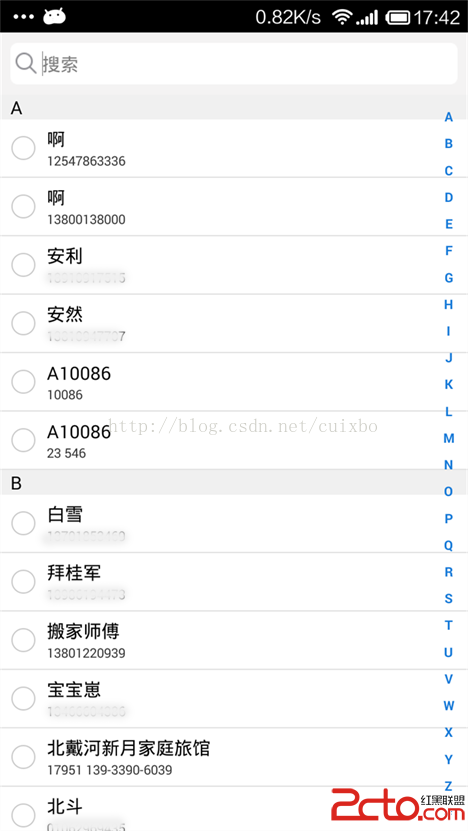 Android通訊錄模糊查詢搜索(號碼,姓名,首字母簡拼,全拼),批量選取聯系人
Android通訊錄模糊查詢搜索(號碼,姓名,首字母簡拼,全拼),批量選取聯系人 公司最近的項目中遇到一個需求需要讀取通訊錄聯系人,並需要支持對聯系人的模糊查詢及批量選
 Android線程池框架下的線程池策略
線程的運行機制 1. 開啟線程過多,會消耗cpu2. 單核cpu,同一時刻只能處理一個線程,多核cpu同一時刻可以處理多個線程3. 操作系統為每個運行線程安排一
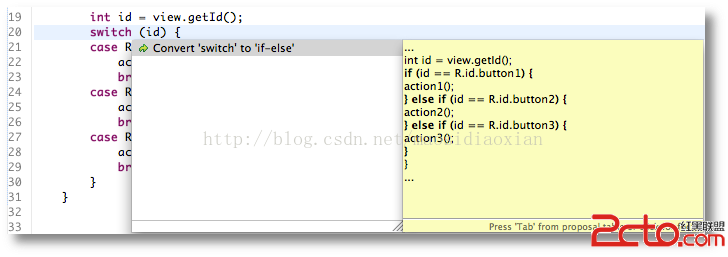 android官方技術文檔翻譯——Case 標簽中的常量字段
Case 標簽中的常量字段 在正常的 Android 項目中,資源R類裡的常量是這樣聲明的: public static final int main=0x
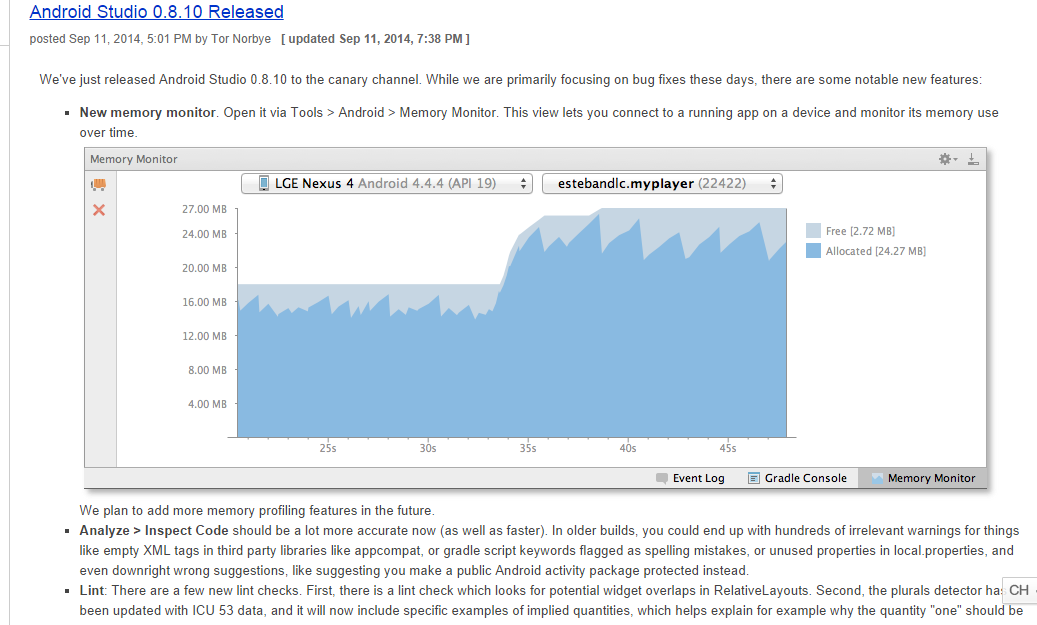 Android Studio 的安裝和配置
下載其實我個人建議:使用綠色版,以後升級也方便,當然以後換電腦,就是超級方便,解壓完後再打開即用。綠色版也和chrome一樣,分Canary版,Dev版,Beta版,但是