編輯:關於Android編程
自定義View一直是自己的短板,趁著公司項目不緊張的時候,多加強這方面的練習。這一系列文章主要記錄自己在自定義View的學習過程中的心得與體會。
刷微博的時候,發現微博運動界面,運動積分的顯示有一個很好看的動畫效果。OK,就從這個開始我的自定義view之路!
看一下最後的效果圖:

分數顏色,分數大小,外圓的顏色,圓弧的顏色都支持自己設置,整體還是和微博那個挺像的。一起看看自定義View是怎樣一步一步實現的:
1.自定義view的屬性:
在res/values/ 下建立一個attrs.xml , 在裡面定義我們的屬性以及聲明我們的整個樣式。
<?xml version="1.0" encoding="utf-8"?>
<resources>
 //自定義屬性名,定義公共屬性
 <attr name="titleSize" format="dimension"></attr>
 <attr name="titleColor" format="color"></attr>
 <attr name="outCircleColor" format="color"></attr>
 <attr name="inCircleColor" format="color"></attr>
 <attr name="lineColor" format="color"></attr>

 //自定義控件的主題樣式
 <declare-styleable name="MySportView">
  <attr name="titleSize"></attr>
  <attr name="titleColor"></attr>
  <attr name="outCircleColor"></attr>
  <attr name="inCircleColor"></attr>
 </declare-styleable>
</resources>
依次定義了字體大小,字體顏色,外圓顏色,圓弧顏色4個屬性,format是值該屬性的取值類型。
然後就是在布局文件中申明我們的自定義view:
    <com.example.tangyangkai.myview.MySportView
    android:id="@+id/sport_view"
    android:layout_width="200dp"
    android:layout_height="200dp"
    android:layout_margin="20dp"
    app:inCircleColor="@color/strong"
    app:outCircleColor="@color/colorAccent"
    app:titleColor="@color/colorPrimary"
    app:titleSize="50dp" />
自定義view的屬性我們可以自己進行設置,記得最後要引入我們的命名空間,
xmlns:app=”http://schemas.Android.com/apk/res-auto”
2.獲取自定義view的屬性:
/**
 * Created by tangyangkai on 16/5/23.
 */
public class MySportView extends View {


 private String text;
 private int textColor;
 private int textSize;
 private int outCircleColor;
 private int inCircleColor;
 private Paint mPaint, circlePaint;
 //繪制文本的范圍
 private Rect mBound;
 private RectF circleRect;
 private float mCurrentAngle;
 private float mStartSweepValue;
 private int mCurrentPercent, mTargetPercent;

 public MySportView(Context context) {
  this(context, null);
 }

 public MySportView(Context context, AttributeSet attrs) {
  this(context, attrs, 0);
 }

 public MySportView(Context context, AttributeSet attrs, int defStyleAttr) {
  super(context, attrs, defStyleAttr);


  //獲取我們自定義的樣式屬性
  TypedArray array = context.getTheme().obtainStyledAttributes(attrs, R.styleable.MySportView, defStyleAttr, 0);
  int n = array.getIndexCount();
  for (int i = 0; i < n; i++) {
   int attr = array.getIndex(i);
   switch (attr) {
    case R.styleable.MySportView_titleColor:
     // 默認顏色設置為黑色
     textColor = array.getColor(attr, Color.BLACK);
     break;
    case R.styleable.MySportView_titleSize:
     // 默認設置為16sp,TypeValue也可以把sp轉化為px
     textSize = array.getDimensionPixelSize(attr, (int) TypedValue.applyDimension(
       TypedValue.COMPLEX_UNIT_SP, 16, getResources().getDisplayMetrics()));
     break;
    case R.styleable.MySportView_outCircleColor:
     // 默認顏色設置為黑色
     outCircleColor = array.getColor(attr, Color.BLACK);
     break;
    case R.styleable.MySportView_inCircleColor:
     // 默認顏色設置為黑色
     inCircleColor = array.getColor(attr, Color.BLACK);
     break;

   }

  }
  array.recycle();
  init();

 }

 //初始化
 private void init() {
  //創建畫筆
  mPaint = new Paint();
  circlePaint = new Paint();
  //設置是否抗鋸齒
  mPaint.setAntiAlias(true);
  //圓環開始角度 (-90° 為12點鐘方向)
  mStartSweepValue = -90;
  //當前角度
  mCurrentAngle = 0;
  //當前百分比
  mCurrentPercent = 0;
  //繪制文本的范圍
  mBound = new Rect();
 }
自定義View一般需要實現一下三個構造方法,這三個構造方法是一層調用一層的,屬於遞進關系。因此,我們只需要在最後一個構造方法中來獲得View的屬性了。
第一步:通過theme.obtainStyledAttributes()方法獲得自定義控件的主題樣式數組;
第二步:遍歷每個屬性來獲得對應屬性的值,也就是我們在xml布局文件中寫的屬性值;
第三步:在循環結束之後記得調用array.recycle()來回收資源;第四步就是進行一下必要的初始化,不建議在onDraw的過程中去實例化對象,因為這是一個頻繁重復執行的過程,new是需要分配內存空間的,如果在一個頻繁重復的過程中去大量地new對象會造成內存浪費的情況。
3.重寫onMesure方法確定view大小:
當你沒有重寫onMeasure方法時候,系統調用默認的onMeasure方法:
 @Override
 protected void onMeasure(int widthMeasureSpec, int heightMeasureSpec) {
  super.onMeasure(widthMeasureSpec, heightMeasureSpec);
 }
這個方法的作用是:測量控件的大小。其實Android系統在加載布局的時候是由系統測量各子View的大小來告訴父View我需要占多大空間,然後父View會根據自己的大小來決定分配多大空間給子View。MeasureSpec的specMode模式一共有三種:
MeasureSpec.EXACTLY:父視圖希望子視圖的大小是specSize中指定的大小;一般是設置了明確的值或者是MATCH_PARENT
MeasureSpec.AT_MOST:子視圖的大小最多是specSize中的大小;表示子布局限制在一個最大值內,一般為WARP_CONTENT
MeasureSpec.UNSPECIFIED:父視圖不對子視圖施加任何限制,子視圖可以得到任意想要的大小;表示子布局想要多大就多大,很少使用。
想要”wrap_content”的效果怎麼辦?不著急,只有重寫onMeasure方法:
 @Override
 protected void onMeasure(int widthMeasureSpec, int heightMeasureSpec) {
//如果布局裡面設置的是固定值,這裡取布局裡面的固定值和父布局大小值中的最小值;如果設置的是match_parent,則取父布局的大小
  int widthMode = MeasureSpec.getMode(widthMeasureSpec);
  int widthSize = MeasureSpec.getSize(widthMeasureSpec);
  int heightMode = MeasureSpec.getMode(heightMeasureSpec);
  int heightSize = MeasureSpec.getSize(heightMeasureSpec);
  int width;
  int height;
  if (widthMode == MeasureSpec.EXACTLY) {
   width = widthSize;
  } else {
   mPaint.setTextSize(textSize);
   mPaint.getTextBounds(text, 0, text.length(), mBound);
   float textWidth = mBound.width();
   int desired = (int) (getPaddingLeft() + textWidth + getPaddingRight());
   width = desired;
  }

  if (heightMode == MeasureSpec.EXACTLY) {
   height = heightSize;
  } else {
   mPaint.setTextSize(textSize);
   mPaint.getTextBounds(text, 0, text.length(), mBound);
   float textHeight = mBound.height();
   int desired = (int) (getPaddingTop() + textHeight + getPaddingBottom());
   height = desired;
  }
  //調用父類方法,把View的大小告訴父布局。
  setMeasuredDimension(width, height);
 }
4.重寫onDraw方法進行繪畫:
 @Override
 protected void onDraw(Canvas canvas) {
  //設置外圓的顏色
  mPaint.setColor(outCircleColor);
  //設置外圓為空心
  mPaint.setStyle(Paint.Style.STROKE);
  //畫外圓
  canvas.drawCircle(getWidth() / 2, getWidth() / 2, getWidth() / 2, mPaint);
  //設置字體顏色
  mPaint.setColor(textColor);
  //設置字體大小
  mPaint.setTextSize(textSize);
  //得到字體的寬高范圍
  text = String.valueOf(mCurrentPercent);
  mPaint.getTextBounds(text, 0, text.length(), mBound);
  //繪制字體
  canvas.drawText(text, getWidth() / 2 - mBound.width() / 2, getWidth() / 2 + mBound.height() / 2, mPaint);

  //設置字體大小
  mPaint.setTextSize(textSize / 3);
  //繪制字體
  canvas.drawText("分", getWidth() * 3 / 4, getWidth() / 3, mPaint);

  circlePaint.setAntiAlias(true);
  circlePaint.setStyle(Paint.Style.STROKE);
  //設置圓弧的寬度
  circlePaint.setStrokeWidth(10);
  //設置圓弧的顏色
  circlePaint.setColor(inCircleColor);
  //圓弧范圍
  circleRect = new RectF(20, 20, getWidth() - 20, getWidth() - 20);
  //繪制圓弧
  canvas.drawArc(circleRect, mStartSweepValue, mCurrentAngle, false, circlePaint);
  //判斷當前百分比是否小於設置目標的百分比
  if (mCurrentPercent < mTargetPercent) {
   //當前百分比+1
   mCurrentPercent += 1;
   //當前角度+360
   mCurrentAngle += 3.6;
   //每100ms重畫一次
   postInvalidateDelayed(100);
  }
 }
代碼注釋寫的灰常詳細,這裡和大家分享一個小技巧,就是在重寫onDraw方法的之前,自己在本子上畫一遍,坐標,位置等簡單標注一下。真的很實用!!!

(1)繪制文本的時候,傳入的第二個參數與第三個參數也就是圖中A點的位置
復制代碼 代碼如下:canvas.drawText(text, getWidth() / 2 - mBound.width() / 2, getWidth() / 2 + mBound.height() / 2, mPaint);
(2)繪制圓弧先確定圓弧的范圍,傳入的四個參數就是圖中內圓的外接正方形的坐標
復制代碼 代碼如下: circleRect = new RectF(20, 20, getWidth() - 20, getWidth() - 20);
(3)繪制圓弧,參數依次是圓弧范圍;開始的角度;圓弧的角度;第四個為True時,在繪制圓弧時將圓心包括在內,通常用來繪制扇形,我們選false;圓弧畫筆復制代碼 代碼如下:canvas.drawArc(circleRect, mStartSweepValue, mCurrentAngle, false, circlePaint);
最後就是分數增加與圓弧動畫的實現,這時就需要調用postInvalidateDelayed這個方法,這個方法會每隔指定的時間來調用View的invalidate()方法,最終會重新調用onDraw方法,完成一個周期。所以如果想控制動畫,我們就可以定義一個全局的mCurrentPercent與mCurrentAngle變量,在onDraw方法中不斷的遞增,達到動畫的效果。
OK,到這裡自定義view的實現就全部結束了,其實重頭梳理一遍,也沒有那麼恐怖。
下一篇自定義View,不見不散!
以上就是本文的全部內容,希望對大家的學習有所幫助,也希望大家多多支持本站。
 Android Fragmnet詳解
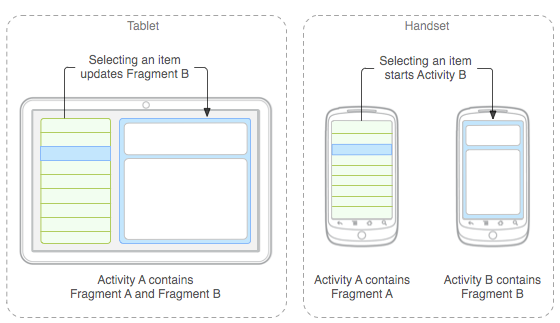
Fragment簡介Fragment 表示 Activity 中的行為或用戶界面部分。您可以將多個Fragment組合在一個 Activity 中來構建多窗格 UI,以及
 Ubuntu中為Android系統實現內置Java應用程序測試Application Frameworks層的硬件服務
我們在Android系統增加硬件服務的目的是為了讓應用層的APP能夠通過Java接口來訪問硬件服務。那麼, APP如何通過Java接口來訪問Application Fra
 Android學習筆記(十五)——碎片的生命周期(附源碼)
碎片的生命周期 點擊下載源碼 與活動類似,碎片具有自己的生命周期。理解了碎片的生命周期後,我們可以在碎片被銷毀時正確地保存其實例,在碎片被重建時
 Android筆記 Intent用法總結
Intent: 官方解釋: An intent is an abstract description of an operation to be performed. I