編輯:關於Android編程
先看下最終的效果

一、開始實現
新建一個DoughnutView繼承View
  public class DoughnutView extends View {

  }
先重寫onMeasure方法。
 /**
   * 當布局為wrap_content時設置默認長寬
   *
   * @param widthMeasureSpec
   * @param heightMeasureSpec
   */
  @Override
  protected void onMeasure(int widthMeasureSpec, int heightMeasureSpec) {
    setMeasuredDimension(measure(widthMeasureSpec), measure(heightMeasureSpec));
  }

  private int measure(int origin) {
    int result = DEFAULT_MIN_WIDTH;
    int specMode = MeasureSpec.getMode(origin);
    int specSize = MeasureSpec.getSize(origin);
    if (specMode == MeasureSpec.EXACTLY) {
      result = specSize;
    } else {
      if (specMode == MeasureSpec.AT_MOST) {
        result = Math.min(result, specSize);
      }
    }
    return result;
  }
下面就是最重要的重寫onDraw方法,大致流程如下
1、畫白色圓環(背景),記得改下Activity背景色不然白色圓環看不出來。
 //畫背景白色圓環
 initPaint();
 float doughnutWidth = Math.min(width, height) / 2 * 0.15f;
 paint.setStrokeWidth(doughnutWidth);
 paint.setStyle(Paint.Style.STROKE);
 paint.setColor(Color.WHITE);
 paint.setAntiAlias(true);
 RectF rectF = new RectF((width > height ? Math.abs(width - height) / 2 : 0) + doughnutWidth / 2, (height > width ? Math.abs(height - width) / 2 : 0) + doughnutWidth / 2, width - (width > height ? Math.abs(width - height) / 2 : 0) - doughnutWidth / 2, height - (height > width ? Math.abs(height - width) / 2 : 0) - doughnutWidth / 2);
 canvas.drawArc(rectF, 0, 360, false, paint);
2、畫彩色圓環
使用SweepGradient來實現圓環漸變的效果,這裡有個判斷當設置的顏色數組只有一個顏色的時候,直接'setColor',有多個顏色才使用SweepGradient實現漸變色。這樣就能既支持漸變色又支持單色。
這裡還有一點要注意,SweepGradient默認是從3點鐘位置開始漸變的,為了能讓它從12點鐘位置開始漸變所以將畫布旋轉了-90°。
 //畫彩色圓環
 initPaint();
 canvas.rotate(-90, width / 2, height / 2);
 paint.setStrokeWidth(doughnutWidth);
 paint.setStyle(Paint.Style.STROKE);
 if (doughnutColors.length > 1) {
   paint.setShader(new SweepGradient(width / 2, height / 2, doughnutColors, null));
 } else {
   paint.setColor(doughnutColors[0]);
 }
 canvas.drawArc(rectF, 0, currentValue, false, paint);
3、畫中間數值的白色背景(只是為了讓數值顯示更明顯一些)
 //畫中間數值的背景
 int fontSize = 50;
 initPaint();
 paint.setStyle(Paint.Style.FILL);
 paint.setColor(Color.WHITE);
 canvas.drawCircle(width / 2, height / 2, fontSize * 2, paint);}
4、畫中間數值
 //畫中間數值
 canvas.rotate(90, width / 2, height / 2);
 initPaint();
 paint.setColor(ColorUtils.getCurrentColor(currentValue / 360f, doughnutColors));
 paint.setTextSize(fontSize);
 paint.setTextAlign(Paint.Align.CENTER);
 float baseLine = height / 2 - (paint.getFontMetrics().descent + paint.getFontMetrics().ascent) / 2;
 canvas.drawText((int) (currentValue / 360f * 100) + "%", width / 2, baseLine, paint);
這裡有兩點比較坑:
1、數值的顏色
要實現的效果是讓數值的顏色是跟彩色圓環終點的顏色是一樣的。尋尋覓覓很久也沒有找到獲取SweepGradient渲染到某一個角度時顏色的方法=_=
最終花了差不多半天時間寫了個顏色漸變算法,代碼如下:
 /**
 * 顏色漸變算法
 * 獲取某個百分比下的漸變顏色值
 *
 * @param percent
 * @param colors
 * @return
 */
 public static int getCurrentColor(float percent, int[] colors) {
   float[][] f = new float[colors.length][3];
   for (int i = 0; i < colors.length; i++) {
     f[i][0] = (colors[i] & 0xff0000) >> 16;
     f[i][1] = (colors[i] & 0x00ff00) >> 8;
     f[i][2] = (colors[i] & 0x0000ff);
   }
   float[] result = new float[3];
   for (int i = 0; i < 3; i++) {
     for (int j = 0; j < f.length; j++) {
       if (f.length == 1 || percent == j / (f.length - 1f)) {
         result = f[j];
       } else {
         if (percent > j / (f.length - 1f) && percent < (j + 1f) / (f.length - 1)) {
           result[i] = f[j][i] - (f[j][i] - f[j + 1][i]) * (percent - j / (f.length - 1f)) * (f.length - 1f);
         }
       }
     }
   }
   return Color.rgb((int) result[0], (int) result[1], (int) result[2]);
 }
2、數值居中對齊問題
drawText是根據baseLine來定位的。具體可以看下下面兩篇文章的分析:文章一、文章二。數字跟文字字母的居中方式可能還略有不同。
二、動畫效果的實現
先上代碼:
public void setValue(float value) {
ValueAnimator valueAnimator = ValueAnimator.ofFloat(currentValue, value);
valueAnimator.setDuration(300);
valueAnimator.setInterpolator(new Interpolator() {
  @Override
  public float getInterpolation(float v) {
    return 1-(1-v)*(1-v)*(1-v);
  }
});
valueAnimator.addUpdateListener(new ValueAnimator.AnimatorUpdateListener() {
  @Override
  public void onAnimationUpdate(ValueAnimator valueAnimator) {
    currentValue = (float) valueAnimator.getAnimatedValue();
    invalidate();
  }
});
valueAnimator.start();
}
使用ValueAnimator來實現動畫效果。還可以設置不同的插值器來實現不同的動畫效果:
 valueAnimator.setInterpolator(new AccelerateInterpolator());//加速
  valueAnimator.setInterpolator(new DecelerateInterpolator());//減速
  valueAnimator.setInterpolator(new AccelerateDecelerateInterpolator());//加速減速
  valueAnimator.setInterpolator(new LinearInterpolator());//雲速
常用插值器介紹可以看這篇文章。
當然也可以自己實現一個簡單的插值器:
valueAnimator.setInterpolator(new Interpolator() {
  @Override
  public float getInterpolation(float v) {
    return 1-(1-v)*(1-v)*(1-v);
  }
});
以上就是本文的全部內容,希望對大家的學習有所幫助。
 Android開發之Location用法實例分析
本文實例講述了Android開發中Location用法。分享給大家供大家參考,具體如下:Location 在Android 開發中還是經常用到的,如通過經緯度獲取天氣,根
 Android中AIDL實現進程通信
AIDL概述但用Messenger實現的IPC存在一點不足:Service內部維護著一個Messenger,Messenger內部又維護著一個Hanlder,當多個cli
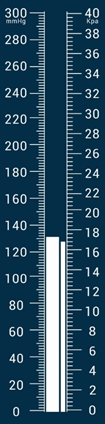 自定義View——模擬水銀柱
由於項目需要,所以用SurfaceView寫了一個自定義View,根據曉風飛雨的溫度計源碼做了一部分修改而來,效果是雙汞柱 不廢話了 先上源碼package view;i
 Android日志Log
日志可以在幫我們開發中調試程序,下面看看Android自帶日志的作用先聲明一個字符串 private static final String TAG = &qu