編輯:關於Android編程
本文實例講述了Android使用libgdx實現模擬方向鍵控制角色移動的方法。分享給大家供大家參考,具體如下:
package com.demo;
import android.os.Bundle;
import com.badlogic.gdx.backends.android.AndroidApplication;
//Libgdx的Texture與Sprite使用
public class LibgdxActivity extends AndroidApplication {
  public void onCreate(Bundle bundle) {
    super.onCreate(bundle);
    // 初始化游戲屏幕,並設置是否支持GLES 2.0,如果您對向下兼容沒什麼需要選擇true即可(2.1以上),否則選擇false。
//   initialize(new FirstGame(), true);
    initialize(new Box2DDemo(), true);
  }
}
package com.demo;
import com.badlogic.gdx.Gdx;
import com.badlogic.gdx.graphics.Texture;
import com.badlogic.gdx.graphics.g2d.SpriteBatch;
import com.badlogic.gdx.scenes.scene2d.Actor;
public class FirstActor extends Actor{
  private Texture texture;
  @Override
  public void draw(SpriteBatch batch, float arg1) {
    batch.draw(texture, this.x, this.y);
  }
  @Override
  public Actor hit(float arg0, float arg1) {
    if (x > 0 && y > 0 && this.height > y && this.width > x) {
      return this;
    } else {
      return null;
    }
  }
  @Override
  public boolean touchDown(float arg0, float arg1, int arg2) {
    // TODO Auto-generated method stub
    return false;
  }
  @Override
  public void touchDragged(float arg0, float arg1, int arg2) {
    // TODO Auto-generated method stub
  }
  @Override
  public void touchUp(float arg0, float arg1, int arg2) {
    // TODO Auto-generated method stub
  }
  public FirstActor(String name) {
    super(name);
    texture = new Texture(Gdx.files.internal("bt.png"));
    this.height = texture.getHeight();
    this.width = texture.getWidth();
  }
}
package com.demo;
import android.util.Log;
import com.badlogic.gdx.ApplicationListener;
import com.badlogic.gdx.Gdx;
import com.badlogic.gdx.graphics.GL10;
import com.badlogic.gdx.graphics.Texture;
import com.badlogic.gdx.graphics.g2d.NinePatch;
import com.badlogic.gdx.scenes.scene2d.Actor;
import com.badlogic.gdx.scenes.scene2d.Stage;
import com.badlogic.gdx.scenes.scene2d.ui.Button;
import com.badlogic.gdx.scenes.scene2d.ui.ClickListener;
import com.badlogic.gdx.scenes.scene2d.ui.Button.ButtonStyle;
class FirstGame implements ApplicationListener,ClickListener {
  private static String UP = "up";
  private static String DOWN = "down";
  private static String LEFT = "left";
  private static String RIGHT = "right";
  //舞台
  private Stage stage;
  //演員
  private Actor firstActor;
  private Texture texture;
  private Button buttonUp,buttonDown,buttonLeft,buttonRight;
  private NinePatch patch1, patch2;
  @Override
  public void create() {
    stage = new Stage(Gdx.graphics.getWidth(), Gdx.graphics.getHeight(), true);
    firstActor = new FirstActor("renwu");
    buttonUp = initButton(UP,40,80);
    buttonDown = initButton(DOWN,40,0);
    buttonLeft = initButton(LEFT,0,40);
    buttonRight = initButton(RIGHT,80,40);
    buttonUp.setClickListener(this);
    buttonDown.setClickListener(this);
    buttonLeft.setClickListener(this);
    buttonRight.setClickListener(this);
    stage.addActor(firstActor);
    stage.addActor(buttonUp);
    stage.addActor(buttonDown);
    stage.addActor(buttonLeft);
    stage.addActor(buttonRight);
    Gdx.input.setInputProcessor(stage);
  }
  @Override
  public void render() {
    // 清屏
    Gdx.gl.glClear(GL10.GL_COLOR_BUFFER_BIT);
    stage.act(Gdx.graphics.getDeltaTime());
    stage.draw();
  }
  @Override
  public void dispose() {
    // 釋放占用的資源
    stage.dispose();
  }
  @Override
  public void resume() {
  }
  @Override
  public void pause() {
  }
  @Override
  public void resize(int width, int height) {
  }
  public Button initButton(String name,int x,int y){
    if(name.equals(UP)){
      texture = new Texture(Gdx.files.internal("up_alt.png"));
    }else if(name.equals(DOWN)){
      texture = new Texture(Gdx.files.internal("down_alt.png"));
    }else if(name.equals(LEFT)){
      texture = new Texture(Gdx.files.internal("back_alt.png"));
    }else if(name.equals(RIGHT)){
      texture = new Texture(Gdx.files.internal("forward_alt.png"));
    }
    patch1 = new NinePatch(texture, 0, 0, 0, 0);
    Button button = new Button(new ButtonStyle(patch1, patch1, patch1, 0f, 0f, 0f, 0f, null, null), name);
    button.x = x;
    button.y = y;
    button.width = 32;
    button.height = 32;
    return button;
  }
  @Override
  public void click(Actor button) {
    if(button.equals(buttonUp)){
      Actor actor = button.parent.findActor("renwu");;
      actor.y += 10;
      Log.i("touch", "up");
    }else if(button.equals(buttonDown)){
      Actor actor = button.parent.findActor("renwu");;
      actor.y -= 10;
      Log.i("touch", "down");
    }else if(button.equals(buttonLeft)){
      Actor actor = button.parent.findActor("renwu");;
      actor.x -= 10;
      Log.i("touch", "left");
    }else if(button.equals(buttonRight)){
      Actor actor = button.parent.findActor("renwu");;
      actor.x += 10;
      Log.i("touch", "right");
    }
  }
}
希望本文所述對大家Android程序設計有所幫助。
 Android Camera開發之基礎知識篇
概述Android框架支持設備的相機拍照和錄像功能,你的應用可以直接調用系統的Camera應用來拍照或者錄像(比如微信拍照),當然也可以利用Android系統提供的API
 Android中使用shape
shape的屬性有:- corners–圓角- padding–內邊距- size(height、width)–設置寬高- strok
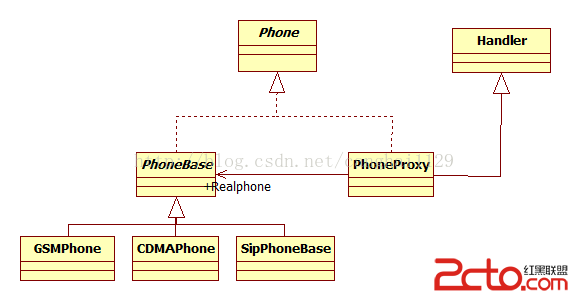 Android與設計模式——代理(Proxy)模式
在閻宏博士的《JAVA與模式》一書中開頭是這樣描述代理(Proxy)模式的: 代理模式是對象的結構模式。代理模式給某一個對象提供一個代理對象,並由代理對象控制對原對象
 關於android源碼的使用心得體會
小生做程序也有些許日子,從一個青澀的小白,慢慢的成長為了小有成就的程序猿,從不知名的碼農,到二三百人圈裡還有點小名氣的碼霸。 要說辛苦,可能每個程序心中都有各自的理解,大
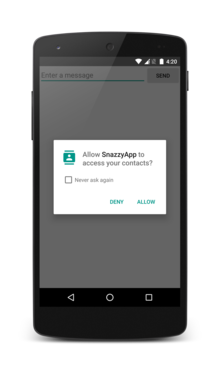 Android doc|Getting Started| Training部分 --翻譯 Working with System Permissions
Working with System PermissionsTo pr