編輯:關於Android編程
1.進度圓環的顏色是漸變。 2.添加一個進度標尺,類似與鐘表表盤的樣子,用來顯示刻度。主要是在原來的基礎上添加了如下功能
3.添加一個進度指示器,三角形的樣子,用來顯示進度。
效果圖如下

下面,就針對這三個變化來說明一下:
        /**
         * 設置圓形漸變
         * 【第一個參數】:中心點x坐標
         * 【第二個參數】:中心點y坐標
         * 【第三個參數】:漸變的顏色數組
         * 【第四個參數】:漸變的顏色數組對應的相對位置
         */
        paintCurrent.setShader(new SweepGradient(centerX, centerX, new int[]{getResources().getColor(R.color.start_color), getResources().getColor(R.color.end_color)}, null));
        /**
         * 通過這個拿到一個資源圖片對象
         */
        bitmap = BitmapFactory.decodeResource(getResources(), R.mipmap.arrow);
2.計算三角形移動軌跡的坐標
 /**
  * 為進度設置動畫
  * ValueAnimator是整個屬性動畫機制當中最核心的一個類,屬性動畫的運行機制是通過不斷地對值進行操作來實現的,
  * 而初始值和結束值之間的動畫過渡就是由ValueAnimator這個類來負責計算的。
  * 它的內部使用一種時間循環的機制來計算值與值之間的動畫過渡,
  * 我們只需要將初始值和結束值提供給ValueAnimator,並且告訴它動畫所需運行的時長,
  * 那麼ValueAnimator就會自動幫我們完成從初始值平滑地過渡到結束值這樣的效果。
  *
  * @param last
  * @param current
  */
 @RequiresApi(api = Build.VERSION_CODES.HONEYCOMB)
 private void setAnimation(float last, float current, int length) {
     ValueAnimator progressAnimator = ValueAnimator.ofFloat(last, current);
     progressAnimator.setDuration(length);
     progressAnimator.setTarget(currentAngleLength);
     progressAnimator.addUpdateListener(new ValueAnimator.AnimatorUpdateListener() {
         @Override
         public void onAnimationUpdate(ValueAnimator animation) {
             /**每次要繪制的圓弧角度**/
             currentAngleLength = (float) animation.getAnimatedValue();

             /**要繪制的三角形指示器的半徑**/
             float radius=centerX - borderWidth-bitmap.getHeight();
             /**要繪制的三角形指示器的x坐標**/
             point.x = (float) (centerX +radius * Math.cos((startAngle + currentAngleLength) * Math.PI / 180));
             /**要繪制的三角形指示器的y坐標**/
             point.y = (float) (centerX + radius* Math.sin((startAngle + currentAngleLength) * Math.PI / 180));
             Log.d("stepView", point + "");

             /**要繪制的圓弧多繪制的部分減掉**/
             double subtractionScale = borderWidth/2/(centerX*2*Math.PI);
             double subtractionAngle=subtractionScale*angleLength;
             if(currentAngleLength>subtractionAngle){
                 currentAngleLength-=subtractionAngle;
             }
             invalidate();
         }
     });
     progressAnimator.start();
 }
3.調整旋轉的角度後繪制三角形指示器
/**
  * 5.畫三角形
  *
  * @param canvas
  */
 private void drawBitmap(Canvas canvas) {
     // 定義矩陣對象
     Matrix matrix = new Matrix();
     // 參數為正則向右旋轉
     matrix.postRotate(startAngle + currentAngleLength + 90);
     Bitmap dstbmp = Bitmap.createBitmap(bitmap, 0, 0, bitmap.getWidth(), bitmap.getHeight(),
             matrix, true);
     Paint mBitmapPaint = new Paint(Paint.DITHER_FLAG);//這裡不管怎麼設置都不影響最終圖像
     canvas.drawBitmap(dstbmp, point.x - dstbmp.getWidth() / 2, point.y - dstbmp.getHeight() / 2, mBitmapPaint);
 }
 /**
  * 6. 畫鐘表線
  *
  * @param canvas
  */
 private void drawLine(Canvas canvas) {
     Paint mPaint = new Paint();
     mPaint.setStrokeWidth(5);
     mPaint.setColor(getResources().getColor(R.color.start_color));
     /**要繪制的表盤線的總數**/
     int count = 60;
     /**要繪制的表盤每個間隔線條之間的夾角**/
     int avgAngle = (360 / (count - 1));
     /**要繪制的表盤的最長的半徑**/
     float radius = centerX - borderWidth - bitmap.getHeight() - 20;
     /**要繪制的表盤線條長度**/
     int lineLength = 25;
     /**起始點**/
     PointF point1 = new PointF();
     /**終止點**/
     PointF point2 = new PointF();
     for (int i = 0; i < count; i++) {
         int angle = avgAngle * i;
         /**起始點坐標**/
         point1.x = centerX + (float) Math.cos(angle * (Math.PI / 180)) * radius;
         point1.y = centerX + (float) Math.sin(angle * (Math.PI / 180)) * radius;

         /**終止點坐標**/
         point2.x = centerX + (float) Math.cos(angle * (Math.PI / 180)) * (radius - lineLength);
         point2.y = centerX + (float) Math.sin(angle * (Math.PI / 180)) * (radius - lineLength);

         /**畫線**/
         canvas.drawLine(point1.x, point1.y, point2.x, point2.y, mPaint);
     }
 }
package cn.bluemobi.dylan.stepcirclestaffview;

/**
* Created by yuandl on 2016-11-08.
*/

import android.animation.ValueAnimator;
import android.content.Context;
import android.graphics.Bitmap;
import android.graphics.BitmapFactory;
import android.graphics.Canvas;
import android.graphics.Color;
import android.graphics.LinearGradient;
import android.graphics.Matrix;
import android.graphics.Paint;
import android.graphics.PointF;
import android.graphics.RadialGradient;
import android.graphics.Rect;
import android.graphics.RectF;
import android.graphics.Shader;
import android.graphics.SweepGradient;
import android.graphics.Typeface;
import android.os.Build;
import android.support.annotation.RequiresApi;
import android.util.AttributeSet;
import android.util.Log;
import android.view.View;

import java.util.logging.Logger;


/**
* Created by DylanAndroid on 2016/5/26.
* 顯示步數的圓弧
*/
public class StepArcView extends View {

 /**
  * 圓弧的寬度
  */
 private float borderWidth = 38f;
 /**
  * 畫步數的數值的字體大小
  */
 private float numberTextSize = 0;
 /**
  * 步數
  */
 private String stepNumber = "0";
 /**
  * 開始繪制圓弧的角度
  */
 private float startAngle = 90;
 /**
  * 終點對應的角度和起始點對應的角度的夾角
  */
 private float angleLength = 360;
 /**
  * 所要繪制的當前步數的紅色圓弧終點到起點的夾角
  */
 private float currentAngleLength = 0;
 /**
  * 動畫時長
  */
 private int animationLength = 3000;

 private PointF point;
 private float centerX;
 private Bitmap bitmap;
 private int totalStepNum;

 private void init() {
     point = new PointF();
     /**
      * 通過這個拿到一個資源圖片對象
      */
     bitmap = BitmapFactory.decodeResource(getResources(), R.mipmap.arrow);


 }

 public StepArcView(Context context) {
     super(context);
     init();

 }


 public StepArcView(Context context, AttributeSet attrs) {
     super(context, attrs);
     init();
 }

 public StepArcView(Context context, AttributeSet attrs, int defStyleAttr) {
     super(context, attrs, defStyleAttr);
     init();
 }


 @Override
 protected void onDraw(Canvas canvas) {
     super.onDraw(canvas);
     /**中心點的x坐標*/
     centerX = (getWidth()) / 2;
     /**指定圓弧的外輪廓矩形區域*/
     RectF rectF = new RectF(0 + borderWidth, borderWidth, 2 * centerX - borderWidth, 2 * centerX - borderWidth);

     /**【第一步】繪制整體的黃色圓弧*/
     drawArcYellow(canvas, rectF);
     /**【第二步】繪制當前進度的紅色圓弧*/
     drawArcRed(canvas, rectF);
     /**【第三步】繪制當前進度的紅色數字*/
     drawTextNumber(canvas, centerX);
     /**【第四步】繪制"步數"的紅色數字*/
     drawTextStepString(canvas, centerX);
     /**【第五步】繪制"步數"進度標尺的三角形*/
     drawBitmap(canvas);
     /**【第六步】繪制"步數"進度標尺類似於鐘表線隔*/
     drawLine(canvas);
 }


 /**
  * 1.繪制總步數的黃色圓弧
  *
  * @param canvas 畫筆
  * @param rectF  參考的矩形
  */
 private void drawArcYellow(Canvas canvas, RectF rectF) {
     Paint paint = new Paint();
     /** 默認畫筆顏色,黃色 */
     paint.setColor(getResources().getColor(R.color.default_color));
     /** 結合處為圓弧*/
     paint.setStrokeJoin(Paint.Join.ROUND);
     /** 設置畫筆的樣式 Paint.Cap.Round ,Cap.SQUARE等分別為圓形、方形*/
     paint.setStrokeCap(Paint.Cap.ROUND);
     /** 設置畫筆的填充樣式 Paint.Style.FILL  :填充內部;Paint.Style.FILL_AND_STROKE  :填充內部和描邊;  Paint.Style.STROKE  :僅描邊*/
     paint.setStyle(Paint.Style.STROKE);
     /**抗鋸齒功能*/
     paint.setAntiAlias(true);
     /**設置畫筆寬度*/
     paint.setStrokeWidth(borderWidth);

     /**繪制圓弧的方法
      * drawArc(RectF oval, float startAngle, float sweepAngle, boolean useCenter, Paint paint)//畫弧,
      參數一是RectF對象,一個矩形區域橢圓形的界限用於定義在形狀、大小、電弧,
      參數二是起始角(度)在電弧的開始,圓弧起始角度,單位為度。
      參數三圓弧掃過的角度,順時針方向,單位為度,從右中間開始為零度。
      參數四是如果這是true(真)的話,在繪制圓弧時將圓心包括在內,通常用來繪制扇形;如果它是false(假)這將是一個弧線,
      參數五是Paint對象;
      */
     canvas.drawArc(rectF, startAngle, angleLength, false, paint);

 }

 /**
  * 2.繪制當前步數的紅色圓弧
  */
 private void drawArcRed(Canvas canvas, RectF rectF) {
     Paint paintCurrent = new Paint();
     paintCurrent.setStrokeJoin(Paint.Join.ROUND);
     paintCurrent.setStrokeCap(Paint.Cap.SQUARE);//圓角弧度
     paintCurrent.setStyle(Paint.Style.STROKE);//設置填充樣式
     paintCurrent.setAntiAlias(true);//抗鋸齒功能
     paintCurrent.setStrokeWidth(borderWidth);//設置畫筆寬度
     /**
      * 設置圓形漸變
      * 【第一個參數】:中心點x坐標
      * 【第二個參數】:中心點y坐標
      * 【第三個參數】:漸變的顏色數組
      * 【第四個參數】:漸變的顏色數組對應的相對位置
      */
     paintCurrent.setShader(new SweepGradient(centerX, centerX, new int[]{getResources().getColor(R.color.start_color), getResources().getColor(R.color.end_color)}, null));
     canvas.drawArc(rectF, startAngle, currentAngleLength, false, paintCurrent);
 }

 /**
  * 3.圓環中心的步數
  */
 private void drawTextNumber(Canvas canvas, float centerX) {
     Paint vTextPaint = new Paint();
     vTextPaint.setTextAlign(Paint.Align.CENTER);
     vTextPaint.setAntiAlias(true);//抗鋸齒功能
     vTextPaint.setTextSize(numberTextSize);
     Typeface font = Typeface.create(Typeface.SANS_SERIF, Typeface.NORMAL);
     vTextPaint.setTypeface(font);//字體風格
     vTextPaint.setColor(getResources().getColor(R.color.center_text_color));
     Rect bounds_Number = new Rect();
     vTextPaint.getTextBounds(stepNumber, 0, stepNumber.length(), bounds_Number);
     canvas.drawText(stepNumber, centerX, getHeight() / 2 + bounds_Number.height() / 2, vTextPaint);

 }

 /**
  * 4.圓環中心[步數]的文字
  */
 private void drawTextStepString(Canvas canvas, float centerX) {
     Paint vTextPaint = new Paint();
     vTextPaint.setTextSize(dipToPx(13));
     vTextPaint.setTextAlign(Paint.Align.CENTER);
     vTextPaint.setAntiAlias(true);//抗鋸齒功能
     vTextPaint.setColor(getResources().getColor(R.color.other_text_color));
     String stepString = "目標 "+totalStepNum;
     Rect bounds = new Rect();
     vTextPaint.getTextBounds(stepString, 0, stepString.length(), bounds);
     canvas.drawText(stepString, centerX, getHeight() / 2 + bounds.height() + getFontHeight(numberTextSize), vTextPaint);
     canvas.save();
      stepString = "今天步數";
      bounds = new Rect();
     vTextPaint.getTextBounds(stepString, 0, stepString.length(), bounds);
     canvas.drawText(stepString, centerX, getHeight() / 2  - getFontHeight(numberTextSize), vTextPaint);

 }

 /**
  * 5.畫三角形
  *
  * @param canvas
  */
 private void drawBitmap(Canvas canvas) {
     // 定義矩陣對象
     Matrix matrix = new Matrix();
     // 參數為正則向右旋轉
     matrix.postRotate(startAngle + currentAngleLength + 90);
     Bitmap dstbmp = Bitmap.createBitmap(bitmap, 0, 0, bitmap.getWidth(), bitmap.getHeight(),
             matrix, true);
     Paint mBitmapPaint = new Paint(Paint.DITHER_FLAG);//這裡不管怎麼設置都不影響最終圖像
     canvas.drawBitmap(dstbmp, point.x - dstbmp.getWidth() / 2, point.y - dstbmp.getHeight() / 2, mBitmapPaint);
 }

 /**
  * 6. 畫鐘表線
  *
  * @param canvas
  */
 private void drawLine(Canvas canvas) {
     Paint mPaint = new Paint();
     mPaint.setStrokeWidth(5);
     mPaint.setColor(getResources().getColor(R.color.start_color));
     /**要繪制的表盤線的總數**/
     int count = 60;
     /**要繪制的表盤每個間隔線條之間的夾角**/
     int avgAngle = (360 / (count - 1));
     /**要繪制的表盤的最長的半徑**/
     float radius = centerX - borderWidth - bitmap.getHeight() - 20;
     /**要繪制的表盤線條長度**/
     int lineLength = 25;
     /**起始點**/
     PointF point1 = new PointF();
     /**終止點**/
     PointF point2 = new PointF();
     for (int i = 0; i < count; i++) {
         int angle = avgAngle * i;
         /**起始點坐標**/
         point1.x = centerX + (float) Math.cos(angle * (Math.PI / 180)) * radius;
         point1.y = centerX + (float) Math.sin(angle * (Math.PI / 180)) * radius;

         /**終止點坐標**/
         point2.x = centerX + (float) Math.cos(angle * (Math.PI / 180)) * (radius - lineLength);
         point2.y = centerX + (float) Math.sin(angle * (Math.PI / 180)) * (radius - lineLength);

         /**畫線**/
         canvas.drawLine(point1.x, point1.y, point2.x, point2.y, mPaint);
     }
 }

 /**
  * 獲取當前步數的數字的高度
  *
  * @param fontSize 字體大小
  * @return 字體高度
  */
 public int getFontHeight(float fontSize) {
     Paint paint = new Paint();
     paint.setTextSize(fontSize);
     Rect bounds_Number = new Rect();
     paint.getTextBounds(stepNumber, 0, stepNumber.length(), bounds_Number);
     return bounds_Number.height();
 }

 /**
  * dip 轉換成px
  *
  * @param dip
  * @return
  */

 private int dipToPx(float dip) {
     float density = getContext().getResources().getDisplayMetrics().density;
     return (int) (dip * density + 0.5f * (dip >= 0 ? 1 : -1));
 }

 /**
  * 所走的步數進度
  *
  * @param totalStepNum  設置的步數
  * @param currentCounts 所走步數
  */
 @RequiresApi(api = Build.VERSION_CODES.HONEYCOMB)
 public void setCurrentCount(int totalStepNum, int currentCounts) {
     this.totalStepNum = totalStepNum;
     stepNumber = currentCounts + "";
     setTextSize(currentCounts);
     /**如果當前走的步數超過總步數則圓弧還是270度,不能成為園*/
     if (currentCounts > totalStepNum) {
         currentCounts = totalStepNum;
     }

     /**所走步數占用總共步數的百分比*/
     float scale = (float) currentCounts / totalStepNum;
     /**換算成弧度最後要到達的角度的長度-->弧長*/
     float currentAngleLength = scale * angleLength;
     /**開始執行動畫*/
     setAnimation(0, currentAngleLength, animationLength);
 }

 /**
  * 為進度設置動畫
  * ValueAnimator是整個屬性動畫機制當中最核心的一個類,屬性動畫的運行機制是通過不斷地對值進行操作來實現的,
  * 而初始值和結束值之間的動畫過渡就是由ValueAnimator這個類來負責計算的。
  * 它的內部使用一種時間循環的機制來計算值與值之間的動畫過渡,
  * 我們只需要將初始值和結束值提供給ValueAnimator,並且告訴它動畫所需運行的時長,
  * 那麼ValueAnimator就會自動幫我們完成從初始值平滑地過渡到結束值這樣的效果。
  *
  * @param last
  * @param current
  */
 @RequiresApi(api = Build.VERSION_CODES.HONEYCOMB)
 private void setAnimation(float last, float current, int length) {
     ValueAnimator progressAnimator = ValueAnimator.ofFloat(last, current);
     progressAnimator.setDuration(length);
     progressAnimator.setTarget(currentAngleLength);
     progressAnimator.addUpdateListener(new ValueAnimator.AnimatorUpdateListener() {
         @Override
         public void onAnimationUpdate(ValueAnimator animation) {
             /**每次要繪制的圓弧角度**/
             currentAngleLength = (float) animation.getAnimatedValue();

             /**要繪制的三角形指示器的半徑**/
             float radius=centerX - borderWidth-bitmap.getHeight();
             /**要繪制的三角形指示器的x坐標**/
             point.x = (float) (centerX +radius * Math.cos((startAngle + currentAngleLength) * Math.PI / 180));
             /**要繪制的三角形指示器的y坐標**/
             point.y = (float) (centerX + radius* Math.sin((startAngle + currentAngleLength) * Math.PI / 180));
             Log.d("stepView", point + "");

             /**要繪制的圓弧多繪制的部分減掉**/
             double subtractionScale = borderWidth/2/(centerX*2*Math.PI);
             double subtractionAngle=subtractionScale*angleLength;
             if(currentAngleLength>subtractionAngle){
                 currentAngleLength-=subtractionAngle;
             }
             invalidate();
         }
     });
     progressAnimator.start();
 }

 /**
  * 設置文本大小,防止步數特別大之後放不下,將字體大小動態設置
  *
  * @param num
  */
 public void setTextSize(int num) {
     String s = String.valueOf(num);
     int length = s.length();
     if (length <= 4) {
         numberTextSize = dipToPx(40);
     } else if (length > 4 && length <= 6) {
         numberTextSize = dipToPx(30);
     } else if (length > 6 && length <= 8) {
         numberTextSize = dipToPx(25);
     } else if (length > 8) {
         numberTextSize = dipToPx(20);
     }
 }

}
 Android啟動Activity
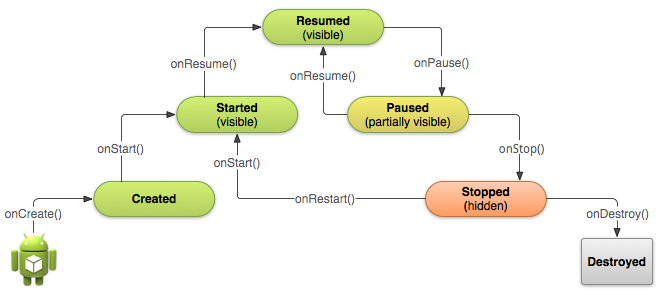
Android和java啟動的區別不同於使用 main() 方法啟動應用的其他編程范例,Android 系統會通過調用對應於其生命周期中特定階段的特定回調方法在 Acti
 Android數據加密之Rsa加密的簡單實現
最近無意中和同事交流數據安全傳輸的問題,想起自己曾經使用過的Rsa非對稱加密算法,閒下來總結一下。什麼是Rsa加密?RSA算法是最流行的公鑰密碼算法,使用長度可以變化的密
 android 開發:繪制復雜曲線,帶漸變圖表
繪制曲線類:public class BaseFundChartView extends View { Paint linePaint; Paint text
 四大組件之ContentProvider(一)-使用系統提供的ContentProvider
第1節 ContentProvider介紹ContentProvider是安卓系統的四大組件之一,可以向其他組件提供數據訪問的能力。它就像是一個網站,其他組件(或者其他應