編輯:關於Android編程
模擬:我們需要外部進程服務提供一個計算地點橫縱坐標的方法來顯示到我們自己的Textview上。
首先新建一個項目
這裡我們需要定義一個自定義類型LocationData 為了記錄橫眾坐標與服務Pid,創建!
LocationData.java 實現ParceLable借口,代碼注釋挺明白。具體可另行百度。
public class LocationData implements Parcelable {
    int width;//代表橫
    int heigth;//代表縱
    public LocationData(){

    }

    public LocationData(Parcel in){
        readFromParcel(in);//對象通過Binder從Parcel返回拿到
    }
    @Override
    public int describeContents() {
        return 0;//描繪類型信息一般不用管
    }
    @Override
    public void writeToParcel(Parcel dest, int flags) {
        dest.writeInt(width);//數據寫入容器Parcel
        dest.writeInt(heigth);
    }
    public static final Creator CREATOR = new Creator() {
        //內部類實現對象反序列化
        @Override
        public LocationData createFromParcel(Parcel in) {
            return new LocationData(in);
        }
        @Override
        public LocationData[] newArray(int size) {
            return new LocationData[size];
        }
    };
    /** 從Parcel中讀取數據 **/
    public void readFromParcel(Parcel in){
        width = in.readInt();
        heigth = in.readInt();
    }
    public int getHeigth() {
        return heigth;
    }
    public void setHeigth(int heigth) {
        this.heigth = heigth;
    }
    public int getWidth() {
        return width;
    }
    public void setWidth(int width) {
        this.width = width;
    }
    @Override
    public String toString() {
        return "width = "+ width + ", heigth="+ heigth;
    }
}
自定義類型LocationData.aidl文件很簡單無需過多聲明只要聲明出類型即可。
AS2.2創建Aidl文件

LocationData.aidl
package com.ljs.testfitsystem;
parcelable LocationData;
默認Aidl支持原生類型只支持如下,所以需要我們自定義類型。
void basicTypes(int anInt, long aLong, boolean aBoolean, float aFloat,
            double aDouble, String aString);
// IMyAidlInterface.aidl
package com.ljs.aidltest;
import com.ljs.aidltest.LocationData;// 導入自定義類型
// Declare any non-default types here with import statements

interface IMyAidlInterface {
             int getPid();//獲得當前服務進程ID
      LocationData getMyData();//提供LocationData對象給予我們Client

}
這裡我們最初的文件准備得到如下

最後再編譯項目,

得到我們接口文件。內部含1個內部類stub。stub內部含有Proxy類。具體就是對Binder的一些控制與數據操作,由於此文件自動生成,我們也不需要過多關心。

這裡我們為了模擬跨進程通信使用 android:process=“”來替代生成一個IPC通信的遠程服務。
  //隨意設置只是一個進程名稱

                //用來啟動服務
具體service文件如下已經作注釋:
public class RemoteService extends Service {
    private static final String TAG = "server"; //Log觀察生命周期
    LocationData mMyData;
    @Override
    public void onCreate() {
        super.onCreate();
        Log.i(TAG, "[server] onCreate");
        initMyData();//初始化Location
    }
    @Override
    public IBinder onBind(Intent intent) {
        Log.i(TAG,"[server] onBind");
        return mBinder;

    }
    @Override
    public boolean onUnbind(Intent intent) {
        Log.i(TAG, "[server] onUnbind");
        return super.onUnbind(intent);
    }
    @Override
    public void onDestroy() {
        Log.i(TAG, "[server] onDestroy");
        super.onDestroy();
    }
    //通過Aidl生成文件中Stub類實現我們生成接口中的方法
    IMyAidlInterface.Stub mBinder = new IMyAidlInterface.Stub() {
        @Override
        public int getPid() throws RemoteException {
            Log.i(TAG,"[server] getPid()="+android.os.Process.myPid());
            return android.os.Process.myPid();
        }
        @Override
        public LocationData getMyData() throws RemoteException {
            Log.i(TAG,"[server] getMyData()  "+ mMyData.toString());
            return mMyData;
        }
        //Binder驅動底層調用傳送數據,由於server ,1對多,一般不設置也可以做權限設置,判斷是否需要傳遞速度給Client。
        @Override
        public boolean onTransact(int code, Parcel data, Parcel reply, int flags) throws RemoteException {
            return super.onTransact(code, data, reply, flags);
        }
    };
    /**
     * 初始化MyData數據
     **/
    private void initMyData() {
        mMyData = new LocationData();
        mMyData.setWidth((int)(Math.random()*100));//隨機給予位置信息
        mMyData.setHeigth((int)(Math.random()*100));
    }
}
得到接口,服務端准備好,我們客戶端Bind服務就可以進行IPC通信了。
MainActivity.java 重要部分已經注釋
public class MainActivity extends AppCompatActivity {
    private static final String TAG = "Client";
    private IMyAidlInterface mRemoteService;
    private boolean mIsBound =false;//是否已經綁定
    private TextView mTv;
    @Override
    protected void onCreate(Bundle savedInstanceState) {
        super.onCreate(savedInstanceState);
        Log.i(TAG, "[Client] onCreate");
        setContentView(R.layout.activity_main);
        mTv = (TextView) findViewById(R.id.tv);
        mTv.setText("還未連接");
    }
    //監控遠程服務狀態鏈接,ServiceConnection
    private ServiceConnection mConnection = new ServiceConnection() {
        @Override
        public void onServiceConnected(ComponentName name, IBinder service) {
            mRemoteService = IMyAidlInterface.Stub.asInterface(service);//鏈接上了才會調用
            String pidInfo = null;
            try {
                LocationData myData = mRemoteService.getMyData();
                pidInfo ="客戶端Pid"+ Process.myPid()+
                        "服務Pid="+ mRemoteService.getPid() +
                        ", 橫坐標 = "+ myData.getWidth() +
                        ", 縱坐標="+ myData.getHeigth();
            } catch (RemoteException e) {
                e.printStackTrace();
            }
            Log.i(TAG, "[Client] onServiceConnected  "+pidInfo);
            mTv.setText(pidInfo);
            Toast.makeText(MainActivity.this, "綁定上了哦", Toast.LENGTH_SHORT).show();
        }
        @Override
        public void onServiceDisconnected(ComponentName name) {
            //正常順序默認不調用意外情況銷毀調用
            Log.i(TAG, "[Client] onServiceDisconnected");
            mTv.setText("服務與客戶端斷開");
            mRemoteService = null;
            Toast.makeText(MainActivity.this, "已經斷開服務", Toast.LENGTH_SHORT).show();
        }
    };
    public void clickButton(View view){
        switch (view.getId()){
            case R.id.btn_bind:
                bindRemoteService();
                break;
            case R.id.btn_unbind:
                unbindRemoteService();
                break;
            case R.id.btn_kill:
                killRemoteService();
                break;
        }
    }
//綁定遠程服務
    private void bindRemoteService(){
        Log.i(TAG, "[Client] bindRemoteService");
        Intent intent = new Intent(MainActivity.this, RemoteService.class);
        intent.setAction("com.ljs.adiltestAction");
        intent.setPackage(getPackageName());//Android5.0不允許直接隱式啟動,需要加包名
        bindService(intent, mConnection, Context.BIND_AUTO_CREATE);
        mIsBound = true;
        mTv.setText("開始綁定服務");
    }
    //解除綁定
    private void unbindRemoteService(){
        Log.i(TAG, "[Client] unbindRemoteService ==>");
        if(!mIsBound){
            Toast.makeText(MainActivity.this, "不需要解綁已經沒有綁定服務", Toast.LENGTH_SHORT).show();
            return;
        }
        unbindService(mConnection);
        mIsBound = false;
        mTv.setText("解除綁定服務");
    }
    //kill遠程服務
    private void killRemoteService(){
        Log.i(TAG, "[Client] killRemoteService");
        try {
            android.os.Process.killProcess(mRemoteService.getPid());
            mTv.setText("Kill掉遠程服務所在進程");
            Toast.makeText(MainActivity.this, "遠程服務殺掉了哦", Toast.LENGTH_SHORT).show();
        } catch (RemoteException e) {
            e.printStackTrace();
            Toast.makeText(MainActivity.this, "服務進程不存在,殺死服務進程失敗", Toast.LENGTH_SHORT).show();

        }
    }
}

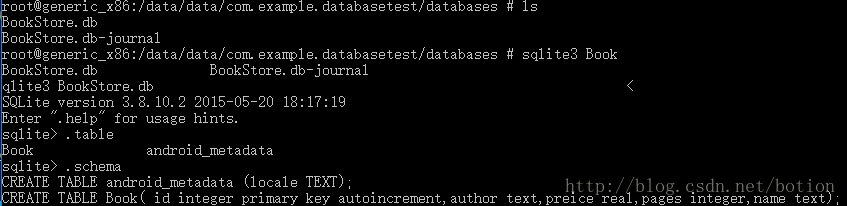
Client下順序

 2570-2570/com.ljs.aidltest I/Client: [Client] onCreate
 2570-2570/com.ljs.aidltest I/Client: [Client] bindRemoteService
 2570-2570/com.ljs.aidltest I/Client: [Client] onServiceConnected  客戶端Pid2570服務Pid=3579, 橫坐標 = 31, 縱坐標=8
 2570-2570/com.ljs.aidltest I/Client: [Client] unbindRemoteService ==>
 2570-2570/com.ljs.aidltest I/Client: [Client] killRemoteService

server下順序

3579-3579/com.ljs.aidltest:Remoteserver I/Server: [server] onCreate
3579-3579/com.ljs.aidltest:Remoteserver I/Server: [server] onBind
3579-3592/com.ljs.aidltest:Remoteserver I/Server: [server] getMyData()  width = 31, heigth=8
3579-3591/com.ljs.aidltest:Remoteserver I/Server: [server] getPid()=3579
 3579-3579/com.ljs.aidltest:Remoteserver I/Server: [server] onUnbind
3579-3579/com.ljs.aidltest:Remoteserver I/Server: [server] onDestroy
https://github.com/anderson9/AIDLnewDemo
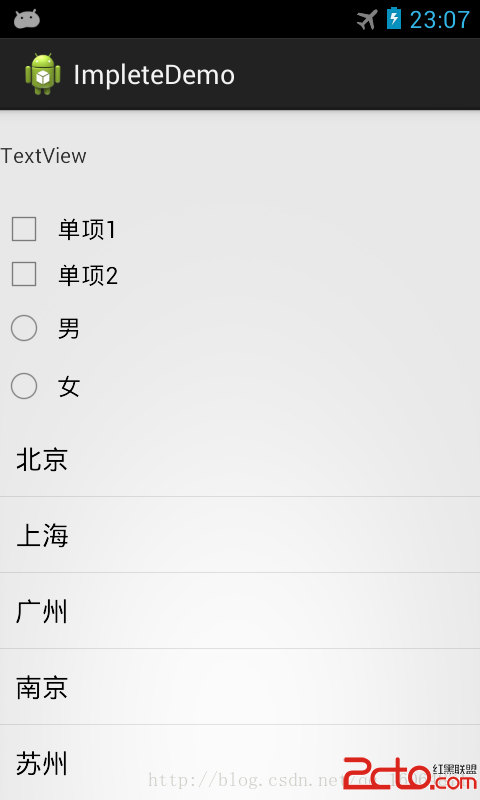 Android 常用控件接口監聽
Android控件監聽方面,用接口實現監聽是最好的,在Android 本身就提供了各種控件監聽接口,我們只要按照這樣實現,看起來代碼會很整潔。實現的效果也是很
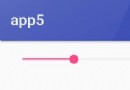 Android控件SeekBar仿淘寶滑動驗證效果
SeekBar是一個拖動條控件,最簡單的案例就是我們的調節音量,還有音頻視頻的播放,傳統的SeekBar樣式,如圖傳統的實現太簡單,不足以讓我們到能裝逼的地步。本來是打算
 android 通過代碼改變控件的布局方式
在很多情況下當我們在xml中布局的方式並不能滿足我們的要求,而這時我們就需要通過在代碼中控制控件的布局 根據不同的條件來控制布局。首先來了解一下安卓中的一些單位 dip:
 Android基礎入門教程——8.3.7 Paint API之—— Xfermode與PorterDuff詳解(四)
本節引言: 上節我們寫了關於Xfermode與PorterDuff使用的第一個例子:圓角&圓形圖片ImageView的實現, 我們體會到了