編輯:關於Android編程
在這裡說過AppBarLayout可以分為可滑出和不可滑出上下2部分,其實細致一點可以分三部分,如下圖所示,下滑最後出現(part 1),下滑立刻出現(part2),無法滑出(part3),其中part1和2合起來就是可以滑出的部分。

xml代碼如下
主要關注layout_scrollFlags,可以看到part3無scroll標志,代表無法滾出;part2是scroll|enterAlways代表下滑立刻出現;part1是scroll下滑的時候最後出現。
為什麼會這樣,主要和mDownPreScrollRange、mDownScrollRange有關,可以看下邊代碼。mDownPreScrollRange控制著嵌套滑動的父view的onNestedPreScroll部分可滑距離,mDownScrollRange控制著嵌套滑動的父view的onNestedScroll部分。
//AppBarLayout
    /**
     * Return the scroll range when scrolling down from a nested pre-scroll.
     */
    private int getDownNestedPreScrollRange() {
        if (mDownPreScrollRange != INVALID_SCROLL_RANGE) {
            // If we already have a valid value, return it
            return mDownPreScrollRange;
        }

        int range = 0;
        for (int i = getChildCount() - 1; i >= 0; i--) {
            final View child = getChildAt(i);
            final LayoutParams lp = (LayoutParams) child.getLayoutParams();
            final int childHeight = child.getMeasuredHeight();
            final int flags = lp.mScrollFlags;

            if ((flags & LayoutParams.FLAG_QUICK_RETURN) == LayoutParams.FLAG_QUICK_RETURN) {
                // First take the margin into account
                range += lp.topMargin + lp.bottomMargin;
                // The view has the quick return flag combination...
                if ((flags & LayoutParams.SCROLL_FLAG_ENTER_ALWAYS_COLLAPSED) != 0) {
                    // If they're set to enter collapsed, use the minimum height
                    range += ViewCompat.getMinimumHeight(child);
                } else if ((flags & LayoutParams.SCROLL_FLAG_EXIT_UNTIL_COLLAPSED) != 0) {
                    // Only enter by the amount of the collapsed height
                    range += childHeight - ViewCompat.getMinimumHeight(child);
                } else {
                    // Else use the full height
                    range += childHeight;
                }
            } else if (range > 0) {
                // If we've hit an non-quick return scrollable view, and we've already hit a
                // quick return view, return now
                break;
            }
        }
        return mDownPreScrollRange = Math.max(0, range - getTopInset());
    }

    /**
     * Return the scroll range when scrolling down from a nested scroll.
     */
    private int getDownNestedScrollRange() {
        if (mDownScrollRange != INVALID_SCROLL_RANGE) {
            // If we already have a valid value, return it
            return mDownScrollRange;
        }

        int range = 0;
        for (int i = 0, z = getChildCount(); i < z; i++) {
            final View child = getChildAt(i);
            final LayoutParams lp = (LayoutParams) child.getLayoutParams();
            int childHeight = child.getMeasuredHeight();
            childHeight += lp.topMargin + lp.bottomMargin;

            final int flags = lp.mScrollFlags;

            if ((flags & LayoutParams.SCROLL_FLAG_SCROLL) != 0) {
                // We're set to scroll so add the child's height
                range += childHeight;

                if ((flags & LayoutParams.SCROLL_FLAG_EXIT_UNTIL_COLLAPSED) != 0) {
                    // For a collapsing exit scroll, we to take the collapsed height into account.
                    // We also break the range straight away since later views can't scroll
                    // beneath us
                    range -= ViewCompat.getMinimumHeight(child) + getTopInset();
                    break;
                }
            } else {
                // As soon as a view doesn't have the scroll flag, we end the range calculation.
                // This is because views below can not scroll under a fixed view.
                break;
            }
        }
        return mDownScrollRange = Math.max(0, range);
    }
實際效果如下所示
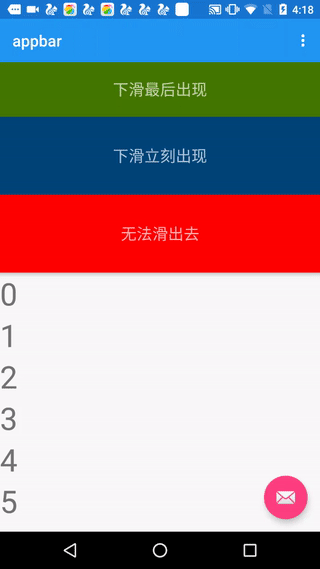
-scroll代表可滾動,被標注後算到mTotalScrollRange裡,要寫其他flag必須先寫scroll才有效
-enterAlways下滑,這個view立刻跑出來,算在mDownPreScrollRange內
-enterAlwaysCollapsed下滑的時候在onNestedPreScroll階段先滑出一個最小高度,這個參數我試了下都存在一定問題,沒找到一個合適的場景。用enterAlwaysCollapsed必須先寫 scroll和enterAlways
-exitUntilCollapsed 向上滾動直到折疊,往往用於CollapsingToolbarLayout內,後邊會有介紹
 Android Studio適當修改
在Eclipse完成上一個APP,決定轉到Studio2.0來。 這次主要進行的設置是 1、代碼區背景顏色的更改 2、注釋、代碼自動補全快捷鍵設定 3、工具欄自定
 Android xml 深入解析shape
先簡單介紹一下shape的基本屬性:
 自定義控件之滑動按鈕
1.創建一個類繼承viewpublic class MyToggleButton extends View { private static final String N
 安卓Andriod使用入門(十二)
MainActivity.java代碼:package siso.mycrawler;import android.app.Activity;import android