編輯:關於Android編程
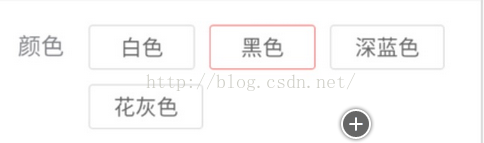
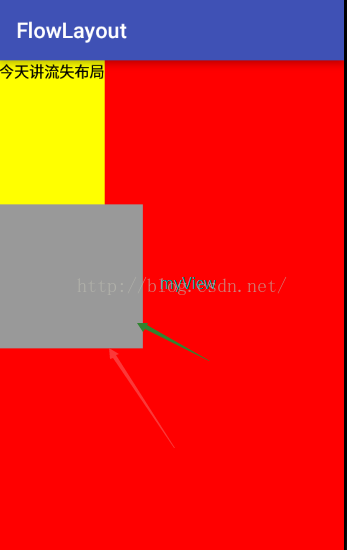
什麼是流式布局呢?也不知道哪個高手把它稱之為流失布局,叫什麼不重要,重要的是要知道怎麼實現,今天就實現下這個功能,先看下圖什麼就知道是什麼是流式布局了,做過電商的app或者網購的人都知道有一個什麼選擇規格(x,xl,ml)so,
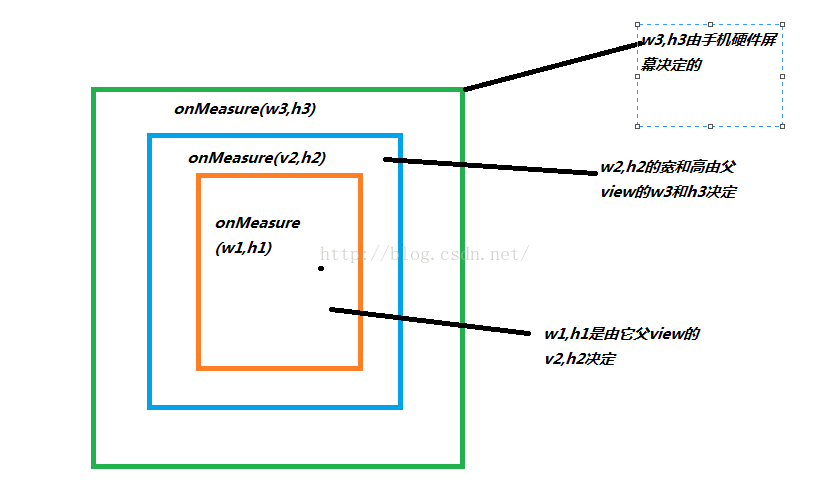
當然這個用其他什麼gridview也能實現,如果大小是一樣的話,如果大小不一樣就不好搞定了,那麼如果使用今天講的流式布局就很好做了,那麼還是一開始並不是直接講這個效果怎麼實現,而是把相關的技術點盡自己的能力講清楚,如果這個懂了,說不定不僅這個流式布局懂了,也許你還懂了其他東西,這就是最好的,這就是為什麼不上來貼代碼的原因,而是花更多的時間把原理講清楚!要實現這個效果,就必須懂view的繪制流程,如圖:
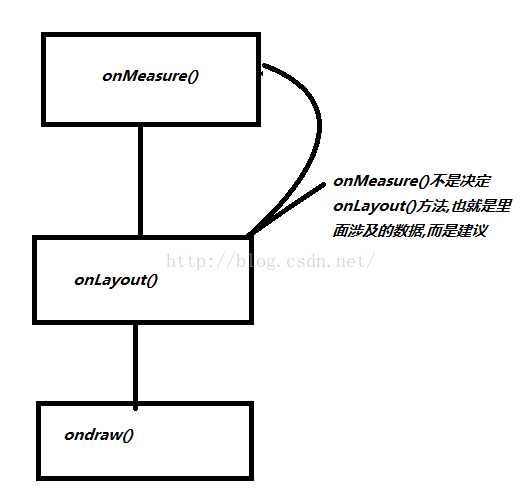
這就是所謂的繪制流程三步驟,打個比方吧,你team叫你把一個控件放到手機屏幕上,那麼要問我要把一個多大的控件放在哪個位置啊,這裡就有二個詞很重要,多大,哪個位置,多大就是onMeasure(),哪個位置就是onLayout(),控件在屏幕上是顯示什麼,這就是內容了也就是onDraw(),
上面的圖說了onMeasure()方法也就是測量控件大小並不是最終的大小,又可能onLayout()方法中改變了view的大小,現在寫個小例子驗證下:
package com.example.flowlayout;
import android.content.Context;
import android.util.AttributeSet;
import android.widget.LinearLayout;
/**
 * Created by admin on 2016/6/13.
 */
public class MyLinearLayout extends LinearLayout {
    public MyLinearLayout(Context context) {
        this(context,null);
    }
    public MyLinearLayout(Context context, AttributeSet attrs) {
        this(context, attrs,0);
    }
    public MyLinearLayout(Context context, AttributeSet attrs, int defStyleAttr) {
        super(context, attrs, defStyleAttr);
    }

    @Override
    protected void onMeasure(int widthMeasureSpec, int heightMeasureSpec) {
        super.onMeasure(widthMeasureSpec, heightMeasureSpec);
    }
    @Override
    protected void onLayout(boolean changed, int l, int t, int r, int b) {
        super.onLayout(changed, l, t, r, b);
    }
}
效果:
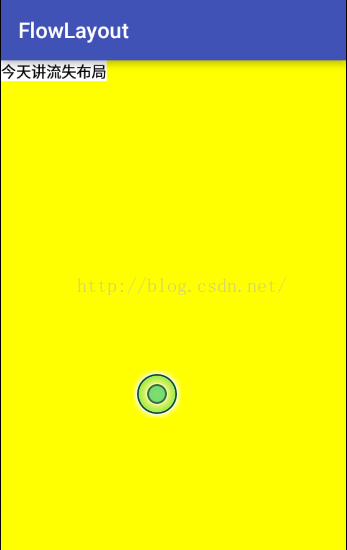
你會發現textview寬和高就是包裹內容,我現在在onLayout()方法中添加幾行代碼:
@Override
protected void onLayout(boolean changed, int l, int t, int r, int b) {
    super.onLayout(changed, l, t, r, b);
    TextView tv = (TextView) getChildAt(0);//獲取MyLinearLayout控件的第一個子view,這個和xml布局是對應的
    tv.layout(0,0,300,300);
}
效果圖:
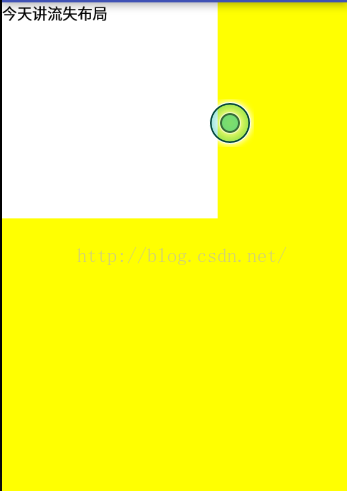
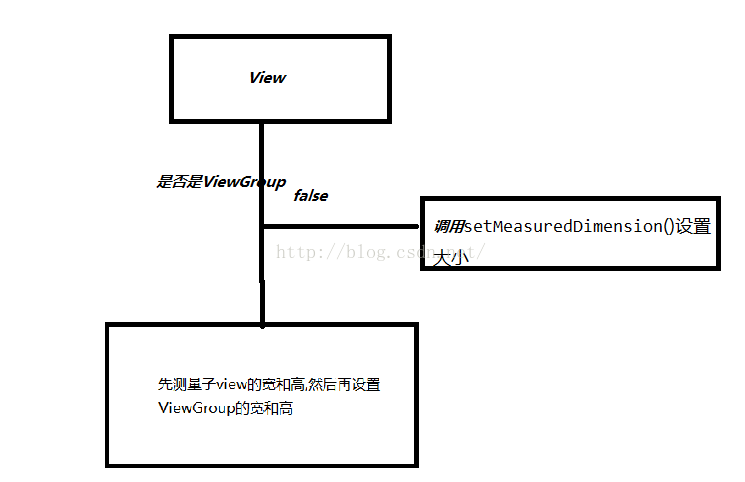
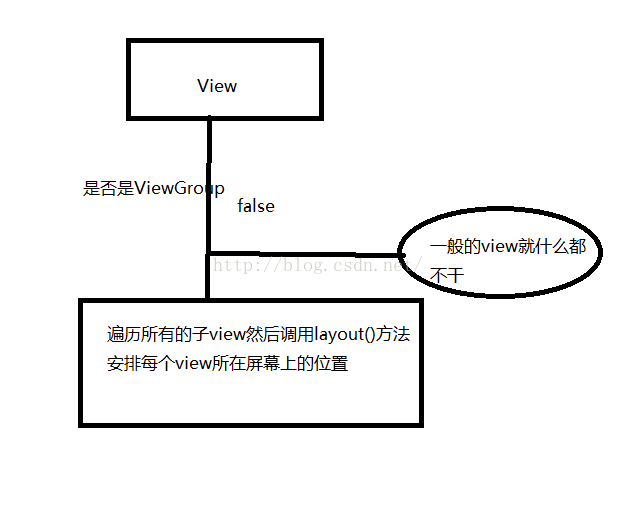
看到textview的寬和高變成了300,300了吧,和之前的內容包裹是不是不一樣了,因為在onLayout()方法中改變了子view的寬和高,按到底這是違背view繪制流程的,但是可以這麼做,我們知道android view有二種,一種是view比如TextView,Button,ImageView,就是不能通過addView(View view)添加子view的,另外還有一種View是ViewGroup,就是存儲view的容器,但是ViewGroup是繼承自View,所以你也可以說android上所有的控件就一種View,
onMeasure()---測量
我們知道繪制流程第一步就是測量,從源碼中發現真正的測量是從measure()方法開始的,這個方法在view中而不是在ViewGroup中,所以剛才在自定義LinearLayout寫的onMeasure()方法也是繼承了View中的onMeasure()方法,那麼先看下View中的measure()方法:
 *
 * @param widthMeasureSpec Horizontal space requirements as imposed by the
 *        parent
 * @param heightMeasureSpec Vertical space requirements as imposed by the
 *        parent
 *
 * @see #onMeasure(int, int)
 */
public final void measure(int widthMeasureSpec, int heightMeasureSpec) {
    boolean optical = isLayoutModeOptical(this);
    if (optical != isLayoutModeOptical(mParent)) {
        Insets insets = getOpticalInsets();
        int oWidth  = insets.left + insets.right;
        int oHeight = insets.top  + insets.bottom;
        widthMeasureSpec  = MeasureSpec.adjust(widthMeasureSpec,  optical ? -oWidth  : oWidth);
        heightMeasureSpec = MeasureSpec.adjust(heightMeasureSpec, optical ? -oHeight : oHeight);
    }

    // Suppress sign extension for the low bytes
    long key = (long) widthMeasureSpec << 32 | (long) heightMeasureSpec & 0xffffffffL;
    if (mMeasureCache == null) mMeasureCache = new LongSparseLongArray(2);

    if ((mPrivateFlags & PFLAG_FORCE_LAYOUT) == PFLAG_FORCE_LAYOUT ||
            widthMeasureSpec != mOldWidthMeasureSpec ||
            heightMeasureSpec != mOldHeightMeasureSpec) {

        // first clears the measured dimension flag
        mPrivateFlags &= ~PFLAG_MEASURED_DIMENSION_SET;

        resolveRtlPropertiesIfNeeded();

        int cacheIndex = (mPrivateFlags & PFLAG_FORCE_LAYOUT) == PFLAG_FORCE_LAYOUT ? -1 :
                mMeasureCache.indexOfKey(key);
        if (cacheIndex < 0 || sIgnoreMeasureCache) {
            // measure ourselves, this should set the measured dimension flag back
            onMeasure(widthMeasureSpec, heightMeasureSpec);//重點
            mPrivateFlags3 &= ~PFLAG3_MEASURE_NEEDED_BEFORE_LAYOUT;
        } else {
            long value = mMeasureCache.valueAt(cacheIndex);
            // Casting a long to int drops the high 32 bits, no mask needed
            setMeasuredDimensionRaw((int) (value >> 32), (int) value);
            mPrivateFlags3 |= PFLAG3_MEASURE_NEEDED_BEFORE_LAYOUT;
        }

        // flag not set, setMeasuredDimension() was not invoked, we raise
        // an exception to warn the developer
        if ((mPrivateFlags & PFLAG_MEASURED_DIMENSION_SET) != PFLAG_MEASURED_DIMENSION_SET) {
            throw new IllegalStateException("View with id " + getId() + ": "
                    + getClass().getName() + "#onMeasure() did not set the"
                    + " measured dimension by calling"
                    + " setMeasuredDimension()");
        }

        mPrivateFlags |= PFLAG_LAYOUT_REQUIRED;
    }

    mOldWidthMeasureSpec = widthMeasureSpec;
    mOldHeightMeasureSpec = heightMeasureSpec;

    mMeasureCache.put(key, ((long) mMeasuredWidth) << 32 |
            (long) mMeasuredHeight & 0xffffffffL); // suppress sign extension
}
從上面方法中的注釋標記了紅色,意思是說水平和豎直空間需要父view提供,記住這個,往下會用到,從上面的measure()方法看到這是用final修飾的,表示子類不能繼承它,也就是說Google讓你不想打破它的測量框架,上面有一個很重要的方法onMeasure(widthMeasureSpec, heightMeasureSpec);一般測量都是繼承這個方法,onMeasure()源碼:
protected void onMeasure(int widthMeasureSpec, int heightMeasureSpec) {
    setMeasuredDimension(getDefaultSize(getSuggestedMinimumWidth(), widthMeasureSpec),
            getDefaultSize(getSuggestedMinimumHeight(), heightMeasureSpec));
}
其實onMeasure()方法中也就是調用了setMeasureDimension()方法,它也是接受2個形參,但是這二個形參確實調用了getDefaultSize()方法,
public static int getDefaultSize(int size, int measureSpec) {
    int result = size; //把size賦值給result
    int specMode = MeasureSpec.getMode(measureSpec);//獲取mode
    int specSize = MeasureSpec.getSize(measureSpec);//獲取size

    switch (specMode) {
    case MeasureSpec.UNSPECIFIED:
        result = size;
        break;
    case MeasureSpec.AT_MOST:
    case MeasureSpec.EXACTLY:
        result = specSize;
        break;
    }
    return result;
}
從上面的形參的字面意思知道第一個形參是大小,第二個形參是測量規范,我是從字面意思翻譯的,因為spec是規范意思,
所以onMeasure()方法中的2個參數就不是一個具體的值,比如不是什麼100,200之類的,其實這100,200是由大小和規范決定的,現在看下getDefaultSize()方法,其中
int specMode = MeasureSpec.getMode(measureSpec);
int specSize = MeasureSpec.getSize(measureSpec);
MeasureSpec類源碼:
public static class MeasureSpec {
    private static final int MODE_SHIFT = 30;
    private static final int MODE_MASK  = 0x3 << MODE_SHIFT;
    public static final int UNSPECIFIED = 0 << MODE_SHIFT;
    public static final int EXACTLY     = 1 << MODE_SHIFT;

    public static final int AT_MOST     = 2 << MODE_SHIFT;
    public static int makeMeasureSpec(int size, int mode) {
        if (sUseBrokenMakeMeasureSpec) {
            return size + mode;
        } else {
            return (size & ~MODE_MASK) | (mode & MODE_MASK);
        }
    }

    public static int makeSafeMeasureSpec(int size, int mode) {
        if (sUseZeroUnspecifiedMeasureSpec && mode == UNSPECIFIED) {
            return 0;
        }
        return makeMeasureSpec(size, mode);
    }

    public static int getMode(int measureSpec) {
        return (measureSpec & MODE_MASK);
    }

    public static int getSize(int measureSpec) {
        return (measureSpec & ~MODE_MASK);
    }

    static int adjust(int measureSpec, int delta) {
        final int mode = getMode(measureSpec);
        int size = getSize(measureSpec);
        if (mode == UNSPECIFIED) {
            // No need to adjust size for UNSPECIFIED mode.
            return makeMeasureSpec(size, UNSPECIFIED);
        }
        size += delta;
        if (size < 0) {
            Log.e(VIEW_LOG_TAG, "MeasureSpec.adjust: new size would be negative! (" + size +
                    ") spec: " + toString(measureSpec) + " delta: " + delta);
            size = 0;
        }
        return makeMeasureSpec(size, mode);
    }

    public static String toString(int measureSpec) {
        int mode = getMode(measureSpec);
        int size = getSize(measureSpec);

        StringBuilder sb = new StringBuilder("MeasureSpec: ");

        if (mode == UNSPECIFIED)
            sb.append("UNSPECIFIED ");
        else if (mode == EXACTLY)
            sb.append("EXACTLY ");
        else if (mode == AT_MOST)
            sb.append("AT_MOST ");
        else
            sb.append(mode).append(" ");

        sb.append(size);
        return sb.toString();
    }
}
上面的幾個常量做一個簡單的介紹
UNSPECIFIED = 0 << MODE_SHIFT(=30)表示向左移30 最後的結果=0
EXACTLY = 1 << MODE_SHIFT表示左移30=1073741824
AT_MOST = 2 << MODE_SHIFT;表示左移30結果=-2147483648
MODE_MASK = 0x3 << MODE_SHIFT表示左移30結果-1073741824
現在看下getMode()的方法:
public static int getMode(int measureSpec) {
    return (measureSpec & MODE_MASK);
}
比如measureSpec=100,那麼getMode()最後返回的值為0,那麼就是UNSPECIFIED
public static int getSize(int measureSpec) {
    return (measureSpec & ~MODE_MASK);
}
getSize()最後的返回的值就是measureSpec傳入的值,
結合上面2個方法以及getDefaultSize()我們總結一個結論
測量最終的值=size+mode
現在講下上面涉及到的三個變量也就是mode,
UNSPECIFIED:
表示視圖按照自己的意願設置成任意的大小,沒有任何限制,這個一般用在ScollerView上
EXACTLY
這個exactly是精確的意思,意思是說父view傳遞給子view的大小是精度的,那麼子view就應該接受父view傳遞給它的值是多少就是多少
AT_MOST
表示子view只能接受指定的大小,不能超過這個指定大小的范圍,就好像是LinearLayout的寬和高是100,而它的子view TextView只能接受最大值為100,不能超過這個100
現在看下之前自定義的LinearLayout中的onMeasure()方法
@Override
protected void onMeasure(int widthMeasureSpec, int heightMeasureSpec) {
    super.onMeasure(widthMeasureSpec, heightMeasureSpec);
    int mode = MeasureSpec.getMode(widthMeasureSpec);
    Log.e(TAG,"mode------------------->"+mode);
}
log:
06-13 06:52:30.088 30004-30004/com.example.flowlayout E/MyLinearLayout: mode------------------->1073741824
把1073741824和上面的幾個分析的常量對比一下發現mode就是EXACTLY,哪為什麼是EXACTLY呢?看下布局文件:
發現MyLinearLayout寬和高都是match_parent,也就是填充父view的大小,它的父view就是RelativeLayout,而這個RelativeLayout的寬和高是讀取手機的屏幕賦值給RelativeLayout的,所以RelativeLayout的寬和高是一個定值,這就是為什麼mode為EXACTLY,如圖:
現在我把布局文件改變下,
現在打印下mode值為
06-13 07:22:11.258 23646-23646/com.example.flowlayout I/MyLinearLayout: mode------------------->-2147483648
這個是不是對應AT_MOST,因為LinearLayout的寬度為wrap_content,它的寬度取決於它孩子view的寬度,所以它不是固定的,那麼你MyLinearLayout就是最大取值反正不能超過父view的寬度就行,從上面的分析可以得出一般的結論:
1:當子view的寬和高設置為wrap_content,父view給它的mode為AT_MOST
2:當子view的高和寬設置為match_parent和確切的值的時候 父view給它的mode為EXACTLY
測量的最終是在setMeasuredDimension(int measuredWidth, int measuredHeight)方法中結束最後的測量過程,因為measuredWidth和measuredHeight都是最終的測量後的寬度和高度,從這個形參也知道後綴沒帶Spec這幾個字母,
在這裡我自定義一個View,
package com.example.flowlayout;
import android.content.Context;
import android.util.AttributeSet;
import android.view.View;
/**
 * Created by admin on 2016/6/13.
 */
public class MyView extends View {
    public MyView(Context context) {
        super(context);
    }
    public MyView(Context context, AttributeSet attrs) {
        super(context, attrs);
    }

    public MyView(Context context, AttributeSet attrs, int defStyleAttr) {
        super(context, attrs, defStyleAttr);
    }

    @Override
    protected void onMeasure(int widthMeasureSpec, int heightMeasureSpec) {
        /**
         * 不調用父view的onMeasure()方法而是直接調用setMeasuredDimension()
         */
//        super.onMeasure(widthMeasureSpec, heightMeasureSpec);
        setMeasuredDimension(200,200);
    }
}
布局文件
我布局文件設置的寬和高都是50px,效果:
發現被騙了一樣,是的布局文件是不能當作最終的view的寬和高,是因為我們在MyView的onMeasure()方法中設置了
setMeasuredDimension(200,200);其實在ViewGroup類中還有一個測量子view的方法
protected void measureChildren(int widthMeasureSpec, int heightMeasureSpec) {
    final int size = mChildrenCount;//子view的總數
    final View[] children = mChildren;//記錄所有的子view(是一個數組)
    for (int i = 0; i < size; ++i) {//遍歷所有的子view
        final View child = children[i];//賦值某一個子view
        if ((child.mViewFlags & VISIBILITY_MASK) != GONE) {//判斷這個View是不是Gone了也就是不可見
            measureChild(child, widthMeasureSpec, heightMeasureSpec);
        }
    }
}
現在看下measureChild()方法源碼:
protected void measureChild(View child, int parentWidthMeasureSpec,
        int parentHeightMeasureSpec) {
    final LayoutParams lp = child.getLayoutParams();

    final int childWidthMeasureSpec = getChildMeasureSpec(parentWidthMeasureSpec,
            mPaddingLeft + mPaddingRight, lp.width);
    final int childHeightMeasureSpec = getChildMeasureSpec(parentHeightMeasureSpec,
            mPaddingTop + mPaddingBottom, lp.height);

    child.measure(childWidthMeasureSpec, childHeightMeasureSpec);
}
上面通過一系列對父view傳遞進來的寬和高計算,最終調用的是子view的measure()方法來最終測量寬和高
在這提一個知識點,就是getMeasuredWidth() getMeasuredHeight()這二個方法,我們只要看其中一個方法源碼就行
public final int getMeasuredHeight() {
    return mMeasuredHeight & MEASURED_SIZE_MASK;
}
mMeasuredHeight這個值是在measure()方法中對進行賦值,而public static final int MEASURED_SIZE_MASK = 0x00ffffff;是一個定值,所以getMeasureHeight()方法是在測量後才能獲取到這個值,好了測量就講到這裡,現在接著講onLayout()方法
onLayout()
研究onLayout()方法首先要先研究下ViewGroup中的layout()方法開始
/**
 * {@inheritDoc}
 */
@Override
public final void layout(int l, int t, int r, int b) {
    if (!mSuppressLayout && (mTransition == null || !mTransition.isChangingLayout())) {
        if (mTransition != null) {
            mTransition.layoutChange(this);
        }
        super.layout(l, t, r, b);//調用父view的layout()方法也就是調用view的layout方法
    } else {
        // record the fact that we noop'd it; request layout when transition finishes
        mLayoutCalledWhileSuppressed = true;
    }
}
發現這個layout()方法也是final修飾的,所以子view不能繼承重寫這個layout()方法,現在看下view的layout()方法
public void layout(int l, int t, int r, int b) {
    if ((mPrivateFlags3 & PFLAG3_MEASURE_NEEDED_BEFORE_LAYOUT) != 0) {
        onMeasure(mOldWidthMeasureSpec, mOldHeightMeasureSpec);//在這裡調用了測量方法
        mPrivateFlags3 &= ~PFLAG3_MEASURE_NEEDED_BEFORE_LAYOUT;
    }

    int oldL = mLeft;
    int oldT = mTop;
    int oldB = mBottom;
    int oldR = mRight;

    boolean changed = isLayoutModeOptical(mParent) ?
            setOpticalFrame(l, t, r, b) : setFrame(l, t, r, b);

    if (changed || (mPrivateFlags & PFLAG_LAYOUT_REQUIRED) == PFLAG_LAYOUT_REQUIRED) {
        onLayout(changed, l, t, r, b);//給繼承了ViewGroup的子類讓它自己去控制view的位置
        mPrivateFlags &= ~PFLAG_LAYOUT_REQUIRED;

        ListenerInfo li = mListenerInfo;
        if (li != null && li.mOnLayoutChangeListeners != null) {
            ArrayList listenersCopy =
                    (ArrayList)li.mOnLayoutChangeListeners.clone();
            int numListeners = listenersCopy.size();
            for (int i = 0; i < numListeners; ++i) {
                listenersCopy.get(i).onLayoutChange(this, l, t, r, b, oldL, oldT, oldR, oldB);
            }
        }
    }

    mPrivateFlags &= ~PFLAG_FORCE_LAYOUT;
    mPrivateFlags3 |= PFLAG3_IS_LAID_OUT;
}
看下onLayout()方法:
protected void onLayout(boolean changed, int left, int top, int right, int bottom) {
}
發現它是一個空方法,哪好了畫圖理解下
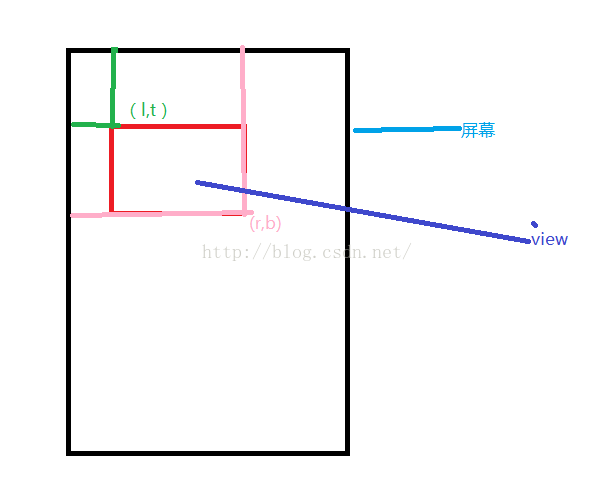
其實view的layout的四個參數其實就是2個坐標點而已,如圖:
package com.example.flowlayout;
import android.content.Context;
import android.graphics.Rect;
import android.util.AttributeSet;
import android.util.DisplayMetrics;
import android.util.Log;
import android.view.MotionEvent;
import android.view.Window;
import android.widget.Button;

/**
 * Created by admin on 2016/6/13.
 */
public class MyView extends Button {
    private static final String TAG ="MyView" ;
    public MyView(Context context) {
        this(context,null);
    }
    public MyView(Context context, AttributeSet attrs) {
        this(context, attrs,0);
    }

    public MyView(Context context, AttributeSet attrs, int defStyleAttr) {
        super(context, attrs, defStyleAttr);
    }

    private float downX = 0;
    private float downY = 0;
    @Override
    public boolean onTouchEvent(MotionEvent event) {
        switch (event.getAction()){
            case MotionEvent.ACTION_DOWN:
                downX = event.getX();
                downY = event.getY();
                break;
            case MotionEvent.ACTION_MOVE:
                float moveX = event.getX();
                float moveY = event.getY();
                int l = getLeft();
                int t = getTop();
                int r = getRight();
                int b =  getBottom();

                int newL = (int) (l+(moveX-downX));
                int newT = (int) (t+(moveY-downY));
                int newR = (int) (r+(moveX-downX));
                int newB = (int) (b+(moveY-downY));
                layout(newL,newT,newR,newB);
                downX = moveX;
                downY = moveY;
                break;
            case MotionEvent.ACTION_UP:
                break;
        }
        return true;
    }
}
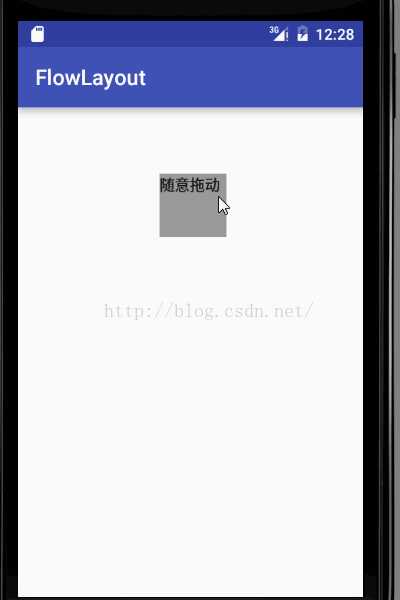
這個是實現在屏幕上隨意拖動
現在講下View的getwidth()和getHeight()方法,直接上源碼
@ViewDebug.ExportedProperty(category = "layout")
public final int getWidth() {
    return mRight - mLeft;
}
widht=mRight-mLeft,從這個簡單的算法中就知道要想一個view通過getWidth()獲取到寬度,必須是onLayout()方法執行後
在這裡忘記了講下onLayout(l,t,r,b)方法中四個參數,其實就是離父view的left,top,right,bottom
布局文件:
在onLayout()方法中打印log;
06-13 12:50:17.293 11451-11451/com.example.flowlayout E/MyLinearLayout: l=10t=10r=110b=110
看出來了吧從log日記中,如圖:
好吧,onLayout()方法就講到這裡了,現在講一個例子引出另外一個技術點
android:layout_width="match_parent"
android:layout_height="match_parent"
android:background="#ffffff"
>
android:layout_height="wrap_content"
android:orientation="horizontal">
android:layout_height="wrap_content"
android:text="阿裡巴巴"
android:background="#ff0000"
android:padding="10dp"
/>
android:layout_height="wrap_content"
android:text="騰訊"
android:background="#ffff00"
android:padding="10dp"
/>
android:layout_height="wrap_content"
android:text="百度"
android:background="#00ff00"
android:padding="10dp"
/>
package com.example.measureviewdemo;
import android.content.Context;
import android.util.AttributeSet;
import android.view.ViewGroup;
public class MyLinearLayout extends ViewGroup {
public MyLinearLayout(Context context, AttributeSet attrs) {
super(context, attrs);
}
public MyLinearLayout(Context context) {
super(context);
}
@Override
protected void onMeasure(int widthMeasureSpec, int heightMeasureSpec) {
super.onMeasure(widthMeasureSpec, heightMeasureSpec);
}
@Override
protected void onLayout(boolean changed, int l, int t, int r, int b) {
}
}
發現MyLinearLayout 是繼承了ViewGroup,裡面什麼邏輯代碼也沒寫,運行起來看有啥
發現叼都沒有,是因為沒有實現onMeasure()和onLayout()方法,因為我是繼承了ViewGroup,現在實現下這個二個方法中的邏輯
@Override
protected void onMeasure(int widthMeasureSpec, int heightMeasureSpec) {
super.onMeasure(widthMeasureSpec, heightMeasureSpec);
int width = 0;
int height=0;
int widthMode = MeasureSpec.getMode(widthMeasureSpec);
int widthSize = MeasureSpec.getSize(widthMeasureSpec);
int heightMode = MeasureSpec.getMode(heightMeasureSpec);
int heightSize = MeasureSpec.getSize(heightMeasureSpec);
int count = getChildCount();//獲取所有的子view
for (int i=0;i
measureChild(view, widthMeasureSpec, heightMeasureSpec); //測量子view
int childWidth = view.getMeasuredWidth(); //測量後獲取子view的寬度
int childHeight = view.getMeasuredHeight();//測量後獲取子view的高度
//得到最大寬度,並且累加高度
height = childHeight;
width+= Math.max(childWidth, width);
}
setMeasuredDimension((widthMode == MeasureSpec.EXACTLY) ? widthSize: width, (heightMode == MeasureSpec.EXACTLY) ? heightSize: height);
}
@Override
protected void onLayout(boolean changed, int l, int t, int r, int b) {
int count = getChildCount();
int viewWidth = 0;//記錄每個子view的寬度累加
for (int i=0;i
int childHeight = child.getMeasuredHeight();
int childWidth = child.getMeasuredWidth();
child.layout(viewWidth, 0, childWidth+viewWidth, childHeight);
viewWidth+=childWidth;
}
}
效果:
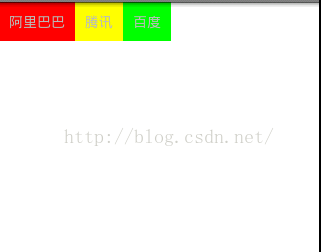
完成的把這三個子view顯示出來了,但是我現在布局文件中對這三個textview添加一個屬性android:layout_marginLeft="20px" 但是你發現運行起來的效果和上面的效果沒任何區別,按到底高度不變,寬度要加3*20也就是width+60呢?
 Android 自定義ListView示例詳解
本文講實現一個自定義列表的Android程序,程序將實現一個使用自定義的適配器(Adapter)綁定 數據,通過contextView.setTag綁定數據有按鈕的Lis
 淺析Android中強大的Dialog
Android中經常會使用到Dialog(彈出框效果),而且功能非常強大,可以模擬出N種彈出框效果。如圖所示:下面將通過一個小實例,來像大家展示Android中功能強大的
 手機進水最佳處理方法
手機能帶給你便捷、歡笑、感動,當然,也會帶給你小小的傷痛,比如,被偷、碎屏,或者掉進水裡——甭管這水是水池、下水道、馬桶還是火鍋,等
 Android源碼解析——LruCache
我認為在寫涉及到數據結構或算法的實現類的源碼解析博客時,不應該急於講它的使用或馬上展開對源碼的解析,而是要先交待一下這個數據結構或算法的資料,了解它的設計,再從它的設計