編輯:關於Android編程
我們的手機通訊錄一般都有這樣的效果,如下圖:
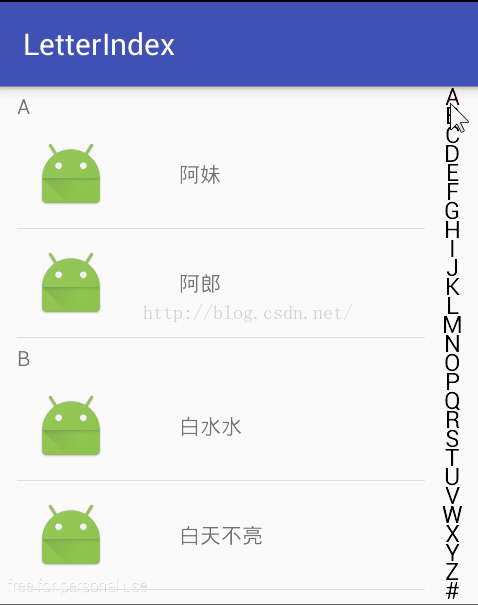
OK,這種效果大家都見得多了,基本上所有的android手機通訊錄都有這樣的效果。那我們今天就來看看這個效果該怎麼實現。
整體上來說,左邊是一個ListView,右邊是一個自定義View,但是左邊的ListView和我們平常使用的ListView還有一點點不同,就是在ListView中我對所有的聯系人進行了分組,那麼這種效果的實現最常見的就是兩種思路:
1.使用ExpandableListView來實現這種分組效果
2.使用普通ListView,在構造Adapter時實現SectionIndexer接口,然後在Adapter中做相應的處理
這兩種方式都不難,都屬於普通控件的使用,那麼這裡我們使用第二種方式來實現,第一種方式的實現方法大家可以自行研究,如果你還不熟悉ExpandableListView的使用,可以參考我的另外兩篇博客:
1.使用ExpandableListView實現一個時光軸
2.android開發之ExpandableListView的使用,實現類似QQ好友列表
OK,這是我們左邊ListView的實現思路,右邊這個東東就是我們今天的主角,這裡我通過自定義一個View來實現,View中的A、B......#這些字符我都通過canvas的drawText方法繪制上去。然後重寫onTouchEvent方法來實現事件監聽。
要實現的效果如上圖所示,但是大家看圖片有些地方可能還不太清楚,所以這裡我再強調一下:
1.左邊的ListView對數據進行分組顯示
2.當左邊ListView滑動的時候,右邊滑動控件中的文字顏色能夠跟隨左邊ListView的滑動自動變化
3.當手指在右邊的滑動控件上滑動時,手指滑動到的地方的文字顏色應當發生變化,同時在整個頁面的正中央有一個TextView顯示手指目前按下的文字
4.當手指按下右邊的滑動控件時,右邊的滑動控件背景變為灰色,手指松開後,右邊的滑動控件又變為透明色
無論多大的工程,我們都要將之分解為一個個細小的功能塊分步來實現,那麼這裡我們就先來看看左邊的ListView的分組的實現,這個效果實現之後,我們再來看看右邊的滑動控件該怎麼實現。
首先我需要在布局文件中添加一個ListView,這個很簡單,和普通的ListView一模一樣,我就不貼代碼了,另外,針對ListView中的數據集,我需要自建一個實體類,該實體類如下:
/**
 * Created by wangsong on 2016/4/24.
 */
public class User {
    private int img;
    private String username;
    private String pinyin;
    private String firstLetter;

    public User() {
    }

    public String getFirstLetter() {
        return firstLetter;
    }

    public void setFirstLetter(String firstLetter) {
        this.firstLetter = firstLetter;
    }

    public int getImg() {
        return img;
    }

    public void setImg(int img) {
        this.img = img;
    }

    public String getPinyin() {
        return pinyin;
    }

    public void setPinyin(String pinyin) {
        this.pinyin = pinyin;
    }

    public String getUsername() {
        return username;
    }

    public void setUsername(String username) {
        this.username = username;
    }

    public User(String firstLetter, int img, String pinyin, String username) {
        this.firstLetter = firstLetter;
        this.img = img;
        this.pinyin = pinyin;
        this.username = username;
    }
}
    private void initData() {
        list = new ArrayList<>();
        String[] allUserNames = getResources().getStringArray(R.array.arrUsernames);
        for (String allUserName : allUserNames) {
            User user = new User();
            user.setUsername(allUserName);
            String convert = ChineseToPinyinHelper.getInstance().getPinyin(allUserName).toUpperCase();
            user.setPinyin(convert);
            String substring = convert.substring(0, 1);
            if (substring.matches("[A-Z]")) {
                user.setFirstLetter(substring);
            }else{
                user.setFirstLetter("#");
            }
            list.add(user);
        }
        Collections.sort(list, new Comparator() {
            @Override
            public int compare(User lhs, User rhs) {
                if (lhs.getFirstLetter().contains("#")) {
                    return 1;
                } else if (rhs.getFirstLetter().contains("#")) {
                    return -1;
                }else{
                    return lhs.getFirstLetter().compareTo(rhs.getFirstLetter());
                }
            }
        });
    }
OK,數據源構造好之後,我還需要對List集合進行一個簡單的排序,那麼這個排序是Java中的操作,我這裡就不再贅述。
構造完數據源之後,接著就該是構造ListView的Adapter了,我們來看看這個怎麼做,先來看看源碼:
/**
 * Created by wangsong on 2016/4/24.
 */
public class MyAdapter extends BaseAdapter implements SectionIndexer {
    private List list;
    private Context context;
    private LayoutInflater inflater;

    public MyAdapter(Context context, List list) {
        this.context = context;
        this.list = list;
        inflater = LayoutInflater.from(context);
    }

    @Override
    public int getCount() {
        return list.size();
    }

    @Override
    public Object getItem(int position) {
        return list.get(position);
    }

    @Override
    public long getItemId(int position) {
        return position;
    }

    @Override
    public View getView(int position, View convertView, ViewGroup parent) {
        ViewHolder holder;
        if (convertView == null) {
            convertView = inflater.inflate(R.layout.listview_item, null);
            holder = new ViewHolder();
            holder.showLetter = (TextView) convertView.findViewById(R.id.show_letter);
            holder.username = (TextView) convertView.findViewById(R.id.username);
            convertView.setTag(holder);
        } else {
            holder = (ViewHolder) convertView.getTag();
        }
        User user = list.get(position);
        holder.username.setText(user.getUsername());
        //獲得當前position是屬於哪個分組
        int sectionForPosition = getSectionForPosition(position);
        //獲得該分組第一項的position
        int positionForSection = getPositionForSection(sectionForPosition);
        //查看當前position是不是當前item所在分組的第一個item
        //如果是,則顯示showLetter,否則隱藏
        if (position == positionForSection) {
            holder.showLetter.setVisibility(View.VISIBLE);
            holder.showLetter.setText(user.getFirstLetter());
        } else {
            holder.showLetter.setVisibility(View.GONE);
        }
        return convertView;
    }

    @Override
    public Object[] getSections() {
        return new Object[0];
    }

    //傳入一個分組值[A....Z],獲得該分組的第一項的position
    @Override
    public int getPositionForSection(int sectionIndex) {
        for (int i = 0; i < list.size(); i++) {
            if (list.get(i).getFirstLetter().charAt(0) == sectionIndex) {
                return i;
            }
        }
        return -1;
    }

    //傳入一個position,獲得該position所在的分組
    @Override
    public int getSectionForPosition(int position) {
        return list.get(position).getFirstLetter().charAt(0);
    }

    class ViewHolder {
        TextView username, showLetter;
    }
}
1.getPositionForSection(int sectionIndex)
這個方法接收一個int類型的參數,該參數實際上就是指我們的分組,我們在這裡傳入分組的值【A.....Z】,然後我們在方法中通過自己的計算,返回該分組中第一個item的position。
2.getSectionForPosition(int position)
這個方法接收一個int類型的參數,該參數實際上就是我們的ListView即將要顯示的item的position,我們通過傳入這個position,可以獲得該position的item所屬的分組,然後再將這個分組的值返回。
說了這麼多,大家可能有疑問了,我為什麼要實現這個接口呢?大家來看看我的item的布局文件:
//獲得當前position是屬於哪個分組
        int sectionForPosition = getSectionForPosition(position);
        //獲得該分組第一項的position
        int positionForSection = getPositionForSection(sectionForPosition);
        //查看當前position是不是當前item所在分組的第一個item
        //如果是,則顯示showLetter,否則隱藏
        if (position == positionForSection) {
            holder.showLetter.setVisibility(View.VISIBLE);
            holder.showLetter.setText(user.getFirstLetter());
        } else {
            holder.showLetter.setVisibility(View.GONE);
        }
ListView listView = (ListView) findViewById(R.id.lv);
        MyAdapter adapter = new MyAdapter(this, list);
        listView.setAdapter(adapter);
右邊這個東東很明顯是一個自定義View,那我們就一起來看看這個自定義View吧。
首先這個自定義控件繼承自View,繼承自View,需要實現它裡邊的構造方法,關於這三個構造方法的解釋大家可以查看我的另一篇博客android自定義View之鐘表誕生記,這裡對於構造方法我不再贅述。在這個自定義View中,我需要首先聲明5個變量,如下:
    //當前手指滑動到的位置
    private int choosedPosition = -1;
    //畫文字的畫筆
    private Paint paint;
    //右邊的所有文字
    private String[] letters = new String[]{"A", "B", "C", "D", "E", "F", "G", "H", "I", "J", "K", "L",
            "M", "N", "O", "P", "Q", "R", "S", "T", "U", "V", "W", "X", "Y", "Z", "#"};
    //頁面正中央的TextView,用來顯示手指當前滑動到的位置的文本
    private TextView textViewDialog;
    //接口變量,該接口主要用來實現當手指在右邊的滑動控件上滑動時ListView能夠跟著滾動
    private UpdateListView updateListView;
public LetterIndexView(Context context, AttributeSet attrs, int defStyleAttr) {
        super(context, attrs, defStyleAttr);
        paint = new Paint();
        paint.setAntiAlias(true);
        paint.setTextSize(24);
    }
准備工作做完之後,接下來就是onDraw了,代碼如下:
    @Override
    protected void onDraw(Canvas canvas) {
        int perTextHeight = getHeight() / letters.length;
        for (int i = 0; i < letters.length; i++) {
            if (i == choosedPosition) {
                paint.setColor(Color.RED);
            } else {
                paint.setColor(Color.BLACK);
            }
            canvas.drawText(letters[i], (getWidth() - paint.measureText(letters[i])) / 2, (i + 1) * perTextHeight, paint);
        }
    }
繪制完成之後,就是重寫onTouchEvent了,如下:
    @Override
    public boolean onTouchEvent(MotionEvent event) {
        int perTextHeight = getHeight() / letters.length;
        float y = event.getY();
        int currentPosition = (int) (y / perTextHeight);
        String letter = letters[currentPosition];
        switch (event.getAction()) {
            case MotionEvent.ACTION_UP:
                setBackgroundColor(Color.TRANSPARENT);
                if (textViewDialog != null) {
                    textViewDialog.setVisibility(View.GONE);
                }
                break;
            default:
                setBackgroundColor(Color.parseColor("#cccccc"));
                if (currentPosition > -1 && currentPosition < letters.length) {
                    if (textViewDialog != null) {
                        textViewDialog.setVisibility(View.VISIBLE);
                        textViewDialog.setText(letter);
                    }
                    if (updateListView != null) {
                        updateListView.updateListView(letter);
                    }
                    choosedPosition = currentPosition;
                }
                break;
        }
        invalidate();
        return true;
    }
    public void updateLetterIndexView(int currentChar) {
        for (int i = 0; i < letters.length; i++) {
            if (currentChar == letters[i].charAt(0)) {
                choosedPosition = i;
                invalidate();
                break;
            }
        }
    }
TextView textView = (TextView) findViewById(R.id.show_letter_in_center);
        final LetterIndexView letterIndexView = (LetterIndexView) findViewById(R.id.letter_index_view);
        letterIndexView.setTextViewDialog(textView);
        letterIndexView.setUpdateListView(new LetterIndexView.UpdateListView() {
            @Override
            public void updateListView(String currentChar) {
                int positionForSection = adapter.getPositionForSection(currentChar.charAt(0));
                listView.setSelection(positionForSection);
            }
        });
        listView.setOnScrollListener(new AbsListView.OnScrollListener() {
            @Override
            public void onScrollStateChanged(AbsListView view, int scrollState) {

            }

            @Override
            public void onScroll(AbsListView view, int firstVisibleItem, int visibleItemCount, int totalItemCount) {
                int sectionForPosition = adapter.getSectionForPosition(firstVisibleItem);
                letterIndexView.updateLetterIndexView(sectionForPosition);
            }
        });
以上。
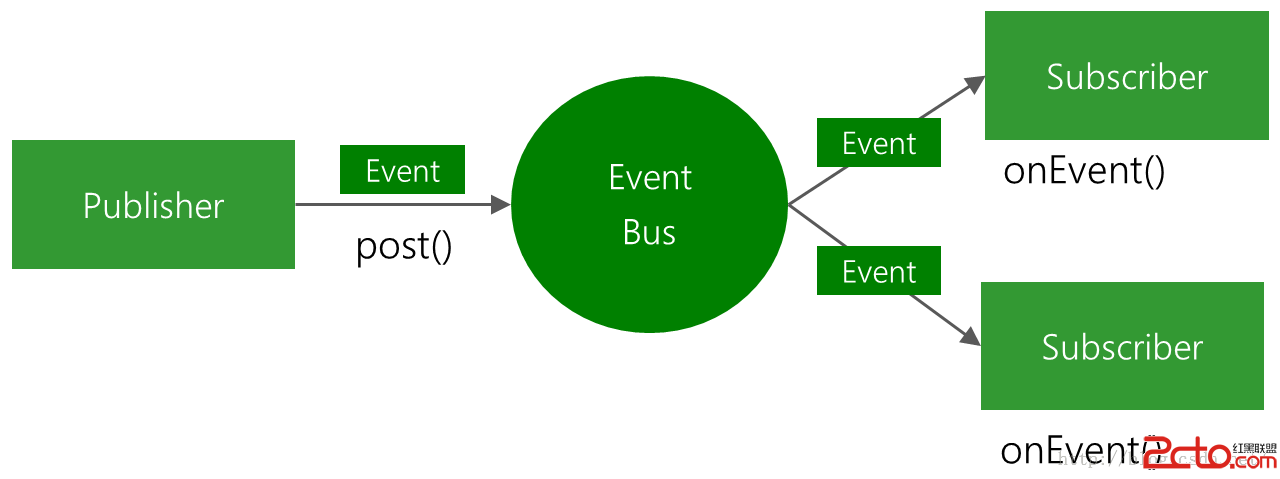 消息總線EventBus的基本使用(二十)
(一).前言:今天我們的項目繼續更新,今天我們主要講解消息總線EventBus的基本使用方法,後面一篇我們會從源碼的角度稍微分析一下實現過程。Fa
 Android ListView的item背景色設置
1.如何改變item的背景色和按下顏色 listview默認情況下,item的背景色是黑色,在用戶點擊時是黃色的。如果需要修改為自定義的背景顏色,一般情況下有三種
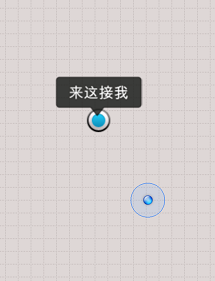 Android百度定位導航之基於百度地圖移動獲取位置和自動定位
一、問題描述使用百度地圖實現如圖所示應用,首先自動定位當前我起始位置(小圓點位置),並跟隨移動不斷自動定位我的當前位置百度Api不同版本使用會有些差異,本例中加入lib如
 android UI進階之android中隱藏的layout 抽屜的使用方法
最近在寫一個應用,想把設置頁面和應用頁面放在一起,這樣就能實現用戶可以實時看到自己的設置對UI的影響,從而更方便的設置用戶喜歡的界面。想了一段時間,發現用slidingD