編輯:關於Android編程
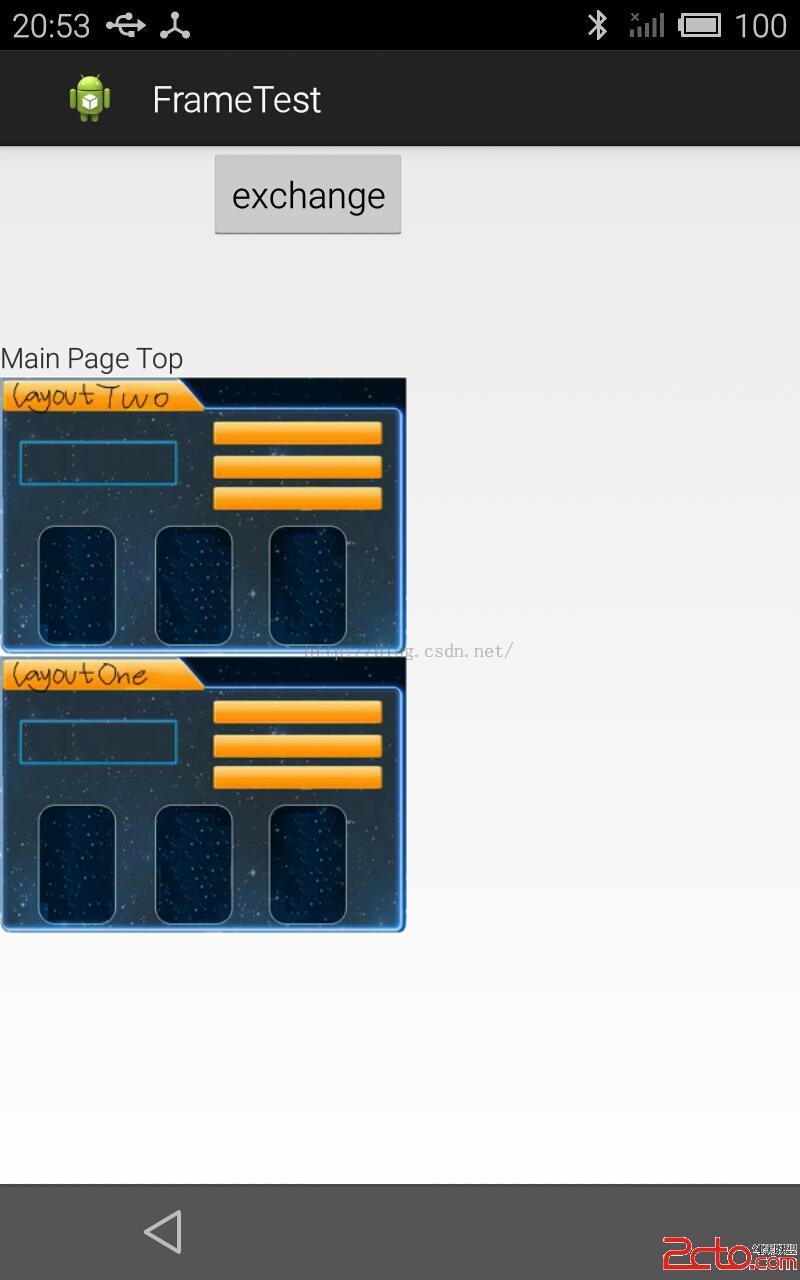
現需要交換兩個控件(本文中是兩個RelativeLayout),找到了兩個方法:
1、使用LayoutParams改變兩個layout的屬性,即其相對關系(below等),實現位置的交換,但是並沒有交換的動畫效果,是“瞬間”交換。
2、使用animation交換控件位置,實現了我需要的動畫效果。
如下圖,交換layoutOne 與layoutTwo 。
一、首先介紹使用LayoutParams的方法。
package com.exchange;

import com.exchange.R;

import android.app.Activity;
import android.os.Bundle;
import android.view.LayoutInflater;
import android.view.View;
import android.view.View.OnClickListener;
import android.widget.Button;
import android.widget.RelativeLayout;
import android.widget.Toast;

/*
 * Exchange layout with LayoutParams
 * Author : likun@stu.zzu.edu.cn
 * Date: 2015/7/15
 */
public class ParamsExchangeActivity extends Activity {

	private Button btnEx;
	private LayoutInflater inflater;
	private RelativeLayout myFirst,mySecond,layoutOne,layoutTwo;

	//set controls' id , the id is random as you like , do NOT use zero
	private int btnExId = 11;
	private int layoutOneId	  = 12;
	private int layoutTwoId   = 13;

	//exchange flag , in order to swap back and forth
	private boolean TAG_firstLayoutTop;


    @Override
    public void onCreate(Bundle savedInstanceState) {
        super.onCreate(savedInstanceState);
        setContentView(R.layout.layout_main);

        btnEx=(Button)findViewById(R.id.button_exchange);

        btnEx.setOnClickListener(new BtnExOnClickListener());

        inflater=getLayoutInflater();

        TAG_firstLayoutTop = true;

        //init layoutOne
        myFirst = (RelativeLayout) inflater.inflate(
                R.layout.layout_first, null).findViewById(R.id.myFirst);
        layoutOne = (RelativeLayout)findViewById(R.id.LayoutOne);
        layoutOne.removeAllViews();
        layoutOne.addView(myFirst);

        //init layoutTwo
        mySecond = (RelativeLayout) inflater.inflate(
                R.layout.layout_second, null).findViewById(R.id.mySecond);
        layoutTwo = (RelativeLayout)findViewById(R.id.LayoutTwo);
        layoutTwo.removeAllViews();
        layoutTwo.addView(mySecond);

    }

    public class BtnExOnClickListener implements OnClickListener
    {
    	@Override
    	public void onClick(View v){
    		Toast.makeText(getBaseContext(), exchange!, Toast.LENGTH_SHORT).show();

    		//set id for controls in order to change their Params
    		btnEx.setId(btnExId);
    		layoutOne.setId(layoutOneId);
    		layoutTwo.setId(layoutTwoId);

    		RelativeLayout.LayoutParams params;
    		if(TAG_firstLayoutTop){
    			params = (RelativeLayout.LayoutParams)layoutTwo.getLayoutParams();
    			params.removeRule(RelativeLayout.BELOW);	//remove the exist 'BELOW' rule
    			params.addRule(RelativeLayout.BELOW,11);	//add a new one 'BELOW' rule,below control NO. 11
    			layoutTwo.setLayoutParams(params);

    			params = (RelativeLayout.LayoutParams)layoutOne.getLayoutParams();
    			params.removeRule(RelativeLayout.BELOW);
    			params.addRule(RelativeLayout.BELOW,13);	//below control NO. 13
    			layoutOne.setLayoutParams(params);

    			TAG_firstLayoutTop=false;	// change the flag
    		}else{
    			//vice versa
    			params = (RelativeLayout.LayoutParams)layoutOne.getLayoutParams();
    			params.removeRule(RelativeLayout.BELOW);
    			params.addRule(RelativeLayout.BELOW,11);
    			layoutOne.setLayoutParams(params);

    			params = (RelativeLayout.LayoutParams)layoutTwo.getLayoutParams();
    			params.removeRule(RelativeLayout.BELOW);
    			params.addRule(RelativeLayout.BELOW,12);
    			layoutTwo.setLayoutParams(params);

    			TAG_firstLayoutTop=true;
    		}
    	}

    }
}
二、使用animation交換控件
使用animation交換的方法非常簡單:
    	ObjectAnimator.ofFloat(layoutTwo, TranslationY, -300).setDuration(1000).start();
    	ObjectAnimator.ofFloat(layoutOne, TranslationY, 300).setDuration(1000).start();
package com.exchange;

import android.animation.ObjectAnimator;
import android.app.Activity;
import android.os.Bundle;
import android.view.LayoutInflater;
import android.view.View;
import android.view.View.OnClickListener;
import android.widget.Button;
import android.widget.RelativeLayout;
import android.widget.Toast;

public class AnimExchangeActivity extends Activity {

	private Button btnEx;
	private LayoutInflater inflater;
	private RelativeLayout myFirst,mySecond,layoutOne,layoutTwo;

	private boolean TAG_firstLayoutTop;


    @Override
    public void onCreate(Bundle savedInstanceState) {
        super.onCreate(savedInstanceState);
        setContentView(R.layout.layout_main);

        btnEx=(Button)findViewById(R.id.button_exchange);

        btnEx.setOnClickListener(new BtnExOnClickListener());

        inflater=getLayoutInflater();

        TAG_firstLayoutTop = true;

        //init layoutOne
        myFirst = (RelativeLayout) inflater.inflate(
                R.layout.layout_first, null).findViewById(R.id.myFirst);
        layoutOne = (RelativeLayout)findViewById(R.id.LayoutOne);
        layoutOne.removeAllViews();
        layoutOne.addView(myFirst);

        //init layoutTwo
        mySecond = (RelativeLayout) inflater.inflate(
                R.layout.layout_second, null).findViewById(R.id.mySecond);
        layoutTwo = (RelativeLayout)findViewById(R.id.LayoutTwo);
        layoutTwo.removeAllViews();
        layoutTwo.addView(mySecond);

    }

    public class BtnExOnClickListener implements OnClickListener
    {
    	@Override
    	public void onClick(View v){
    		Toast.makeText(getBaseContext(), exchange!, Toast.LENGTH_SHORT).show();

    		if(TAG_firstLayoutTop){
    			//move upward and downward 300
    			ObjectAnimator.ofFloat(layoutTwo, TranslationY, -300).setDuration(1000).start();
    			ObjectAnimator.ofFloat(layoutOne, TranslationY, 300).setDuration(1000).start();
    			TAG_firstLayoutTop = false;
    		}else{
    			//back to normal position
    			ObjectAnimator.ofFloat(layoutOne, TranslationY, 0).setDuration(1000).start();
    			ObjectAnimator.ofFloat(layoutTwo, TranslationY, 0).setDuration(1000).start();
    			TAG_firstLayoutTop = true;
    		}

    	}

    }
}
 Android 實現沉浸式狀態欄
上一篇文章將Android 實現變色狀態欄我們實現了變色的狀態欄,也介紹了沉浸式狀態欄和透明狀態欄的區別,這篇文章我們實現沉浸式狀態欄。 沉浸式狀態欄的來源就是很多手機用
 詳解Android控件之DatePicker、TimePicker探究
一、DatePicker繼承自FrameLayout類,日期選擇控件的主要功能是向用戶提供包含年、月、日的日期數據並允許用戶對其修改。如果要捕獲用戶修改日期選擇控件中的數
 Android Touch系統簡介(二):實例詳解onInterceptTouchEvent與onTouchEvent的調用過程
上一篇文章主要講述了Android的TouchEvent的分發過程,其中有兩個重要的函數:onInterceptTouchEvent和onTouchEvent,這兩個函數
 Android中使用RecyclerView實現下拉刷新和上拉加載
推薦閱讀:使用RecyclerView添加Header和Footer的方法