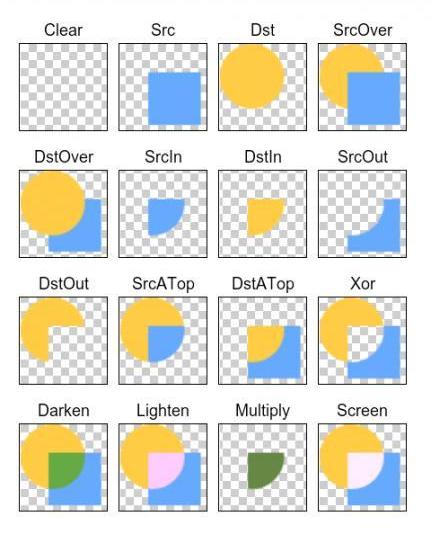
編輯:關於Android編程
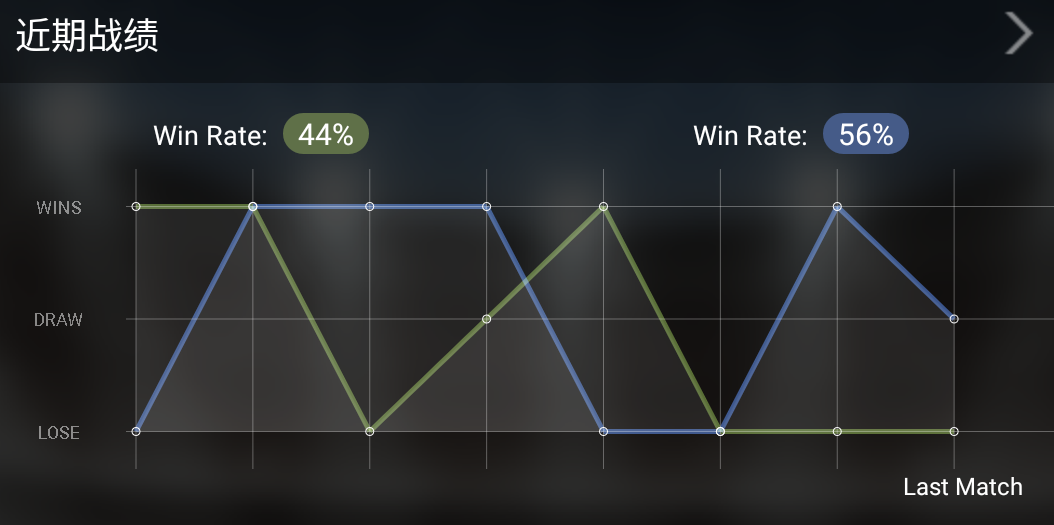
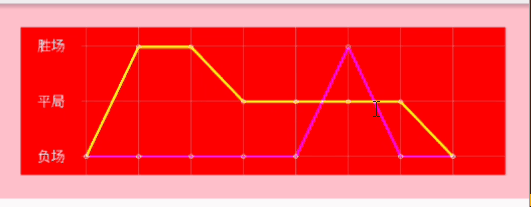
實現一個如下圖所示的折線圖
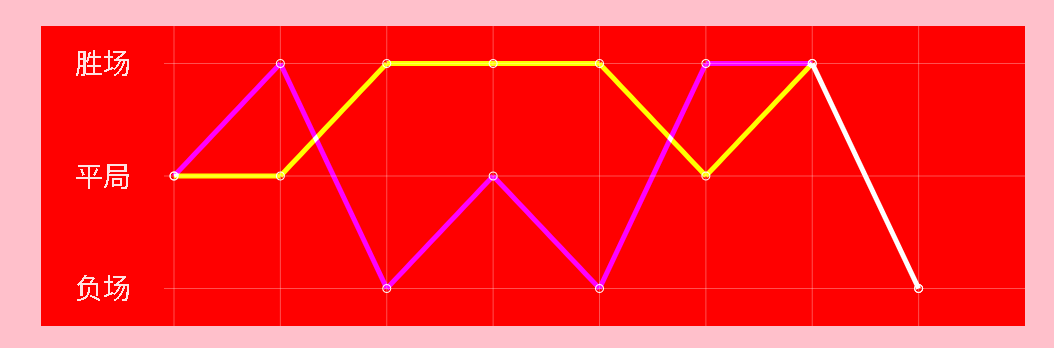
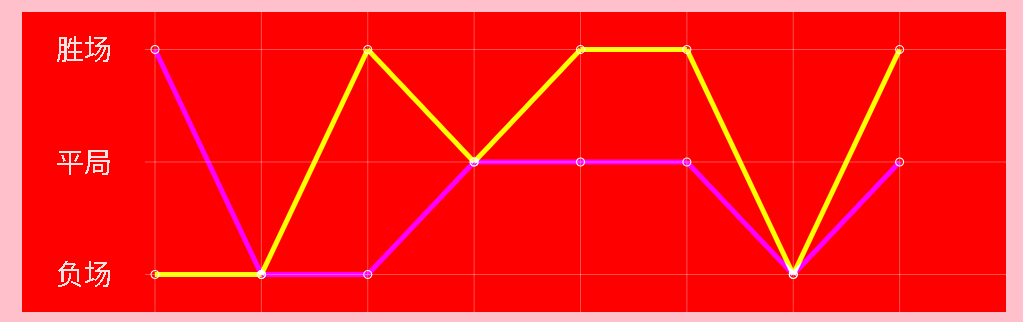
首先是控件繪圖區域的劃分,控件左邊取一小部分(控件總寬度的八分之一)繪制表頭,右邊剩余的部分繪制表格
確定表格的行列數,首先繪制一個三行八列的網格,設置好行列的坐標後開始繪制
/*繪制三條橫線*/ for(int i=0;i<3;i++){ canvas.drawLine(textWide, mLineYs[i], totalWidth, mLineYs[i], mPaintLine); } /*繪制八條豎線*/ for(int i=0;i<8;i++){ canvas.drawLine(mLineXs[i], 0, mLineXs[i], totalHeight, mPaintLine); }
網格繪制完成後,開始繪制折線圖
根據輸入的節點數據,分別繪制兩條折線
通過canvas的drawLine方法依次連接兩點即可
在每個數據節點處繪制一個小圓,突出顯示
/*繪制第一條折線的路徑*/
for (int i = 0; i < mPerformance_1.length - 1; i++) {
    /*折線圖的折線的畫筆設置粗一點*/
    mPaintLine.setStrokeWidth(5);
    /*計算當前節點的坐標值*/
    float prePointX =mLineXs[i];
    float prePointY =mLineYs[2] - (mLineYs[2] - mLineYs[mPerformance_1[i].type]) * animCurrentValue;
    /*計算下一個節點的坐標值*/
    float nextPointX=mLineXs[i + 1];
    float nextPointY=mLineYs[2] - (mLineYs[2] - mLineYs[mPerformance_1[i + 1].type]) * animCurrentValue;
    /*連接當前坐標和下一個坐標,繪制線段*/
    canvas.drawLine(prePointX, prePointY, nextPointX, nextPointY, mPaintLine1);
    /*當前節點坐標處繪制小圓*/
    canvas.drawCircle(prePointX, prePointY, mSmallDotRadius, mPointPaint);
}
兩條折線重合的地方,需要特殊考慮,比如希望兩條折線重合的地方折線變為白色
設置下兩條折線的畫筆即可
mPaintLine2.setXfermode(new PorterDuffXfermode(PorterDuff.Mode.SCREEN));
mPaintLine1.setXfermode(new PorterDuffXfermode(PorterDuff.Mode.SCREEN));
測試代碼及效果;
final Random random=new Random();
final LineChartView myView=(LineChartView)findViewById(R.id.custom_view);
final LineChartView.Performance[] performances1=new LineChartView.Performance[8];
final LineChartView.Performance[] performances2=new LineChartView.Performance[8];
myView.setOnClickListener(new View.OnClickListener(){
    @Override
    public void onClick(View v){
        for(int i=0;ilength;i++){
            switch (random.nextInt(2016)%3){
                case 0:
                    performances1[i]= LineChartView.Performance.WIN;
                    break;
                case 1:
                    performances1[i]= LineChartView.Performance.DRAW;
                    break;
                case 2:
                    performances1[i]= LineChartView.Performance.LOSE;
                    break;
                default:
                    performances1[i]= LineChartView.Performance.LOSE;
                    break;
            }
            switch (random.nextInt(2016)%3){
                case 0:
                    performances2[i]= LineChartView.Performance.WIN;
                    break;
                case 1:
                    performances2[i]= LineChartView.Performance.DRAW;
                    break;
                case 2:
                    performances2[i]= LineChartView.Performance.LOSE;
                    break;
                default:
                    performances1[i]= LineChartView.Performance.LOSE;
                    break;
            }
        }
        myView.setPerformances(performances1,performances2);
    }
});
完整代碼如下:
public class LineChartView extends View {
    private Context context;
    /*動畫插值器*/
    DecelerateInterpolator mDecelerateInterpolator = new DecelerateInterpolator();
    /*動畫刷新的次數*/
    private int mDuration = 10;
    /*當前動畫進度值*/
    private int mCurrentTime = 0;
    private Performance[] mPerformance_1, mPerformance_2;
    /*兩條折線的顏色*/
    private int mLineColor1, mLineColor2;
    /*繪制表頭文字畫筆*/
    private Paint mPaintText = new Paint();
    /*繪制表格的畫筆*/
    private Paint mPaintLine = new Paint();
    /*第一條折線的畫筆*/
    private Paint mPaintLine1 =new Paint();
    /*第二條折線的畫筆*/
    private Paint mPaintLine2 =new Paint();
    /*坐標點的小圓點畫筆*/
    private Paint mPointPaint = new Paint();
    private float mSmallDotRadius = 4;
    private TypedValue typedValue;
    private int mPaintClolor;
    /*Handler刷新界面產生動畫效果*/
    private Handler mHandler = new Handler();
    private Runnable mAnimation = new Runnable() {
        @Override
        public void run() {
            if (mCurrentTime < mDuration) {
                mCurrentTime++;
                LineChartView.this.invalidate();
            }
        }
    };

    public LineChartView(Context context) {
        super(context);
        this.context=context;
        init();
    }

    public LineChartView(Context context, AttributeSet attrs) {
        super(context, attrs);
        this.context=context;
        init();
    }

    public LineChartView(Context context, AttributeSet attrs, int defStyleAttr) {
        super(context, attrs, defStyleAttr);
        this.context=context;
        init();
    }

    public enum Performance {
        WIN(0),
        DRAW(1),
        LOSE(2);
        public int type;
        Performance(int type) {
            this.type = type;
        }
    }

    public void setPerformances(Performance[] performance1, Performance[] performance2) {
        if (performance1 == null) {
            performance1 = new Performance[0];
        }
        if (performance2 == null) {
            performance2 = new Performance[0];
        }
        mPerformance_1 = Arrays.copyOf(performance1, performance1.length > 8 ? 8 : performance1.length);
        mPerformance_2 = Arrays.copyOf(performance2, performance2.length > 8 ? 8 : performance2.length);
        if (isShown()) {
            mCurrentTime = 0;
            this.invalidate();
        }
    }

    /**
     * 設置折線1的顏色
     *
     * @param mLineColor1
     */
    public void setLineColor1(int mLineColor1) {
        this.mLineColor1 = mLineColor1;
    }

    /**
     * 設置折線2的顏色
     *
     * @param mLineColor2
     */
    public void setLineColor2(int mLineColor2) {
        this.mLineColor2 = mLineColor2;
    }

    private void init() {
        mLineColor1=Color.BLUE;
        mLineColor2 = Color.GREEN;
        typedValue=new TypedValue();
        context.getTheme().resolveAttribute(R.attr.title_bar,typedValue,true);
        mPaintClolor =getResources().getColor(typedValue.resourceId);

        final LineChartView.Performance[] performances1=new LineChartView.Performance[8];
        final LineChartView.Performance[] performances2=new LineChartView.Performance[8];
        final Random random=new Random();
        for(int i=0;i
 給Android的APK程序簽名和重新簽名的方法
簽名工具的使用Android源碼編譯出來的signapk.jar既可給apk簽名,也可給rom簽名的。使用格式:java –jar signapk.jar [-w] pu
 Android自定義(三)實現圓盤的百分比設置
最近一直在學習自定義控件,昨天看到群裡有人問如何如何實現圓盤樣式的顯示,學有所用,於是乎就有了這篇博客 先上圖,一目了然 這裡的顯示顏色以及顏色塊的大小你都可以自己設置
 詳解Android N適配要點
Google即將發布的Android7.0的預覽版Android_N為我們增加了許多新的特性,其中包括多窗口的支持、通知欄支持直接回復、網絡數據節省開關、以及新的DOZE
 Android入門之AlertDialog用法實例分析
本文實例講述的是AlertDialog,這種對話框會經常遇到。AlertDialog跟WIN32開發中的Dialog不一樣,AlertDialog是非阻塞的,而阻塞的對話