編輯:關於Android編程
public class ShapeSelectorView extends View {
 // We must provide a constructor that takes a Context and an AttributeSet.
 // This constructor allows the UI to create and edit an instance of your view.
 public ShapeSelectorView(Context context, AttributeSet attrs) {
super(context, attrs);
   }
}
添加視圖到布局中
<RelativeLayout xmlns:android="http://schemas.android.com/apk/res/android"
   xmlns:app="http://schemas.android.com/apk/res-auto"
   xmlns:tools="http://schemas.android.com/tools"
   android:layout_width="match_parent"
   android:layout_height="match_parent" >
   <com.codepath.example.customviewdemo.ShapeSelectorView
android:id="@+id/shapeSelector"
android:layout_width="match_parent"
android:layout_height="match_parent"
android:layout_alignParentRight="true"
android:layout_alignParentTop="true"
android:layout_alignParentLeft="true" />
</RelativeLayout>
接下來我們定義一個命名空間app,這個命名空間允許Android自動解析而不需要指定具體的包名。 自定義屬性 視圖可以通過XML來配置屬性和樣式,你需要想清楚要添加那些自定義的屬性,比如我們想讓用戶可以選擇形狀的顏色、是否顯示形狀的名稱,比如我們想讓視圖可以像下面一樣配置:
<com.codepath.example.customviewdemo.ShapeSelectorView
   app:shapeColor="#7f0000"
   app:displayShapeName="true"
   android:id="@+id/shapeSelector"
   ... />
為了能夠定義shapeColor和displayShapeName,我們需要在res/values/attrs.xml中配置:
<?xml version="1.0" encoding="utf-8"?>
<resources>
  <declare-styleable name="ShapeSelectorView">
      <attr name="shapeColor" format="color" />
      <attr name="displayShapeName" format="boolean" />
  </declare-styleable>
</resources>
對於每個你想自定義的屬性你需要定義attr節點,每個節點有name和format屬性,format屬性是我們期望的值的類型,比如color,dimension,boolean,integer,float等。一旦定義好了屬性,你可以像使用自帶屬性一樣使用他們,唯一的區別在於你的自定義屬性屬於一個不同的命名空間,你可以在根視圖的layout裡面定義命名空間,一般情況下你只需要這樣子指定:http://schemas.android.com/apk/res/<package_name>,但是你可以使用
<?xml version="1.0" encoding="utf-8"?>
<RelativeLayout xmlns:android="http://schemas.android.com/apk/res/android"
   xmlns:tools="http://schemas.android.com/tools"
   xmlns:app="http://schemas.android.com/apk/res-auto"
   android:layout_width="match_parent"
   android:layout_height="match_parent" >
   <com.codepath.example.customviewdemo.ShapeSelectorView
  app:shapeColor="#7f0000"
  app:displayShapeName="true"
  android:id="@+id/shapeSelector"
  android:layout_width="wrap_content"
  android:layout_height="wrap_content"
  android:layout_above="@+id/btnSelect"
  android:layout_alignParentLeft="true"
  android:layout_below="@+id/tvPrompt" />
</RelativeLayout>
應用自定義屬性 在前面我們定義了shapeColor和displayShapeName兩個屬性值,我們需要提取這兩個屬性值來用在自定義的視圖中,可以使用TypedArray和obtainStyledAttributes方法來完成,如下所示:
public class ShapeSelectorView extends View {
 private int shapeColor;
 private boolean displayShapeName;

 public ShapeSelectorView(Context context, AttributeSet attrs) {
   super(context, attrs);
   setupAttributes(attrs);
 }

 private void setupAttributes(AttributeSet attrs) {
   // Obtain a typed array of attributes
   TypedArray a = getContext().getTheme().obtainStyledAttributes(attrs, R.styleable.ShapeSelectorView, 0, 0);
   // Extract custom attributes into member variables
   try {
     shapeColor = a.getColor(R.styleable.ShapeSelectorView_shapeColor, Color.BLACK);
     displayShapeName = a.getBoolean(R.styleable.ShapeSelectorView_displayShapeName, false);
   } finally {
     // TypedArray objects are shared and must be recycled.
     a.recycle();
   }
 }
}
接下來添加一些getter和setter方法:
public class ShapeSelectorView extends View {
 // ...
 public boolean isDisplayingShapeName() {
   return displayShapeName;
 }

 public void setDisplayingShapeName(boolean state) {
   this.displayShapeName = state;
   invalidate();
   requestLayout();
 }

 public int getShapeColor() {
   return shapeColor;
 }

 public void setShapeColor(int color) {
   this.shapeColor = color;
   invalidate();
   requestLayout();
 }
}
當視圖屬性發生改變的時候可能需要重新繪圖,你需要調用invalidate()和requestLayout()來刷新顯示。 畫圖 假設我們要使用前面的屬性畫一個長方形,所有的繪圖都是在onDraw方法裡執行,使用Canvas對象來繪圖,如下所示:
public class ShapeSelectorView extends View {
 // ...
 private int shapeWidth = 100;
 private int shapeHeight = 100;
 private int textXOffset = 0;
 private int textYOffset = 30;
 private Paint paintShape;

 // ...
 public ShapeSelectorView(Context context, AttributeSet attrs) {
   super(context, attrs);
   setupAttributes(attrs);
   setupPaint();
 }

 @Override
 protected void onDraw(Canvas canvas) {
   super.onDraw(canvas);
   canvas.drawRect(0, 0, shapeWidth, shapeHeight, paintShape);
   if (displayShapeName) {
     canvas.drawText("Square", shapeWidth + textXOffset, shapeHeight + textXOffset, paintShape);
   }
 }

 private void setupPaint() {
     paintShape = new Paint();
     paintShape.setStyle(Style.FILL);
     paintShape.setColor(shapeColor);
     paintShape.setTextSize(30);
  }
}
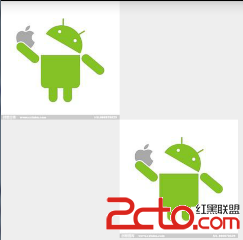
這段代碼就會根據XML裡設置的shapeColor來畫圖,根據displayShapeName屬性來決定是否顯示圖形的名稱,結果如下圖: 更多畫圖的教程可以參考這裡 Custom 2D Drawing Tutorial 計算尺寸 為了更好的理解自定義視圖的寬度和高度,我們需要定義onMeasure方法,這個方法根據視圖的內容來決定它的寬度和高度,在這裡寬度和高度是由形狀和下面的文本決定的,如下所示:
public class ShapeSelectorView extends View {
 @Override
 protected void onMeasure(int widthMeasureSpec, int heightMeasureSpec) {
   // Defines the extra padding for the shape name text
   int textPadding = 10;
   int contentWidth = shapeWidth;

   // Resolve the width based on our minimum and the measure spec
   int minw = contentWidth + getPaddingLeft() + getPaddingRight();
   int w = resolveSizeAndState(minw, widthMeasureSpec, 0);

   // Ask for a height that would let the view get as big as it can
   int minh = shapeHeight + getPaddingBottom() + getPaddingTop();
   if (displayShapeName) {
minh += textYOffset + textPadding;
   }
   int h = resolveSizeAndState(minh, heightMeasureSpec, 0);

   // Calling this method determines the measured width and height
   // Retrieve with getMeasuredWidth or getMeasuredHeight methods later
   setMeasuredDimension(w, h);
 }
}
寬度和高度都是基於MeasureSpec來討論的,一個MeasureSpec封裝了父布局傳遞給子布局的布局要求,每個MeasureSpec代表了一組寬度和高度的要求。一個MeasureSpec由大小和模式組成。它有三種模式:UNSPECIFIED(未指定),父元素未給子元素施加任何束縛,子元素可以得到任意想要的大小;EXACTLY(完全),父元素決定子元素的確切大小,子元素將被限定在給定的邊界裡而忽略它本身大小;AT_MOST(至多),子元素至多達到指定大小的值。resolveSizeAndState()方法根據視圖想要的大小和MeasureSpec返回一個合適的值,最後你需要調用setMeasureDimension()方法生效。 不同形狀之間切換 如果想實現用戶點擊之後改變形狀,需要在onTouchEvent方法裡添加自定義邏輯:
public class ShapeSelectorView extends View {
 // ...
 private String[] shapeValues = { "square", "circle", "triangle" };
 private int currentShapeIndex = 0;

 // Change the currentShapeIndex whenever the shape is clicked
 @Override
 public boolean onTouchEvent(MotionEvent event) {
   boolean result = super.onTouchEvent(event);
   if (event.getAction() == MotionEvent.ACTION_DOWN) {
     currentShapeIndex ++;
     if (currentShapeIndex > (shapeValues.length - 1)) {
currentShapeIndex = 0;
     }
     postInvalidate();
     return true;
   }
   return result;
 }
}
現在不管什麼時候視圖被單擊,選擇的形狀的下標會改變,調用postInvalisate()方法後會顯示一個不同的形狀,接下來更新onDraw()方法來實現更改形狀的邏輯:
public class ShapeSelectorView extends View {
 // ...

 @Override
 protected void onDraw(Canvas canvas) {
   super.onDraw(canvas);
   String shapeSelected = shapeValues[currentShapeIndex];
   if (shapeSelected.equals("square")) {
     canvas.drawRect(0, 0, shapeWidth, shapeHeight, paintShape);
     textXOffset = 0;
   } else if (shapeSelected.equals("circle")) {
     canvas.drawCircle(shapeWidth / 2, shapeHeight / 2, shapeWidth / 2, paintShape);
     textXOffset = 12;
   } else if (shapeSelected.equals("triangle")) {
     canvas.drawPath(getTrianglePath(), paintShape);
     textXOffset = 0;
   }
   if (displayShapeName) {
     canvas.drawText(shapeSelected, 0 + textXOffset, shapeHeight + textYOffset, paintShape);
   }
 }

 protected Path getTrianglePath() {
   Point p1 = new Point(0, shapeHeight), p2 = null, p3 = null;
   p2 = new Point(p1.x + shapeWidth, p1.y);
   p3 = new Point(p1.x + (shapeWidth / 2), p1.y - shapeHeight);
   Path path = new Path();
   path.moveTo(p1.x, p1.y);
   path.lineTo(p2.x, p2.y);
   path.lineTo(p3.x, p3.y);
   return path;
 }

 // ...
}
現在每次點擊都會顯示一個不同的形狀,結果如下: 接下來添加一個獲取形狀的方法:
public class ShapeSelectorView extends View {
 // ...
 // Returns selected shape name
 public String getSelectedShape() {
   return shapeValues[currentShapeIndex];
 }
}
保存視圖的狀態 當配置發生改變的時候(比如屏幕旋轉)視圖需要保存它們的狀態,你可以實現onSaveInstanceState()和onRestoreInstanceState()方法來保存和恢復視圖狀態,如下所示:
public class ShapeSelectorView extends View {
 // This is the view state for this shape selector
 private int currentShapeIndex = 0;

 @Override
 public Parcelable onSaveInstanceState() {
   // Construct bundle
   Bundle bundle = new Bundle();
   // Store base view state
   bundle.putParcelable("instanceState", super.onSaveInstanceState());
   // Save our custom view state to bundle
   bundle.putInt("currentShapeIndex", this.currentShapeIndex);
   // ... store any other custom state here ...
   // Return the bundle
   return bundle;
 }

 @Override
 public void onRestoreInstanceState(Parcelable state) {
   // Checks if the state is the bundle we saved
   if (state instanceof Bundle) {
     Bundle bundle = (Bundle) state;
     // Load back our custom view state
     this.currentShapeIndex = bundle.getInt("currentShapeIndex");
     // ... load any other custom state here ...
     // Load base view state back
     state = bundle.getParcelable("instanceState");
   }
   // Pass base view state on to super
   super.onRestoreInstanceState(state);
 }
}
一旦你實現了這些保存和恢復的邏輯,當手機配置改變的時候你的視圖能夠自動保存狀態。
 Android自定義View之圖形圖像Bitmap
概述:BitMap代表一張位圖,擴展名可以是.bmp或者.dib。位圖是Windows標准格式圖形文件,它將圖像定義為由點(像素)組成,每個點可以由多種色彩表示,包括2、
 Android開發中下拉刷新如何實現
因為最近的開發涉及到了網絡讀取數據,那麼自然少不了的就是下拉刷新的功能,搜索的方法一般是自己去自定義ListView或者RecyclerView來重寫OnTouch或者O
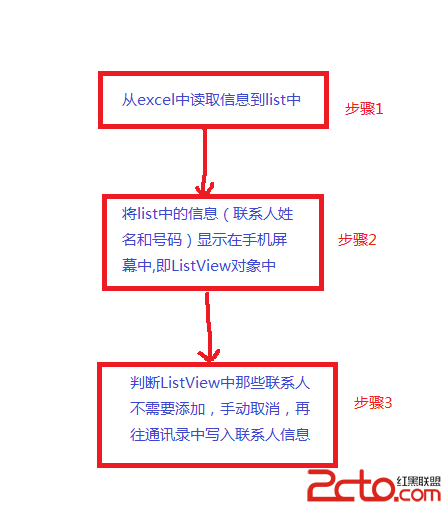 android批量添加聯系人
研究生期間就沒寫過Java代碼了,這幾天由於想做一個統計網頁詞頻的工具,但是使用C++不是很方便,於是又用Java做了一個小工具。翻開電腦中以前的文件,發現之前還做過一個
 androidLayout之layout_weight小解
一.兄弟Layout_height為fill_parent本來准備編寫一款簡單的計算器,來學習android,遇到了多個兄弟Layout區域按照一個比例大小來顯示的技術問