編輯:關於Android編程
在《自己動手寫android圖片異步加載庫》系列的第一篇文章中,主要是學習了使用ReferenceQueue來實現一個內存緩存。在這篇文章中主要是介紹在下載很多圖片是怎麼控制線程和隊列。在這版代碼裡,加入信號量和隊列,可以控制下載任務的順序、可以控制暫停和結束。
代碼A:ImageLoader.java
/**
 * 圖片加載工具類
 *
 * @author qingtian
 * @blog http://blog.csdn.net/bingoSpunky
 */
@SuppressLint(HandlerLeak)
public class ImageLoader {

	private int flag = 0;
	public static int FLAG_FINISHED_INIT_SECOND_THREAD = 0X1;


	private static final int DEFAULT_THREAD_COUNT = 2;
	private static final int SUCCESS = 1;
	private static final int FAILED = 0;

	// config
	public int configLoadingImage;// 正在現在時顯示的圖片id
	public int configFailedImage;// 下載失敗時顯示的資源id
	public Type configType = Type.LIFO;// 隊列的調度方式

	private ExecutorService threadPool;// 線程池
	private Tasks task;// 管理任務的隊列

	// 圖片緩存
	private LruCache cache;

	private Handler mainHandler;// 主線程的handler,修改view

	private Handler secondHandler;//
	private volatile Semaphore secondSemaphore;// 信號量控制第二條線程發送的正在執行且沒執行完的線程的數量==線程池的數量


	public ImageLoader() {
		this(DEFAULT_THREAD_COUNT);
	}

	public ImageLoader(int threadNum) {

		task = new Tasks();

		new Thread() {
			public void run() {
				Looper.prepare();

				secondHandler = new Handler() {
					public void handleMessage(android.os.Message msg) {

						try {
							secondSemaphore.acquire();
						} catch (InterruptedException e) {
							e.printStackTrace();
						}

						threadPool.execute(task.getTask(configType));

					};
				};
				flag |= FLAG_FINISHED_INIT_SECOND_THREAD;
				task.mSemaphore.release();

				Looper.loop();
			};
		}.start();

		mainHandler = new Handler() {

			@Override
			public void handleMessage(Message msg) {
				ImgBeanHolder holder;
				switch (msg.what) {
				case SUCCESS:
					holder = (ImgBeanHolder) msg.obj;
					ImageView imageView = holder.imageView;
					Bitmap bm = holder.bitmap;
					String uri = holder.uri;
					Object tag = imageView.getTag();
					if (holder!=null&&holder.listener != null) {
						if (tag != null && tag.toString().equals(uri)) {
							holder.listener.onSuccess(imageView, true, bm, uri);
						} else {
							holder.listener.onSuccess(imageView, false, bm, uri);
						}
						LogUtils.d(加載失敗    加載圖片    uri:+holder.uri);
					}
					break;
				case FAILED:
					holder = (ImgBeanHolder) msg.obj;
					if (holder.listener != null) {
						holder.listener.onFailed();
						LogUtils.d(加載成功    加載圖片    uri:+holder.uri);
					}
					break;
				}

			}

		};

		threadPool = new ThreadPoolExecutor(threadNum, threadNum, 0,
				TimeUnit.SECONDS, new LinkedBlockingDeque());
		secondSemaphore = new Semaphore(threadNum);

		int maxMemory = (int) Runtime.getRuntime().maxMemory();
		cache = new LruCache(maxMemory / 8) {
			// 測量Bitmap的大小
			@Override
			protected int sizeOf(String key, Bitmap value) {
				return value.getRowBytes() * value.getHeight();
			}
		};

	}

	public void display(ImageView iv, String uri) {
		display(iv, uri, new SimpleImageLoaderListener());
	}

	public void display(final ImageView iv, final String uri,
			final ImageLoaderListener imageLoaderListener)
			throws RuntimeException {

		if (imageLoaderListener == null) {
			throw new RuntimeException(imageLoaderListener不能為空);
		}

		iv.setTag(uri);

		showDefalutImage(iv);

		task.addTask(flag, new Runnable() {
			@Override
			public void run() {

				LogUtils.d(開始    加載圖片    uri:+uri);

				Bitmap bm = cache.get(uri);
				if (bm != null) {
					LogUtils.d(在內存緩存    加載圖片    uri:+uri);
					sendMessageToMainHandler(SUCCESS, bm, iv, uri,
							imageLoaderListener);
				} else {

					ImageSize imageSize = ImageViewUtil.getImageViewWidth(iv);

					LogUtils.d(通過網絡    加載圖片     uri:+uri);
					bm = BitmapUtil.decodeSampledBitmapFromResource(uri,
							imageSize.width, imageSize.height);
					// bm = BitmapUtil.getImageBitmap(uri);

					if (bm != null) {
						cache.put(uri, bm);
						sendMessageToMainHandler(SUCCESS, bm, iv, uri,
								imageLoaderListener);
					} else {
						sendMessageToMainHandler(FAILED, bm, iv, uri,
								imageLoaderListener);
					}

				}
				secondSemaphore.release();
			}
		});
		secondHandler.sendEmptyMessage(0x123);

	}

	@SuppressWarnings(deprecation)
	private static BitmapDrawable mBitmapDrawable = new BitmapDrawable();
	public void showDefalutImage(ImageView iv){
		if (configLoadingImage != 0) {
			iv.setImageResource(configLoadingImage);
		}else{
			iv.setImageDrawable(mBitmapDrawable);
		}
	}

	public void stop() {
		task.stop();
	}

	public void restart() {
		task.start();
	}

	public void cancel() {
		task.cancel();
	}

	/**
	 * 向主線程的handler發送message
	 */
	private void sendMessageToMainHandler(int what, Bitmap bm, ImageView iv,
			String uri, ImageLoaderListener imageLoaderListener) {
		ImgBeanHolder holder = new ImgBeanHolder();
		holder.bitmap = bm;
		holder.imageView = iv;
		holder.uri = uri;
		holder.listener = imageLoaderListener;
		Message msg = Message.obtain();
		msg.what = what;
		msg.obj = holder;
		mainHandler.sendMessage(msg);
	}

	public class ImgBeanHolder {
		Bitmap bitmap;
		ImageView imageView;
		String uri;
		ImageLoaderListener listener;
	}

}
public class Tasks {

	public boolean starting = true;

	public enum Type
	{
		FIFO, LIFO
	}

	/**
	 * 引入一個值為1的信號量,防止mPoolThreadHander未初始化完成
	 */
	public volatile Semaphore mSemaphore = new Semaphore(0);

	/**
	 * 任務隊列
	 */
	private LinkedList mTasks;


	public Tasks() {
		mTasks = new LinkedList();
	}

	public synchronized void addTask(int flag, Runnable runnable) {
		try {
			// 請求信號量,防止mPoolThreadHander為null
			if ((flag & ImageLoader.FLAG_FINISHED_INIT_SECOND_THREAD) == 0)
				mSemaphore.acquire();
		} catch (InterruptedException e) {
			e.printStackTrace();
		}
		mTasks.add(runnable);
	}

	public volatile Semaphore startingSemaphore = new Semaphore(0);
	/**
	 * 取出一個任務
	 */
	public synchronized Runnable getTask(Type type) {
		if(!starting){
			try {
				LogUtils.d(wait());
				wait();
			} catch (InterruptedException e) {
				e.printStackTrace();
			}
		}
		if (type == Type.FIFO) {
			return mTasks.removeFirst();
		} else if (type == Type.LIFO) {
			return mTasks.removeLast();
		}
		return null;
	}

	public synchronized void start(){
		if(!starting){
			starting = true;
			this.notify();
			LogUtils.d(start notify());
		}
	}
	public synchronized void stop(){
		if(starting){
			LogUtils.d(stop());
			starting = false;
		}
	}

	/**
	 * 取消所有任務
	 */
	public synchronized void cancel(){
		mTasks.clear();
	}
}
 Android RenderScript實現高斯模糊
昨天看了下RenderScript的官方文檔,發現RenderScript這厮有點牛逼。無意中發現ScriptIntrinsic這個抽象類,有些很有用的子類。其中有個子類
 android Activity相對布局的使用方法
相對布局要比前面講的線性布局和表格布局要靈活一些,所以平常用得也是比較多的。相對布局控件的位置是與其周圍控件的位置相關的,從名字可以看出來,這些位置都是相對的,確定出了其
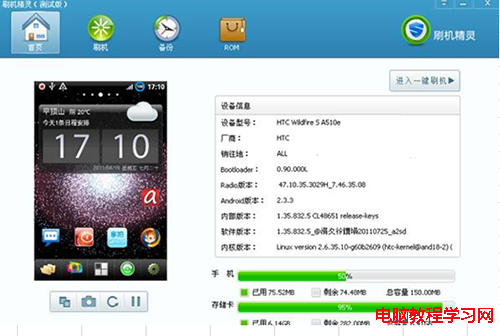 刷機精靈怎麼使用 刷機精靈使用介紹
刷機精靈是Android手機一鍵刷機輔助工具,可以幫助玩家更快速完成刷機操作,很多用戶對刷機精靈的使用不是很了解,那麼刷機精靈應該如何操作呢,一起來和小編
 Android 自定義標題欄背景
設置標題欄背景1> 准備背景圖片: background_pix.png注:用背景圖片比用顏色好處,可以讓背景看起來有凹凸感.2> drawable文件夾下放