編輯:關於Android編程
android開發中,圖片的處理是非常普遍的,經常是需要將用戶選擇的圖片上傳到服務器,但是現在手機的分辨率越來越好了,隨便一張照片都是2M或以上,如果直接顯示到ImageView中,是會出現OOM的,上傳到如服務器也會占用大量的流量,用戶體驗肯定不好了!
下面自己實現了圖片的顯示以及壓縮功能,主要代碼是從Volley的ImageRequest中copy過來,作為工具類方便以後圖片處理
package com.img.util;

import java.io.File;
import java.io.FileNotFoundException;
import java.io.FileOutputStream;
import java.io.OutputStream;

import android.content.Context;
import android.database.Cursor;
import android.graphics.Bitmap;
import android.graphics.BitmapFactory;
import android.graphics.Bitmap.CompressFormat;
import android.net.Uri;
import android.os.Environment;
import android.provider.MediaStore.Images;
import android.util.Log;

/**
 * 圖片壓縮工具類
 *
 * @author Administrator
 *
 */
public class ImageCompress {

	public static final String CONTENT = "content";
	public static final String FILE = "file";

	/**
	 * 圖片壓縮參數
	 *
	 * @author Administrator
	 *
	 */
	public static class CompressOptions {
		public static final int DEFAULT_WIDTH = 400;
		public static final int DEFAULT_HEIGHT = 800;

		public int maxWidth = DEFAULT_WIDTH;
		public int maxHeight = DEFAULT_HEIGHT;
		/**
		 * 壓縮後圖片保存的文件
		 */
		public File destFile;
		/**
		 * 圖片壓縮格式,默認為jpg格式
		 */
		public CompressFormat imgFormat = CompressFormat.JPEG;

		/**
		 * 圖片壓縮比例 默認為30
		 */
		public int quality = 30;

		public Uri uri;
	}

	public Bitmap compressFromUri(Context context,
			CompressOptions compressOptions) {

		// uri指向的文件路徑
		String filePath = getFilePath(context, compressOptions.uri);

		if (null == filePath) {
			return null;
		}

		BitmapFactory.Options options = new BitmapFactory.Options();
		options.inJustDecodeBounds = true;

		Bitmap temp = BitmapFactory.decodeFile(filePath, options);

		int actualWidth = options.outWidth;
		int actualHeight = options.outHeight;

		int desiredWidth = getResizedDimension(compressOptions.maxWidth,
				compressOptions.maxHeight, actualWidth, actualHeight);
		int desiredHeight = getResizedDimension(compressOptions.maxHeight,
				compressOptions.maxWidth, actualHeight, actualWidth);

		options.inJustDecodeBounds = false;
		options.inSampleSize = findBestSampleSize(actualWidth, actualHeight,
				desiredWidth, desiredHeight);

		Bitmap bitmap = null;

		Bitmap destBitmap = BitmapFactory.decodeFile(filePath, options);

		// If necessary, scale down to the maximal acceptable size.
		if (destBitmap.getWidth() > desiredWidth
				|| destBitmap.getHeight() > desiredHeight) {
			bitmap = Bitmap.createScaledBitmap(destBitmap, desiredWidth,
					desiredHeight, true);
			destBitmap.recycle();
		} else {
			bitmap = destBitmap;
		}

		// compress file if need
		if (null != compressOptions.destFile) {
			compressFile(compressOptions, bitmap);
		}

		return bitmap;
	}

	/**
	 * compress file from bitmap with compressOptions
	 *
	 * @param compressOptions
	 * @param bitmap
	 */
	private void compressFile(CompressOptions compressOptions, Bitmap bitmap) {
		OutputStream stream = null;
		try {
			stream = new FileOutputStream(compressOptions.destFile);
		} catch (FileNotFoundException e) {
			Log.e("ImageCompress", e.getMessage());
		}

		bitmap.compress(compressOptions.imgFormat, compressOptions.quality,
				stream);
	}

	private static int findBestSampleSize(int actualWidth, int actualHeight,
			int desiredWidth, int desiredHeight) {
		double wr = (double) actualWidth / desiredWidth;
		double hr = (double) actualHeight / desiredHeight;
		double ratio = Math.min(wr, hr);
		float n = 1.0f;
		while ((n * 2) <= ratio) {
			n *= 2;
		}

		return (int) n;
	}

	private static int getResizedDimension(int maxPrimary, int maxSecondary,
			int actualPrimary, int actualSecondary) {
		// If no dominant value at all, just return the actual.
		if (maxPrimary == 0 && maxSecondary == 0) {
			return actualPrimary;
		}

		// If primary is unspecified, scale primary to match secondary's scaling
		// ratio.
		if (maxPrimary == 0) {
			double ratio = (double) maxSecondary / (double) actualSecondary;
			return (int) (actualPrimary * ratio);
		}

		if (maxSecondary == 0) {
			return maxPrimary;
		}

		double ratio = (double) actualSecondary / (double) actualPrimary;
		int resized = maxPrimary;
		if (resized * ratio > maxSecondary) {
			resized = (int) (maxSecondary / ratio);
		}
		return resized;
	}

	/**
	 * 獲取文件的路徑
	 *
	 * @param scheme
	 * @return
	 */
	private String getFilePath(Context context, Uri uri) {

		String filePath = null;

		if (CONTENT.equalsIgnoreCase(uri.getScheme())) {

			Cursor cursor = context.getContentResolver().query(uri,
					new String[] { Images.Media.DATA }, null, null, null);

			if (null == cursor) {
				return null;
			}

			try {
				if (cursor.moveToNext()) {
					filePath = cursor.getString(cursor
							.getColumnIndex(Images.Media.DATA));
				}
			} finally {
				cursor.close();
			}
		}

		// 從文件中選擇
		if (FILE.equalsIgnoreCase(uri.getScheme())) {
			filePath = uri.getPath();
		}

		return filePath;
	}
}
使用方式:
			ImageCompress compress = new ImageCompress();
			ImageCompress.CompressOptions options = new ImageCompress.CompressOptions();
			options.uri = imgUri;
			options.maxWidth=getWindowManager().getDefaultDisplay().getWidth();
			options.maxHeight=getWindowManager().getDefaultDisplay().getHeight();
			Bitmap bitmap = compress.compressFromUri(this, options);
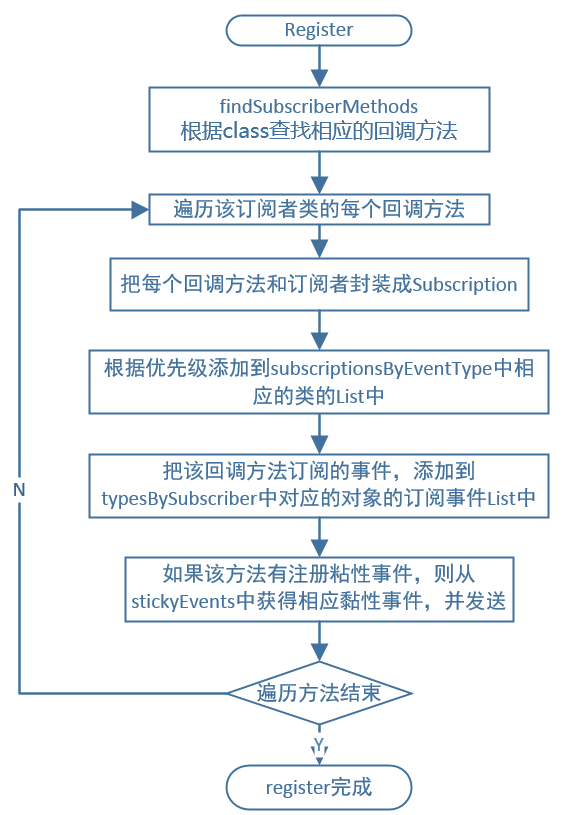 Android事件總線(二)EventBus3.0源碼解析
前言上一篇我們講到了EventBus3.0的用法,這一篇我們來講一下EventBus3.0的源碼以及它的利與弊。1.構造函數當我們要調用EventBus的功能時,比如注冊
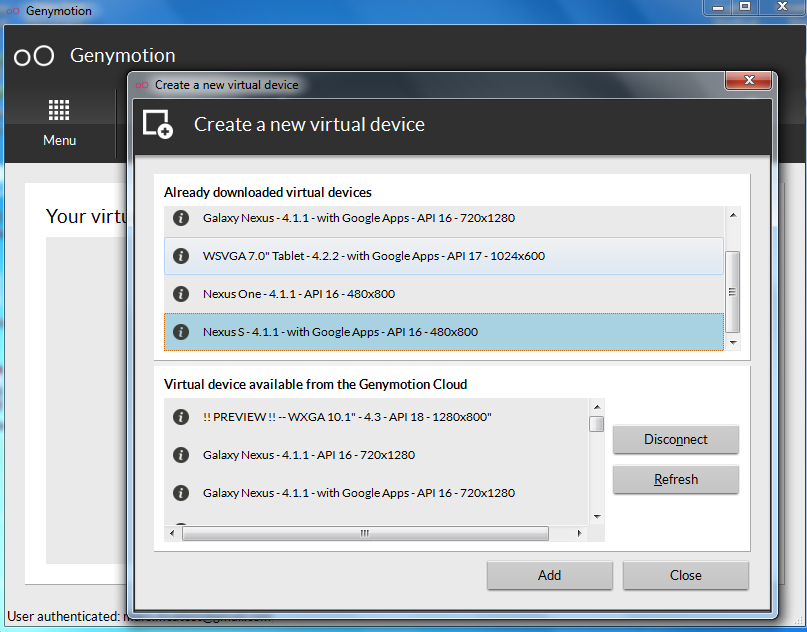 Android開發必備:秒殺真機超快模擬器Genymotion介紹
第一,這貨速度太快,第二,模仿真機環境,第三,秒殺任何Android模擬器包括真機,不多說上圖,我忒忙! 官網:http://www.genymotion.com/鏡像圖
 Android自定義view實現進度條指示效果
先看看效果圖:首先是布局文件<FrameLayout android:layout_width=match_parent android:layout_margin
 安卓自定義View----且看如何巧妙地實現一個類似於電視遙控板的環形按鈕效果(上)
本文力求用最簡單的方式實現這樣的一個效果,並輔以詳細的文字說明。老規矩,先看圖:一個點餐界面,6種菜品,意味著6個按鈕,點擊‘開始點餐’ 幕布上升