編輯:關於Android編程
本文為Android動畫系列的最後一篇文章,通過對源碼的分析,能夠讓大家更深刻地理解屬性動畫的工作原理,這有助於我們更好地使用屬性動畫。但是,由於動畫的底層實現已經深入到jni層,並且涉及到顯示子系統,因此,深入地分析動畫的底層實現不僅比較困難而且意義不大,因此,本文的分析到jni層為止。
Android動畫系列:
android動畫簡介
Android動畫進階—使用開源動畫庫nineoldandroids
Android屬性動畫深入分析:讓你成為動畫牛人
Android源碼分析—屬性動畫的工作原理
屬性動畫要求動畫作用的對象提供該屬性的set方法,屬性動畫根據你傳遞的該熟悉的初始值和最終值,以動畫的效果多次去調用set方法,每次傳遞給set方法的值都不一樣,確切來說是隨著時間的推移,所傳遞的值越來越接近最終值。如果動畫的時候沒有傳遞初始值,那麼還要提供get方法,因為系統要去拿屬性的初始值。對於屬性動畫來說,其動畫過程中所做的就是這麼多,下面看源碼分析。
首先我們要找一個入口,就從ObjectAnimator.ofInt(mButton, width, 500).setDuration(5000).start()開始吧,其他動畫都是類似的。
看ObjectAnimator的start方法
    @Override
    public void start() {
        // See if any of the current active/pending animators need to be canceled
        AnimationHandler handler = sAnimationHandler.get();
        if (handler != null) {
            int numAnims = handler.mAnimations.size();
            for (int i = numAnims - 1; i >= 0; i--) {
                if (handler.mAnimations.get(i) instanceof ObjectAnimator) {
                    ObjectAnimator anim = (ObjectAnimator) handler.mAnimations.get(i);
                    if (anim.mAutoCancel && hasSameTargetAndProperties(anim)) {
                        anim.cancel();
                    }
                }
            }
            numAnims = handler.mPendingAnimations.size();
            for (int i = numAnims - 1; i >= 0; i--) {
                if (handler.mPendingAnimations.get(i) instanceof ObjectAnimator) {
                    ObjectAnimator anim = (ObjectAnimator) handler.mPendingAnimations.get(i);
                    if (anim.mAutoCancel && hasSameTargetAndProperties(anim)) {
                        anim.cancel();
                    }
                }
            }
            numAnims = handler.mDelayedAnims.size();
            for (int i = numAnims - 1; i >= 0; i--) {
                if (handler.mDelayedAnims.get(i) instanceof ObjectAnimator) {
                    ObjectAnimator anim = (ObjectAnimator) handler.mDelayedAnims.get(i);
                    if (anim.mAutoCancel && hasSameTargetAndProperties(anim)) {
                        anim.cancel();
                    }
                }
            }
        }
        if (DBG) {
            Log.d(ObjectAnimator, Anim target, duration:  + mTarget + ,  + getDuration());
            for (int i = 0; i < mValues.length; ++i) {
                PropertyValuesHolder pvh = mValues[i];
                ArrayList keyframes = pvh.mKeyframeSet.mKeyframes;
                Log.d(ObjectAnimator,    Values[ + i + ]:  +
                    pvh.getPropertyName() + ,  + keyframes.get(0).getValue() + ,  +
                    keyframes.get(pvh.mKeyframeSet.mNumKeyframes - 1).getValue());
            }
        }
        super.start();
    }
說明:上面的代碼別看那麼長,其實做的事情很簡單,首先會判斷一下,如果當前動畫、等待的動畫(Pending)和延遲的動畫(Delay)中有和當前動畫相同的動畫,那麼就把相同的動畫給取消掉,接下來那一段是log,再接著就調用了父類的super.start()方法,因為ObjectAnimator繼承了ValueAnimator,所以接下來我們看一下ValueAnimator的Start方法
    private void start(boolean playBackwards) {
        if (Looper.myLooper() == null) {
            throw new AndroidRuntimeException(Animators may only be run on Looper threads);
        }
        mPlayingBackwards = playBackwards;
        mCurrentIteration = 0;
        mPlayingState = STOPPED;
        mStarted = true;
        mStartedDelay = false;
        mPaused = false;
        AnimationHandler animationHandler = getOrCreateAnimationHandler();
        animationHandler.mPendingAnimations.add(this);
        if (mStartDelay == 0) {
            // This sets the initial value of the animation, prior to actually starting it running
            setCurrentPlayTime(0);
            mPlayingState = STOPPED;
            mRunning = true;
            notifyStartListeners();
        }
        animationHandler.start();
    }
說明:上述代碼最終會調用AnimationHandler的start方法,這個AnimationHandler並不是Handler,它是個Runnable。看下它的代碼,通過代碼我們發現,很快就調到了jni層,不過jni層最終還是要調回來的。它的run方法會被調用,這個Runnable涉及到和底層的交互,我們就忽略這部分,直接看重點:ValueAnimator中的doAnimationFrame方法
    final boolean doAnimationFrame(long frameTime) {
        if (mPlayingState == STOPPED) {
            mPlayingState = RUNNING;
            if (mSeekTime < 0) {
                mStartTime = frameTime;
            } else {
                mStartTime = frameTime - mSeekTime;
                // Now that we're playing, reset the seek time
                mSeekTime = -1;
            }
        }
        if (mPaused) {
            if (mPauseTime < 0) {
                mPauseTime = frameTime;
            }
            return false;
        } else if (mResumed) {
            mResumed = false;
            if (mPauseTime > 0) {
                // Offset by the duration that the animation was paused
                mStartTime += (frameTime - mPauseTime);
            }
        }
        // The frame time might be before the start time during the first frame of
        // an animation.  The current time must always be on or after the start
        // time to avoid animating frames at negative time intervals.  In practice, this
        // is very rare and only happens when seeking backwards.
        final long currentTime = Math.max(frameTime, mStartTime);
        return animationFrame(currentTime);
    }
注意到上述代碼末尾調用了animationFrame方法,而animationFrame內部調用了animateValue,下面看animateValue的代碼
    void animateValue(float fraction) {
        fraction = mInterpolator.getInterpolation(fraction);
        mCurrentFraction = fraction;
        int numValues = mValues.length;
        for (int i = 0; i < numValues; ++i) {
            mValues[i].calculateValue(fraction);
        }
        if (mUpdateListeners != null) {
            int numListeners = mUpdateListeners.size();
            for (int i = 0; i < numListeners; ++i) {
                mUpdateListeners.get(i).onAnimationUpdate(this);
            }
        }
    }
上述代碼中的calculateValue方法就是計算每幀動畫所對應的屬性的值,下面著重看一下到底是在哪裡調用屬性的get和set方法的,畢竟這個才是我們最關心的。
get方法:在初始化的時候,如果屬性的初始值沒有提供,則get方法將會被調用。
    private void setupValue(Object target, Keyframe kf) {
        if (mProperty != null) {
            kf.setValue(mProperty.get(target));
        }
        try {
            if (mGetter == null) {
                Class targetClass = target.getClass();
                setupGetter(targetClass);
                if (mGetter == null) {
                    // Already logged the error - just return to avoid NPE
                    return;
                }
            }
            kf.setValue(mGetter.invoke(target));
        } catch (InvocationTargetException e) {
            Log.e(PropertyValuesHolder, e.toString());
        } catch (IllegalAccessException e) {
            Log.e(PropertyValuesHolder, e.toString());
        }
    }
set方法:當動畫的下一幀到來的時候,PropertyValuesHolder中的setAnimatedValue方法會將新的屬性值設置給對象,調用其set方法
    void setAnimatedValue(Object target) {
        if (mProperty != null) {
            mProperty.set(target, getAnimatedValue());
        }
        if (mSetter != null) {
            try {
                mTmpValueArray[0] = getAnimatedValue();
                mSetter.invoke(target, mTmpValueArray);
            } catch (InvocationTargetException e) {
                Log.e(PropertyValuesHolder, e.toString());
            } catch (IllegalAccessException e) {
                Log.e(PropertyValuesHolder, e.toString());
            }
        }
    }
 Android中Fab(FloatingActionButton)實現上下滑動的漸變效果
前言Promoted Actions是指一種操作按鈕,它不是放在actionbar中,而是直接在可見的UI布局中(當然這裡的UI指的是setContentView所管轄的
 android listview適配器裡區分不同按鈕的點擊事件
一、適配器 ListItemClickAdapterpublic class ListItemClickAdapter extends BaseAdapter { pr
 使用root精靈root失敗怎麼辦|刷機精靈一鍵root失敗怎麼辦?
如果你的手機無法通過刷機精靈實用工具中的“Root 解鎖”來獲取 Root 權限,那麼你可以參考本文進行操作。下載吧本教程適用於多數
 徹底理解handler的實現原理
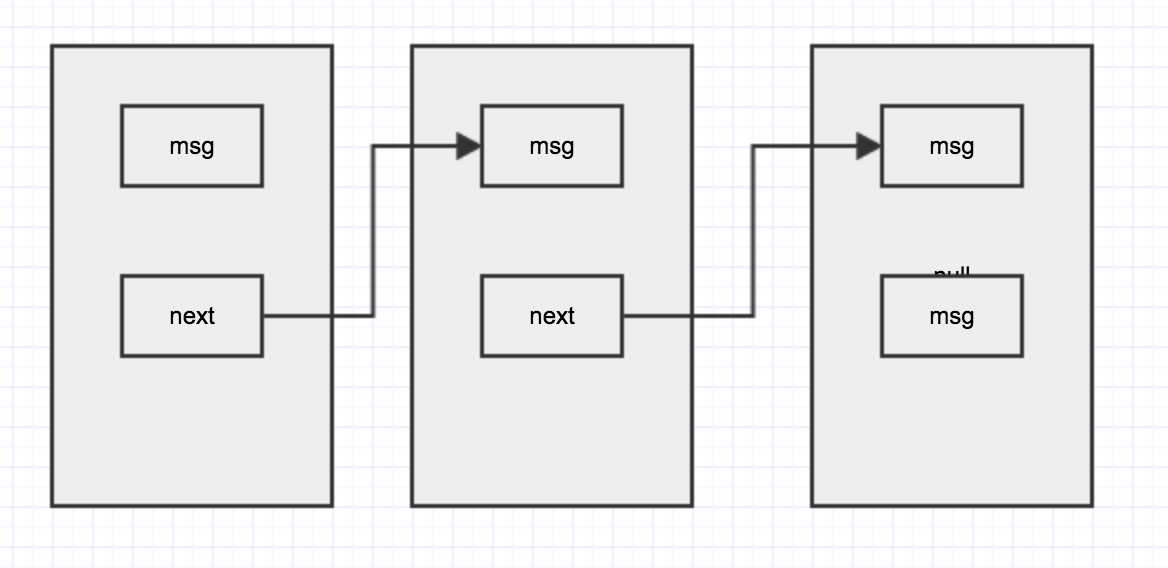
說到handler大家都很熟悉,自己也用了很久,再此總結一下 從handler的源碼角度看看handler是如何執行的。涉及到的內容:Loop Message Messa