編輯:關於Android編程
CheckBox復選框控件使用方法,具體內容如下
一、簡介
1、

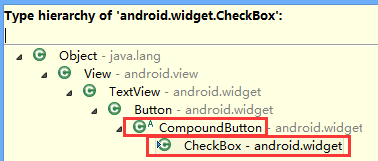
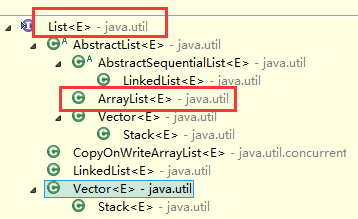
2、類結構圖
二、CheckBox復選框控件使用方法
這裡是使用java代碼在LinearLayout裡面添加控件
1、新建LinearLayout布局
2、建立CheckBox的XML的Layout文件
3、通過View.inflate()方法創建CheckBox
CheckBox checkBox=(CheckBox) View.inflate(this, R.layout.checkbox, null);
4、通過LinearLayout的addView方法添加CheckBox
ll_checkBoxList.addView(checkBox);
5、通過List<CheckBox>完成輸出功能
for(CheckBox checkBox:checkBoxList)
三、代碼實例
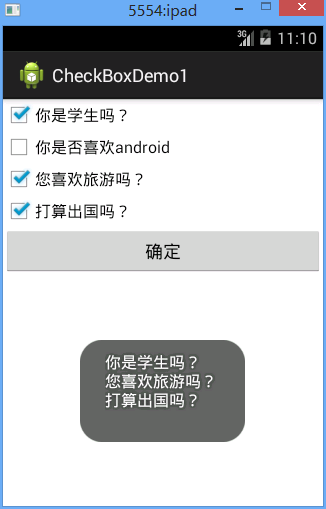
1、效果圖:
2、代碼
fry.Activity01
package fry;

import java.util.ArrayList;
import java.util.List;

import com.example.CheckBoxDemo1.R;

import android.app.Activity;
import android.os.Bundle;
import android.view.View;
import android.view.View.OnClickListener;
import android.widget.Button;
import android.widget.CheckBox;
import android.widget.LinearLayout;
import android.widget.Toast;

public class Activity01 extends Activity implements OnClickListener{
  private List<CheckBox> checkBoxList=new ArrayList<CheckBox>();
  private LinearLayout ll_checkBoxList;
  private Button btn_ok;
//  CheckBox復選框控件使用方法
//  這裡是使用java代碼在LinearLayout裡面添加控件
//  1、新建LinearLayout布局
//  2、建立CheckBox的XML的Layout文件
//  3、通過View.inflate()方法創建CheckBox
//  4、通過LinearLayout的addView方法添加CheckBox
//  5、通過List<CheckBox>完成輸出功能
  @Override
  protected void onCreate(Bundle savedInstanceState) {
    // TODO Auto-generated method stub
    super.onCreate(savedInstanceState);
    setContentView(R.layout.activity01);
    ll_checkBoxList=(LinearLayout) findViewById(R.id.ll_CheckBoxList);
    btn_ok=(Button) findViewById(R.id.btn_ok);
    String[] strArr={"你是學生嗎?","你是否喜歡android","您喜歡旅游嗎?","打算出國嗎?"};
    for(String str:strArr){
      CheckBox checkBox=(CheckBox) View.inflate(this, R.layout.checkbox, null);
      checkBox.setText(str);
      ll_checkBoxList.addView(checkBox);
      checkBoxList.add(checkBox);
    }
    btn_ok.setOnClickListener(this);
  }
  @Override
  public void onClick(View v) {
    // TODO Auto-generated method stub
    String str="";
    for(CheckBox checkBox:checkBoxList){
      if(checkBox.isChecked()){
        str+=checkBox.getText().toString()+"\n";
      }
    }
    Toast.makeText(this, str, Toast.LENGTH_SHORT).show();
  }
}
/CheckBoxDemo1/res/layout/activity01.xml
<?xml version="1.0" encoding="utf-8"?>
<LinearLayout xmlns:android="http://schemas.android.com/apk/res/android"
  android:layout_width="match_parent"
  android:layout_height="match_parent"
  android:orientation="vertical" >

  <LinearLayout
    android:id="@+id/ll_CheckBoxList"
    android:layout_width="match_parent"
    android:layout_height="wrap_content"
    android:orientation="vertical"
    >


  </LinearLayout>

  <Button
    android:id="@+id/btn_ok"
    android:layout_width="match_parent"
    android:layout_height="wrap_content"
    android:text="確定"
    />


</LinearLayout>
/CheckBoxDemo1/res/layout/checkbox.xml
<?xml version="1.0" encoding="utf-8"?>
<CheckBox xmlns:android="http://schemas.android.com/apk/res/android"
  android:layout_width="match_parent"
  android:layout_height="match_parent"
  android:orientation="vertical" >


</CheckBox>
四、收獲
1、 View.inflate(this, R.layout.checkbox, null)方法裡面的checkbox的XML
<?xml version="1.0" encoding="utf-8"?>
<CheckBox xmlns:android="http://schemas.android.com/apk/res/android"
  android:layout_width="match_parent"
  android:layout_height="match_parent"
  android:orientation="vertical" >
</CheckBox>
2、用代碼在LinearLayout中添加CheckBox方法
1)通過View.inflate()方法創建CheckBox
CheckBox checkBox=(CheckBox) View.inflate(this, R.layout.checkbox, null);
2)通過LinearLayout的addView方法添加CheckBox
ll_checkBoxList.addView(checkBox);
3、List<CheckBox>的創建
private List<CheckBox> checkBoxList=new ArrayList<CheckBox>();
4、for(CheckBox checkBox:checkBoxList)
遍歷
5、list類結構圖
以上就是本文的全部內容,希望對大家的學習有所幫助,也希望大家多多支持本站。
 achartengine圖標框架的使用心得
廢話不多說先貼效果圖,跟代碼,後面再詳解:效果圖如下效果圖如下由於項目公司數據保密性加了馬賽克。貼代碼代碼如下:package com.tony.linechart;im
 一個簡單的例子帶你了解jni流程
1、前言jni是java調用原生語言來進行開發的一座橋梁,原生語言一般是指c,c++語言,即jni機制可以讓java語言調用c,c++語言,也可以讓c,c++語言調用ja
 Android實現字母雨的效果
首先來看效果: 一、實現原理在實現過程中,主要考慮整個界面由若干個字母組成的子母線條組成,這樣的話把固定數量的字母封裝成一個字母線條,而每個字母又封裝成一個對象,這樣的話
 簡單實現Android驗證碼
安卓驗證碼的簡單實現我們經常在登錄或者注冊的時候要求輸入驗證碼,這裡簡單介紹一下一種方法 效果如下首先是要獲取 隨機的四個字母組合,我這裡是將26個字母存儲到一個數組中,