編輯:關於android開發
【include+LinearLayout】的使用例子
AndroidIncludeLayout.java
package com.AndroidIncludeLayout;

import android.app.Activity;
import android.content.Intent;
import android.os.Bundle;
import android.view.View;
import android.widget.Button;
import android.widget.Toast;

public class AndroidIncludeLayout extends Activity {

    @Override
    public void onCreate(Bundle savedInstanceState) {
        super.onCreate(savedInstanceState);
        setContentView(R.layout.main);

        View subLayout1 = (View)findViewById(R.id.main1);
        View subLayout2 = (View)findViewById(R.id.main2);
        Button myButton_main1 = (Button)subLayout1.findViewById(R.id.mybutton);
        Button myButton_main2 = (Button)subLayout2.findViewById(R.id.mybutton);
        Button startAnotherActivity = (Button)findViewById(R.id.startanotheractivity);

        startAnotherActivity.setOnClickListener(new Button.OnClickListener(){

   @Override
   public void onClick(View arg0) {
    // TODO Auto-generated method stub
    Intent intent = new Intent();
             intent.setClass(AndroidIncludeLayout.this, AnotherActivity.class);
             startActivity(intent);

   }});

        myButton_main1.setOnClickListener(new Button.OnClickListener(){

   @Override
   public void onClick(View arg0) {
    // TODO Auto-generated method stub
    Toast.makeText(AndroidIncludeLayout.this, "Button 1 Pressed", Toast.LENGTH_LONG).show();
   }});

        myButton_main2.setOnClickListener(new Button.OnClickListener(){

   @Override
   public void onClick(View arg0) {
    // TODO Auto-generated method stub
    Toast.makeText(AndroidIncludeLayout.this, "Button 2 Pressed", Toast.LENGTH_LONG).show();
   }});
    }
}
mail.xml
<?xml version="1.0" encoding="utf-8"?>
<LinearLayout xmlns:android="http://schemas.android.com/apk/res/android"
    android:orientation="vertical"
    android:layout_width="fill_parent"
    android:layout_height="fill_parent"
    >
<TextView
    android:layout_width="fill_parent"
    android:layout_height="wrap_content"
    android:text="@string/hello"
    />
<include android:id="@+id/main1" layout="@layout/sublayout" />
<include android:id="@+id/main2" layout="@layout/sublayout" />
<Button
    android:id="@+id/startanotheractivity"
    android:layout_width="wrap_content"
    android:layout_height="wrap_content"
    android:text=" Start Another Activity "
    />
</LinearLayout>
sublayout.xml
<?xml version="1.0" encoding="utf-8"?>
<LinearLayout xmlns:android="http://schemas.android.com/apk/res/android"
    android:orientation="vertical"
    android:layout_width="fill_parent"
    android:layout_height="wrap_content"
    android:background="#505050"
    >
<TextView
    android:layout_width="fill_parent"
    android:layout_height="wrap_content"
    android:text="SubLayout"
    />
<Button
android:id="@+id/mybutton"
    android:layout_width="fill_parent"
    android:layout_height="wrap_content"
    android:text=" A Button "
    />
</LinearLayout>
【include+merge】 //與上面的include用法有點不一樣
LightActivity.java
/**
 * Copyright(c) 2014-2015 ChinaYong Hotel Media Technology Co.,Ltd.
 * All Rights Reserved.
 *
 * Filename : LightActivity.java
 * Author : Seldy lipeineng
 * Creation time : 上午10:58:53 - 2015-6-4
 * Description :
 */
package com.hysmarthotel.roomcontrol;

import com.hysmarthotel.util.LogUtil;
import com.hysmarthotel.view.Temperature;

import android.app.Activity;
import android.os.Bundle;
import android.view.View;
import android.widget.TextView;
//燈光控制
public class LightActivity extends Activity {
    public static Temperature temp;
    @Override
    public void onCreate(Bundle savedInstanceState) {
        super.onCreate(savedInstanceState);
        setContentView(R.layout.light);
        temp = (Temperature)findViewById(R.id.temperature_light);  //特殊的地方是,可以直接一步調用merge中的id,不用通過include,再去調用
        log("layout1"+temp);
        init();
    }
    private void init() {
        temp.setTemperature(MainActivity.mTemp+"");
    }
    private void log(String msg) {
        LogUtil.info(this.getClass(), this + ":" + msg,"i");
    }
}
light.xml
<?xml version="1.0" encoding="utf-8"?>
<AbsoluteLayout xmlns:android="http://schemas.android.com/apk/res/android"
    android:layout_width="match_parent"
    android:layout_height="match_parent"
    android:background="@drawable/bg1" >
    <TextView
        android:id="@+id/lightctrl"
        android:layout_x="91.5px"
        android:layout_y="93.0px"
        android:layout_width="wrap_content"
        android:layout_height="wrap_content"
        android:gravity="center_vertical"
        android:textSize="42.0px"
        android:textColor="#fff3e3d1"
        android:text="@string/light_ctrl"
        android:drawableLeft="@drawable/ic_light_t"
        android:drawablePadding="6px"/>

    <include android:id="@+id/include1" layout="@layout/time_temp"/>
</AbsoluteLayout>
time_temp.xml
<?xml version="1.0" encoding="utf-8"?>
<merge xmlns:android="http://schemas.android.com/apk/res/android"
xmlns:hyhotel="http://schemas.android.com/apk/res/com.hysmarthotel.roomcontrol" >

<com.hysmarthotel.view.Temperature
android:id="@+id/temperature_light"
android:layout_x="1545.0px"
android:layout_y="109.5px"
android:layout_width="wrap_content"
android:layout_height="wrap_content"
android:textSize="22.5px"
android:textColor="#fff3e3d1"
hyhotel:prefix="@string/room_temp"
hyhotel:unit="@string/celsius" />
</merge>
 我的android學習經歷12,android學習經歷12
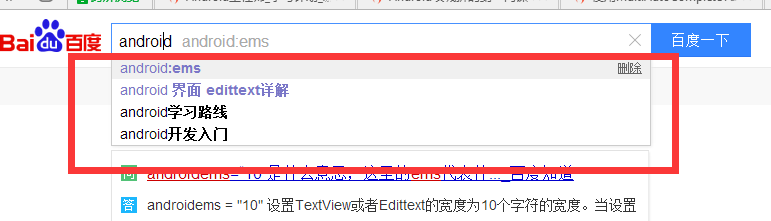
我的android學習經歷12,android學習經歷12自動匹配輸入的內容(文章最後有一個問題有興趣的可以解答一下,謝謝大神了) 這個主要是兩個控件MultiAutoC
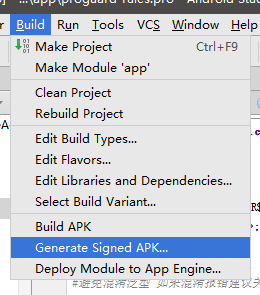 Android項目實戰(二十五):Android studio 混淆+打包+驗證是否成功,androidstudio
Android項目實戰(二十五):Android studio 混淆+打包+驗證是否成功,androidstudio前言: 單挑Android項目,最近即時通訊用到環信,
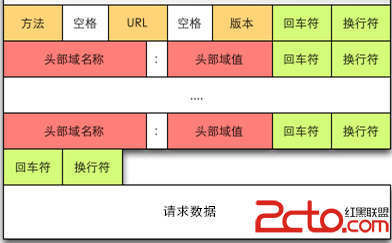 Android網絡編程(一)HTTP協議原理
Android網絡編程(一)HTTP協議原理 前言 這篇文章是這個系列的開篇,作為移動開發者,開發的應用不免會對網絡進行訪問,雖然現在已經有很多的開源庫幫助我們可以輕而易
 簡單的下拉刷新以及優化--SwipeRefreshLayout,swiperefreshlayout
簡單的下拉刷新以及優化--SwipeRefreshLayout,swiperefreshlayout 代碼工程簡要說明:以一個SwipeRefreshLayout包裹Li