編輯:關於Android編程
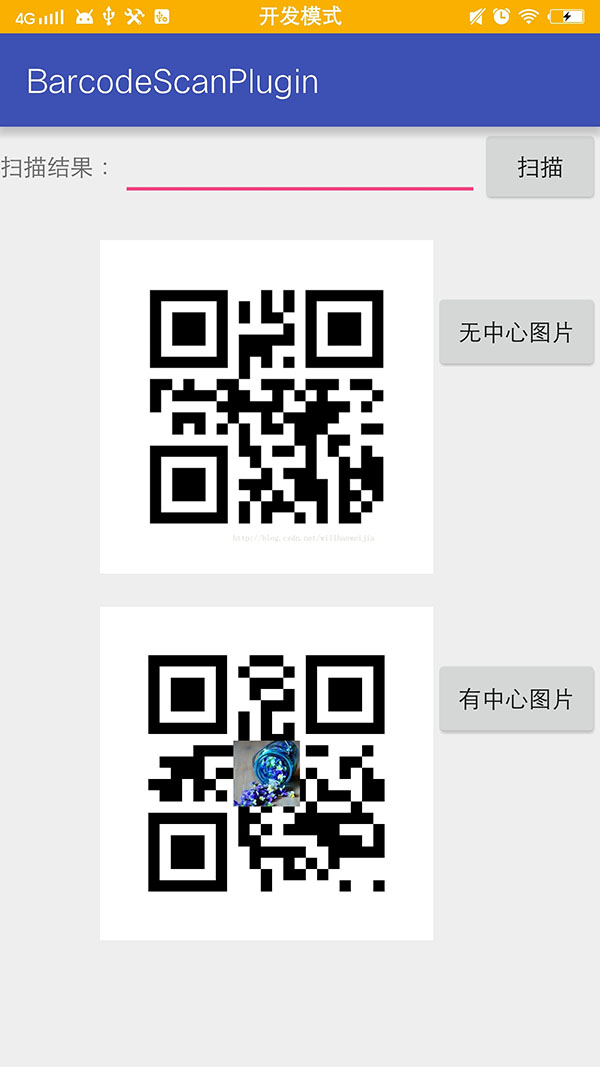
首先聲明我們通篇用的都是Google開源框架Zxing,要實現的功能有三個 ,生成普通二維碼、生成帶有中心圖片Logo 的二維碼,掃描解析二維碼,直接上效果圖吧
首先我們需要一個這樣的 Zxing 的包類似於這樣
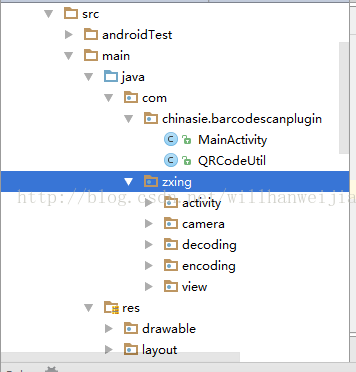
接下來需要引入資源
1.drawable 中引入圖片 navbar.png
2.layout中引入camera.xml、main.xml、qrcode_capture_page.xml
3.創建raw文件夾並添加beep.ogg 掃描聲音
4.合並color.xml,copy ids.xml到values目錄中
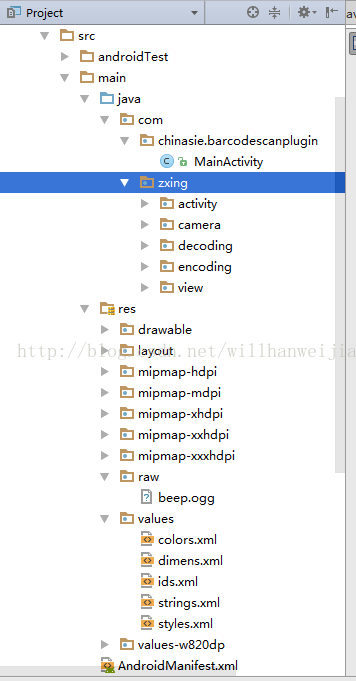
引入文件之後的效果圖是這樣的
接下來是 QRCodeUtil 類
package com.chinasie.barcodescanplugin;
import android.graphics.Bitmap;
import android.graphics.Canvas;
import com.google.zxing.BarcodeFormat;
import com.google.zxing.EncodeHintType;
import com.google.zxing.WriterException;
import com.google.zxing.common.BitMatrix;
import com.google.zxing.qrcode.QRCodeWriter;
import com.google.zxing.qrcode.decoder.ErrorCorrectionLevel;
import java.io.FileOutputStream;
import java.io.IOException;
import java.util.HashMap;
import java.util.Hashtable;
import java.util.Map;
/**
 * Created by HanWeijia on 2017/2/4.
 */
public class QRCodeUtil {
 private static int QR_WIDTH = 300;
 private static int QR_HEIGHT = 300;
 /**
 * 生成二維碼Bitmap
 *
 * @param content 內容
 * @param widthPix 圖片寬度
 * @param heightPix 圖片高度
 * @param logoBm 二維碼中心的Logo圖標(可以為null)
 * @param filePath 用於存儲二維碼圖片的文件路徑
 * @return 生成二維碼及保存文件是否成功
 */
 public static Bitmap createQRImage(String content, int widthPix, int heightPix, Bitmap logoBm, String filePath) {
 try {
  if (content == null || "".equals(content)) {
  return null;
  }
  //配置參數
  Map<EncodeHintType, Object> hints = new HashMap<>();
  hints.put(EncodeHintType.CHARACTER_SET, "utf-8");
  //容錯級別
  hints.put(EncodeHintType.ERROR_CORRECTION, ErrorCorrectionLevel.H);
  //設置空白邊距的寬度
  //  hints.put(EncodeHintType.MARGIN, 2); //default is 4
  // 圖像數據轉換,使用了矩陣轉換
  BitMatrix bitMatrix = new QRCodeWriter().encode(content, BarcodeFormat.QR_CODE, widthPix, heightPix, hints);
  int[] pixels = new int[widthPix * heightPix];
  // 下面這裡按照二維碼的算法,逐個生成二維碼的圖片,
  // 兩個for循環是圖片橫列掃描的結果
  for (int y = 0; y < heightPix; y++) {
  for (int x = 0; x < widthPix; x++) {
   if (bitMatrix.get(x, y)) {
   pixels[y * widthPix + x] = 0xff000000;
   } else {
   pixels[y * widthPix + x] = 0xffffffff;
   }
  }
  }
  // 生成二維碼圖片的格式,使用ARGB_8888
  Bitmap bitmap = Bitmap.createBitmap(widthPix, heightPix, Bitmap.Config.ARGB_8888);
  bitmap.setPixels(pixels, 0, widthPix, 0, 0, widthPix, heightPix);
  if (logoBm != null) {
  bitmap = addLogo(bitmap, logoBm);
  }
  //必須使用compress方法將bitmap保存到文件中再進行讀取。直接返回的bitmap是沒有任何壓縮的,內存消耗巨大!
  return bitmap;//!= null && bitmap.compress(Bitmap.CompressFormat.JPEG, 100, new FileOutputStream(filePath));
 } catch (WriterException e) {
  e.printStackTrace();
 }
 return null;
 }
 /**
 * 在二維碼中間添加Logo圖案
 */
 private static Bitmap addLogo(Bitmap src, Bitmap logo) {
 if (src == null) {
  return null;
 }
 if (logo == null) {
  return src;
 }
 //獲取圖片的寬高
 int srcWidth = src.getWidth();
 int srcHeight = src.getHeight();
 int logoWidth = logo.getWidth();
 int logoHeight = logo.getHeight();
 if (srcWidth == 0 || srcHeight == 0) {
  return null;
 }
 if (logoWidth == 0 || logoHeight == 0) {
  return src;
 }
 //logo大小為二維碼整體大小的1/5
 float scaleFactor = srcWidth * 1.0f / 5 / logoWidth;
 Bitmap bitmap = Bitmap.createBitmap(srcWidth, srcHeight, Bitmap.Config.ARGB_8888);
 try {
  Canvas canvas = new Canvas(bitmap);
  canvas.drawBitmap(src, 0, 0, null);
  canvas.scale(scaleFactor, scaleFactor, srcWidth / 2, srcHeight / 2);
  canvas.drawBitmap(logo, (srcWidth - logoWidth) / 2, (srcHeight - logoHeight) / 2, null);
  canvas.save(Canvas.ALL_SAVE_FLAG);
  canvas.restore();
 } catch (Exception e) {
  bitmap = null;
  e.getStackTrace();
 }
 return bitmap;
 }
 /**
 * 生成普通的二維碼
 * 要轉換的地址或字符串,可以是中文
 * @param url
 */
 public static Bitmap createQRImage(String url)
 {
 try
 {
  //判斷URL合法性
  if (url == null || "".equals(url) || url.length() < 1)
  {
  return null;
  }
  Hashtable<EncodeHintType, String> hints = new Hashtable<EncodeHintType, String>();
  hints.put(EncodeHintType.CHARACTER_SET, "utf-8");
  //圖像數據轉換,使用了矩陣轉換
  BitMatrix bitMatrix = new QRCodeWriter().encode(url, BarcodeFormat.QR_CODE, QR_WIDTH, QR_HEIGHT, hints);
  int[] pixels = new int[QR_WIDTH * QR_HEIGHT];
  //下面這裡按照二維碼的算法,逐個生成二維碼的圖片,
  //兩個for循環是圖片橫列掃描的結果
  for (int y = 0; y < QR_HEIGHT; y++)
  {
  for (int x = 0; x < QR_WIDTH; x++)
  {
   if (bitMatrix.get(x, y))
   {
   pixels[y * QR_WIDTH + x] = 0xff000000;
   }
   else
   {
   pixels[y * QR_WIDTH + x] = 0xffffffff;
   }
  }
  }
  //生成二維碼圖片的格式,使用ARGB_8888
  Bitmap bitmap = Bitmap.createBitmap(QR_WIDTH, QR_HEIGHT, Bitmap.Config.ARGB_8888);
  bitmap.setPixels(pixels, 0, QR_WIDTH, 0, 0, QR_WIDTH, QR_HEIGHT);
  return bitmap;
 }
 catch (WriterException e)
 {
  e.printStackTrace();
 }
 return null;
 }
}
注釋已經很明了了 ,這個工具類我就不多說了,就下來說說調用,當然也很簡單
package com.chinasie.barcodescanplugin;
import android.content.Intent;
import android.graphics.Bitmap;
import android.graphics.BitmapFactory;
import android.support.v7.app.AppCompatActivity;
import android.os.Bundle;
import android.util.Log;
import android.view.View;
import android.widget.Button;
import android.widget.EditText;
import android.widget.ImageView;
import com.zxing.activity.CaptureActivity;
import java.io.File;
public class MainActivity extends AppCompatActivity implements View.OnClickListener {
 private static String TAB = MainActivity.class.getSimpleName();
 //顯示掃描結果
 private EditText editText = null;
 //掃描按鈕
 private Button btnScan = null;
 //普通圖片
 private ImageView imageNormal = null;
 //普通按鈕
 private Button buttonNormal = null;
 //特按鈕
 private Button buttonAndCenter = null;
 //有中心圖片
 private ImageView imageWithCenter = null;
 @Override
 protected void onCreate(Bundle savedInstanceState) {
 super.onCreate(savedInstanceState);
 setContentView(R.layout.activity_main);
 initView();
 }
 /**
 * 點擊時間響應
 * @param v
 */
 @Override
 public void onClick(View v) {
 switch (v.getId()){
  case R.id.btnScan:
  try {
   //打開掃描界面掃描條形碼或二維碼
   Intent openCameraIntent = new Intent(MainActivity.this, CaptureActivity.class);
   startActivityForResult(openCameraIntent, 0);
  }
  catch (Exception ex){
   Log.e(TAB,ex.getMessage());
   ex.printStackTrace();
  }
  break;
  case R.id.button:
  //普通的二維碼圖片顯示到一個ImageView上面
  imageNormal.setImageBitmap(QRCodeUtil.createQRImage("123456789"));
  break;
  case R.id.buttonAndCenter:
  final String filePath = File.separator
   + "qr_" + System.currentTimeMillis() + ".jpg";
  //二維碼圖片較大時,生成圖片、保存文件的時間可能較長,因此放在新線程中
  new Thread(new Runnable() {
   @Override
   public void run() {
   final Bitmap success = QRCodeUtil.createQRImage("strUrl", 800,800,BitmapFactory.decodeResource(getResources(), R.drawable.gg),filePath);
   if (success!=null) {
    runOnUiThread(new Runnable() {
    @Override
    public void run() {
     //帶有中心圖片的二維碼顯示在 imageWithCenter 上
     imageWithCenter.setImageBitmap(success);
    }
    });
   }
   }
  }).start();
  break;
 }
 }
 @Override
 protected void onActivityResult(int requestCode, int resultCode, Intent data) {
 super.onActivityResult(requestCode, resultCode, data);
 //處理掃描結果(在界面上顯示)
 if (resultCode == RESULT_OK) {
  Bundle bundle = data.getExtras();
  String scanResult = bundle.getString("result");
  editText.setText(scanResult);
 }
 }
 /**
 * 初始化View
 */
 private void initView(){
 editText = (EditText)this.findViewById(R.id.editText);
 imageWithCenter = (ImageView)findViewById(R.id.imageAndCenter);
 imageNormal = (ImageView)this.findViewById(R.id.image) ;
 btnScan = (Button)this.findViewById(R.id.btnScan);
 buttonNormal = (Button)this.findViewById(R.id.button);
 buttonAndCenter = (Button)findViewById(R.id.buttonAndCenter);
 btnScan.setOnClickListener(this);
 buttonNormal.setOnClickListener(this);
 buttonAndCenter.setOnClickListener(this);
 }
}
這裡也不過多說了,淡然如果有找不到上述資源的可以下載我的源代碼,裡面都有。。
點擊下載源碼
以上所述是小編給大家介紹的Android中二維碼的生成方法(普通二維碼、中心Logo 二維碼、及掃描解析二維碼),希望對大家有所幫助,如果大家有任何疑問請給我留言,小編會及時回復大家的。在此也非常感謝大家對本站網站的支持!
 Android搜索框組件SearchView的基本使用方法
SearchView是android系統中內置的一個搜索框組件,可以很方便在添加在用戶界面之上,但是也帶來了一些問題,那就是searchview的UI是固定的,定制起來會
 Android 屬性動畫Property Animation
1、概述Android提供了幾種動畫類型:View Animation 、Drawable Animation 、Property Animation 。View Ani
 《Android源碼設計模式解析與實戰》讀書筆記(二十六)
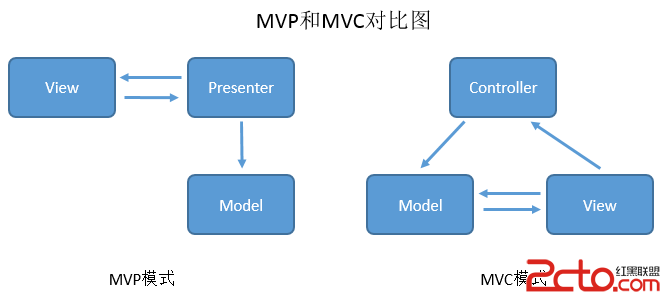
第二十六章、MVP應用構架模式1.MVP介紹 MVP模式是MVC模式的一個演化版本,MVP全稱Model-View-Presenter。目前MVP在Android應用開發
 Android Toast花式使用
Toast的自定義使用原理與其類似。1.Toast源碼分析老規矩,我們先去看Toast的源碼。Toast有兩種顯示布局方式,一種最常見調用Toast.makeText()