編輯:關於Android編程
我們在開發中經常用到倒計時的功能,比如發送驗證碼後,倒計時60s再進行驗證碼的獲取,為了方便以後使用,這裡做個記錄,講講倒計時器的實現。
1、先進行倒計時工具類的封裝
public class CountDownTimerUtils extends CountDownTimer {
  private TextView mTextView;

  /**
   * @param textView     The TextView
   *
   *
   * @param millisInFuture  The number of millis in the future from the call
   *             to {@link #start()} until the countdown is done and {@link #onFinish()}
   *             is called.
   * @param countDownInterval The interval along the way to receiver
   *             {@link #onTick(long)} callbacks.
   */
  public CountDownTimerUtils(TextView textView, long millisInFuture, long countDownInterval) {
    super(millisInFuture, countDownInterval);
    this.mTextView = textView;
  }

  /**
   * 倒計時期間會調用
   * @param millisUntilFinished
   */
  @Override
  public void onTick(long millisUntilFinished) {
    mTextView.setClickable(false); //設置不可點擊
    mTextView.setText(millisUntilFinished / 1000 + "秒"); //設置倒計時時間
    mTextView.setBackgroundResource(R.drawable.shape_verify_btn_press); //設置按鈕為灰色,這時是不能點擊的

    SpannableString spannableString = new SpannableString(mTextView.getText().toString()); //獲取按鈕上的文字
    ForegroundColorSpan span = new ForegroundColorSpan(Color.RED);
    /**
     * public void setSpan(Object what, int start, int end, int flags) {
     * 主要是start跟end,start是起始位置,無論中英文,都算一個。
     * 從0開始計算起。end是結束位置,所以處理的文字,包含開始位置,但不包含結束位置。
     */
    spannableString.setSpan(span, 0, 2, Spannable.SPAN_INCLUSIVE_EXCLUSIVE);//將倒計時的時間設置為紅色
    mTextView.setText(spannableString);
  }

  /**
   * 倒計時完成後調用
   */
  @Override
  public void onFinish() {
    mTextView.setText("重新獲取驗證碼");
    mTextView.setClickable(true);//重新獲得點擊
    mTextView.setBackgroundResource(R.drawable.shape_verify_btn_normal); //還原背景色
  }
}
讓這個工具類繼承CountDownTimer,然後把顯示倒計時的View傳進去,在倒計時期間會調用onTick方法,在這個方法裡面對View的倒計時界面進行刷新,倒計時結束後,會調用onFinish方法,在裡面恢復View的狀態即可。
2、布局文件
未點擊獲取驗證碼時的view布局 shape_verify_btn_normal.xml
 <?xml version="1.0" encoding="utf-8"?>
<shape xmlns:android="http://schemas.android.com/apk/res/android"
  android:shape="rectangle" >

  <!-- 填充的顏色:這裡設置背景透明 -->
  <solid android:color="@color/maincolor" />
  <!-- 邊框的顏色 :不能和窗口背景色一樣-->
  <stroke
    android:width="1dp"
    android:color="@color/white" />
  <!-- 設置按鈕的四個角為弧形 -->
  <!-- android:radius 弧形的半徑 -->
  <corners android:radius="5dip" />

  <!-- padding:Button裡面的文字與Button邊界的間隔 -->
  <padding
    android:bottom="5dp"
    android:left="5dp"
    android:right="5dp"
    android:top="5dp" />
</shape>
點擊獲取驗證碼之後的view布局 shape_verify_btn_press.xml
<?xml version="1.0" encoding="utf-8"?>
<shape xmlns:android="http://schemas.android.com/apk/res/android"
  android:shape="rectangle" >

  <!-- 填充的顏色:這裡設置背景透明 -->
  <solid android:color="@color/graywhite" />
  <!-- 邊框的顏色 :不能和窗口背景色一樣-->
  <stroke
    android:width="1dp"
    android:color="@color/white" />
  <!-- 設置按鈕的四個角為弧形 -->
  <!-- android:radius 弧形的半徑 -->
  <corners android:radius="5dip" />

  <!-- padding:Button裡面的文字與Button邊界的間隔 -->
  <padding
    android:bottom="5dp"
    android:left="5dp"
    android:right="5dp"
    android:top="5dp" />
</shape>
整個界面的布局
<LinearLayout xmlns:android="http://schemas.android.com/apk/res/android"
  android:orientation="vertical"
  android:layout_width="match_parent"
  android:layout_height="match_parent"
  android:background="@drawable/login_bg">

  <EditText
    android:id="@+id/rst_phone_number"
    android:layout_width="match_parent"
    android:layout_height="40dp"
    android:inputType="phone"
    android:hint="@string/phone_number"
    android:textSize="16sp"
    android:textColor="@color/black"
    android:singleLine="true"
    android:background="@drawable/shape_form"
    android:textCursorDrawable="@drawable/text_cursor"
    android:layout_marginLeft="30dp"
    android:layout_marginRight="30dp"
    android:layout_marginTop="30dp"
    android:layout_gravity="center_vertical"/>

  <LinearLayout
    android:layout_width="match_parent"
    android:layout_height="40dp"
    android:layout_marginLeft="30dp"
    android:layout_marginRight="30dp"
    android:layout_marginTop="15dp"
    android:orientation="horizontal">

    <EditText
      android:id="@+id/rst_verify_code"
      android:layout_width="wrap_content"
      android:layout_height="match_parent"
      android:layout_weight="1"
      android:inputType="number"
      android:hint="@string/rst_verify_code"
      android:textSize="16sp"
      android:textColor="@color/black"
      android:singleLine="true"
      android:background="@drawable/shape_form"
      android:textCursorDrawable="@drawable/text_cursor" />

    <TextView
      android:id="@+id/rst_send_code"
      android:layout_width="130dp"
      android:layout_height="match_parent"
      android:text="@string/rst_send_code"
      android:textSize="13sp"
      android:textColor="@color/white"
      android:gravity="center"
      android:layout_marginLeft="10dp"
      android:background="@drawable/shape_verify_btn_normal"/>

  </LinearLayout>

  <Button
    android:id="@+id/rst_next_step"
    android:layout_width="match_parent"
    android:layout_height="40dp"
    android:layout_margin="30dp"
    android:text="@string/rst_next_step"
    android:textSize="15sp"
    android:textColor="@color/white"
    android:background="@drawable/shape_btn"/>

</LinearLayout>
這裡布局有個問題,因為獲取驗證碼這個TextView中的字會在倒計時期間有變化,而且每次字的變化長度不一樣,如果把它的layout_width設為wrap_content,那麼這個TextView的長度會變化,影響界面美觀,所以可以把它的長度固定,然後把驗證碼輸入框的layout_weight設為1,這樣就可以了。
3、具體使用方法
// 發送成功進入倒計時
countDownTimer = new CountDownTimerUtils(tv_send_code, 60000, 1000);
countDownTimer.start();
其中60000代表要倒計時的時長,即60s;1000代表每次遞減1s。
以上就是具體的實現過程,下面附幾張效果圖!


以上就是本文的全部內容,希望對大家的學習有所幫助,也希望大家多多支持本站。
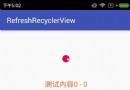 RefreshRecyclerView下拉刷新,加載更多
ListView已經用了很多年了,後來又有了RecyclerView,基本可以代替ListView/GridView了,還有瀑布流的模式,加上各種特效,於是就嘗試用Rec
 Android之——應用更新功能
一、概述相信大家都遇到過這種情況,就是在Android手機中的應用,往往在應用的設置裡面,都會有一個檢查更新的功能,如果應用開發商或者運營商發布了新的應用版本,點擊設置裡
 Android_刮刮樂刮獎
該功能實現很簡單,就是根據手指坐標位置在畫板上畫 1.效果圖 2.代碼實現 public class ErinieShow extends
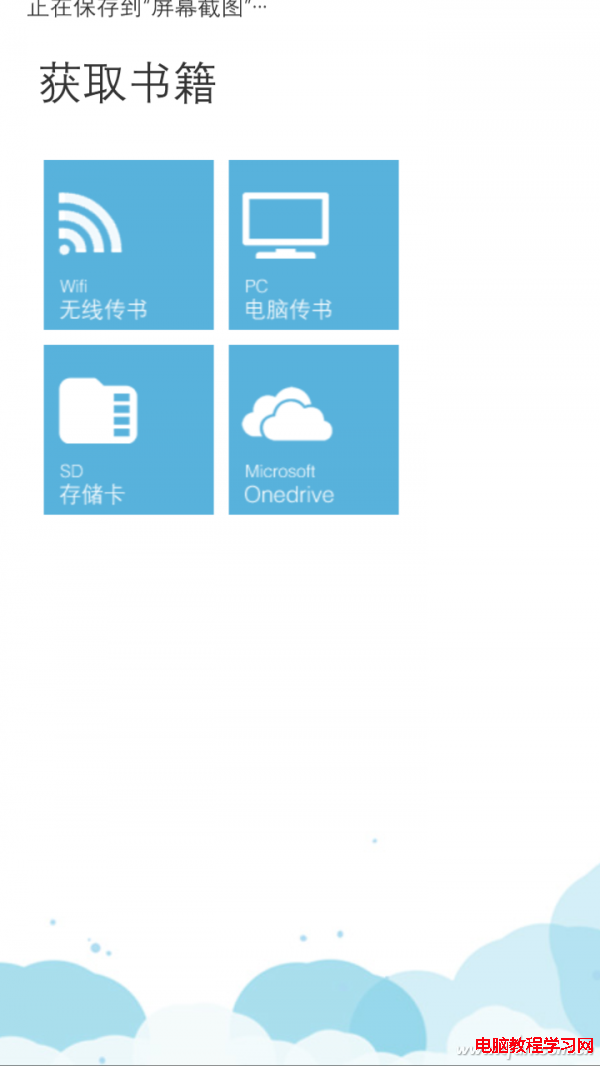 Lumia手機玩轉本地電子書
Lumia手機看電子書的限制頗多,比如直接將電子書復制到手機Document文件夾不能被閱讀軟件識別,用Office看書的體驗遠遜於專業的閱讀軟件。那麼,L