編輯:關於Android編程
一、著色游戲概述
近期群裡偶然看到一哥們在群裡聊不規則圖像填充什麼四聯通、八聯通什麼的,就本身好學務實的態度去查閱了相關資料。對於這類著色的資料,最好的就是去搜索些相關app,根據我的觀察呢,不規則圖像填充在著色游戲裡面應用居多,不過大致可以分為兩種:
那麼針對上述兩種,我們會通過兩篇博文來講解,本篇就是敘述基於層的填充方式,那麼什麼基於層的填充方式呢?其實就是一張圖實際上是由多個層組成的,每個層顯示部分圖像(無圖像部分為透明),多層疊加後形成一張完整的圖案,圖層間是疊加的關系,類似下圖。

相信大家如果學過PS,對上述肯定再了解不過了。比如你要繪制一個天空,你可以最底層去繪制藍天,在上層繪制白雲,再上層會執行小鳥。然後三層疊加以後就是一副小鳥在天空翱翔的圖了。
二、效果與分析
好了,接下來看下今天的效果。

ok,可以看到一個簡單的著色效果,其實原理很簡單,首先呢,該圖實際上是由7層組成:
例如下圖。

那麼如果我們需要給這幅圖的某個位置著色,實際上是給某一層的非透明區域著色。實際上就轉化為:
用戶點擊的(x,y)-> 判斷落在哪一層的非透明區域 -> 然後給該層非透明區域著色。
ok,這樣原理就敘述清楚了,實際上也是非常的簡單,基於該原理,我們可以自定義一個View,然後一幅一幅去繪制圖層,最後按照上述步驟去編寫代碼。不過,我們還有可以偷懶的地方,其實沒必要我們自己去一個圖層一個圖層的繪制,我們可以利用Drawable去完成圖層疊加的工作,我們有一類Drawable叫做LayerDrawable,對應的xml為layer-list,我們可以通過使用LayerDrawable極大的簡化我們的工作。
三、編碼與實現
上述已經描述很清楚了,我再給大家細化一下:
layer-list中去定義我們的drawable
然後把該drawable作為我們View的背景
復寫onTouchEvent方法
判斷用戶點擊的坐標落在哪一層的非透明位置,改變該層非透明區域顏色
(一)layer-list
 <?xml version="1.0" encoding="utf-8"?>
<layer-list xmlns:android="http://schemas.android.com/apk/res/android">
 <item
  android:drawable="@drawable/eel_mask1"/>
 <item
  android:drawable="@drawable/eel_mask2"/>
 <item
  android:drawable="@drawable/eel_mask3"/>
 <item
  android:drawable="@drawable/eel_mask4"/>
 <item
  android:drawable="@drawable/eel_mask5"/>
 <item
  android:drawable="@drawable/eel_mask6"/>
 <item
  android:drawable="@drawable/eel_mask7"/>
</layer-list>
ok,這樣我們的drawable就ok了~~沒撒說的,不過layer-list可以做很多事情,大家可以關注下。
(二)View代碼
package com.zhy.colour_app_01;

import android.content.Context;
import android.graphics.Bitmap;
import android.graphics.Color;
import android.graphics.PorterDuff;
import android.graphics.drawable.BitmapDrawable;
import android.graphics.drawable.Drawable;
import android.graphics.drawable.LayerDrawable;
import android.util.AttributeSet;
import android.util.Log;
import android.view.MotionEvent;
import android.view.View;

import java.util.Random;

/**
 * Created by zhy on 15/5/14.
 */
public class ColourImageBaseLayerView extends View
{

 private LayerDrawable mDrawables;

 public ColourImageBaseLayerView(Context context, AttributeSet attrs)
 {
  super(context, attrs);
  mDrawables = (LayerDrawable) getBackground();

 }

 @Override
 protected void onMeasure(int widthMeasureSpec, int heightMeasureSpec)
 {
  setMeasuredDimension(mDrawables.getIntrinsicWidth(), mDrawables.getIntrinsicHeight());
 }

 @Override
 public boolean onTouchEvent(MotionEvent event)
 {
  final float x = event.getX();
  final float y = event.getY();
  if (event.getAction() == MotionEvent.ACTION_DOWN)
  {
   Drawable drawable = findDrawable(x, y);
   if (drawable != null)
    drawable.setColorFilter(randomColor(), PorterDuff.Mode.SRC_IN);
  }

  return super.onTouchEvent(event);
 }

 private int randomColor()
 {
  Random random = new Random();
  int color = Color.argb(255, random.nextInt(256), random.nextInt(256), random.nextInt(256));
  return color;
 }

 private Drawable findDrawable(float x, float y)
 {
  final int numberOfLayers = mDrawables.getNumberOfLayers();
  Drawable drawable = null;
  Bitmap bitmap = null;
  for (int i = numberOfLayers - 1; i >= 0; i--)
  {
   drawable = mDrawables.getDrawable(i);
   bitmap = ((BitmapDrawable) drawable).getBitmap();
   try
   {
    int pixel = bitmap.getPixel((int) x, (int) y);
    if (pixel == Color.TRANSPARENT)
    {
     continue;
    }
   } catch (Exception e)
   {
    continue;
   }
   return drawable;
  }
  return null;
 }

}
ok,代碼也比較簡單,首先我們把drawable作為view的背景,然後在構造中獲取drawable(LayerDrawable)。接下來復寫onTouchEvent,捕獲用戶點擊的(x,y),根據(x,y)去找出當前點擊的是哪一層(必須點擊在非透明區域),最後通過設置setColorFilter去改變顏色即可~很easy吧最後貼下布局文件:
(三)布局文件
<RelativeLayout xmlns:android="http://schemas.android.com/apk/res/android"
    xmlns:tools="http://schemas.android.com/tools"
    android:layout_width="match_parent"
    android:layout_height="match_parent"
    android:paddingLeft="@dimen/activity_horizontal_margin"
    android:paddingRight="@dimen/activity_horizontal_margin"
    android:paddingTop="@dimen/activity_vertical_margin"
    android:paddingBottom="@dimen/activity_vertical_margin"
    tools:context=".MainActivity">

 <com.zhy.colour_app_01.ColourImageBaseLayerView
  android:background="@drawable/eel"
  android:layout_width="match_parent"
  android:layout_centerInParent="true"
  android:layout_height="match_parent"/>

</RelativeLayout>
四、邊界的填充
1.圖像的填充有2種經典算法。
一種是種子填充法。種子填充法理論上能夠填充任意區域和圖形,但是這種算法存在大量的反復入棧和大規模的遞歸,降低了填充效率。
另一種是掃描線填充法。
注意:實際上圖像填充的算法還是很多的,有興趣可以去Google學術上去搜一搜。
ok,下面先看看效果圖:

ok,可以看到這樣的顏色填充比上一篇的基於層的在素材的准備上要easy 很多~~~
2.原理分析
首先我們簡述下原理,我們在點擊的時候拿到點擊點的”顏色”,然後按照我們選擇的算法進行填色即可。
算法1:種子填充法,四聯通/八聯通
算法簡介:假設要將某個區域填充成紅色。
從用戶點擊點的像素開始,上下左右(八聯通還有左上,左下,右上,右下)去判斷顏色,如果四個方向上的顏色與當前點擊點的像素一致,則改變顏色至目標色。然後繼續上述這個過程。
ok,可以看到這是一個遞歸的過程,1個點到4個,4個到16個不斷的去延伸。如果按照這種算法,你會寫出類似這樣的代碼:
/**
  * @param pixels 像素數組
  * @param w  寬度
  * @param h  高度
  * @param pixel 當前點的顏色
  * @param newColor 填充色
  * @param i  橫坐標
  * @param j  縱坐標
  */
 private void fillColor01(int[] pixels, int w, int h, int pixel, int newColor, int i, int j)
 {
  int index = j * w + i;
  if (pixels[index] != pixel || i >= w || i < 0 || j < 0 || j >= h)
   return;
  pixels[index] = newColor;
  //上
  fillColor01(pixels, w, h, pixel, newColor, i, j - 1);
  //右
  fillColor01(pixels, w, h, pixel, newColor, i + 1, j);
  //下
  fillColor01(pixels, w, h, pixel, newColor, i, j + 1);
  //左
  fillColor01(pixels, w, h, pixel, newColor, i - 1, j);
 }
代碼很簡單,但是如果你去運行,會發生StackOverflowException異常,這個異常主要是因為大量的遞歸造成的。雖然簡單,但是在移動設備上使用該方法不行。
於是,我就想,這個方法不是遞歸深度過多麼,那麼我可以使用一個Stack去存像素點,減少遞歸的深度和次數,於是我把代碼改成如下的方式:
/**
  * @param pixels 像素數組
  * @param w  寬度
  * @param h  高度
  * @param pixel 當前點的顏色
  * @param newColor 填充色
  * @param i  橫坐標
  * @param j  縱坐標
  */
 private void fillColor(int[] pixels, int w, int h, int pixel, int newColor, int i, int j)
 {
  mStacks.push(new Point(i, j));

  while (!mStacks.isEmpty())
  {
   Point seed = mStacks.pop();
   Log.e("TAG", "seed = " + seed.x + " , seed = " + seed.y);

   int index = seed.y * w + seed.x;

   pixels[index] = newColor;
   if (seed.y > 0)
   {
    int top = index - w;
    if (pixels[top] == pixel)
    {

     mStacks.push(new Point(seed.x, seed.y - 1));
    }
   }

   if (seed.y < h - 1)
   {
    int bottom = index + w;
    if (pixels[bottom] == pixel)
    {
     mStacks.push(new Point(seed.x, seed.y + 1));
    }
   }

   if (seed.x > 0)
   {
    int left = index - 1;
    if (pixels[left] == pixel)
    {
     mStacks.push(new Point(seed.x - 1, seed.y));
    }
   }

   if (seed.x < w - 1)
   {
    int right = index + 1;
    if (pixels[right] == pixel)
    {
     mStacks.push(new Point(seed.x + 1, seed.y));
    }
   }

  }


 }
方法的思想也比較簡單,將當前像素點入棧,然後出棧著色,接下來分別判斷四個方向的,如果符合條件也進行入棧(只要棧不為空持續運行)。ok,這個方法我也嘗試跑了下,恩,這次不會報錯了,但是速度特別的慢~~~~慢得我是不可接受的。(有興趣可以嘗試,記得如果ANR,點擊等待)。
這樣來看,第一種算法,我們是不考慮了,沒有辦法使用,主要原因是假設對於矩形同色區域,都是需要填充的,而算法一依然是各種入棧。於是考慮第二種算法
掃描線填充法
詳細可參考 掃描線種子填充算法的解析和掃描線種子填充算法。
算法思想:
初始化一個空的棧用於存放種子點,將種子點(x, y)入棧;
判斷棧是否為空,如果棧為空則結束算法,否則取出棧頂元素作為當前掃描線的種子點(x, y),y是當前的掃描線;
從種子點(x, y)出發,沿當前掃描線向左、右兩個方向填充,直到邊界。分別標記區段的左、右端點坐標為xLeft和xRight;
分別檢查與當前掃描線相鄰的y - 1和y + 1兩條掃描線在區間[xLeft, xRight]中的像素,從xRight開始向xLeft方向搜索,假設掃描的區間為AAABAAC(A為種子點顏色),那麼將B和C前面的A作為種子點壓入棧中,然後返回第(2)步;
上述參考自參考文獻[4],做了些修改,文章[4]中描述算法,測試有一點問題,所以做了修改.
可以看到該算法,基本上是一行一行著色的,這樣的話在大塊需要著色區域的效率比算法一要高很多。
ok,關於算法的步驟大家目前覺得模糊,一會可以參照我們的代碼。選定了算法以後,接下來就開始編碼了。
3.編碼實現
我們代碼中引入了一個邊界顏色,如果設置的話,著色的邊界參考為該邊界顏色,否則會只要與種子顏色不一致為邊界。
(一)構造方法與測量
public class ColourImageView extends ImageView
{

 private Bitmap mBitmap;
 /**
  * 邊界的顏色
  */
 private int mBorderColor = -1;

 private boolean hasBorderColor = false;

 private Stack<Point> mStacks = new Stack<Point>();

 public ColourImageView(Context context, AttributeSet attrs)
 {
  super(context, attrs);

  TypedArray ta = context.obtainStyledAttributes(attrs, R.styleable.ColourImageView);
  mBorderColor = ta.getColor(R.styleable.ColourImageView_border_color, -1);
  hasBorderColor = (mBorderColor != -1);

  L.e("hasBorderColor = " + hasBorderColor + " , mBorderColor = " + mBorderColor);

  ta.recycle();

 }

 @Override
 protected void onMeasure(int widthMeasureSpec, int heightMeasureSpec)
 {
  super.onMeasure(widthMeasureSpec, heightMeasureSpec);

  int viewWidth = getMeasuredWidth();
  int viewHeight = getMeasuredHeight();

  //以寬度為標准,等比例縮放view的高度
  setMeasuredDimension(viewWidth,
    getDrawable().getIntrinsicHeight() * viewWidth / getDrawable().getIntrinsicWidth());
  L.e("view's width = " + getMeasuredWidth() + " , view's height = " + getMeasuredHeight());

  //根據drawable,去得到一個和view一樣大小的bitmap
  BitmapDrawable drawable = (BitmapDrawable) getDrawable();
  Bitmap bm = drawable.getBitmap();
  mBitmap = Bitmap.createScaledBitmap(bm, getMeasuredWidth(), getMeasuredHeight(), false);
 }
可以看到我們選擇的是繼承ImageView,這樣只需要將圖片設為src即可。
構造方法中獲取我們的自定義邊界顏色,當然可以不設置~~
重寫測量的目的是為了獲取一個和View一樣大小的Bitmap便於我們操作。
接下來就是點擊啦~
4.onTouchEvent
@Override
 public boolean onTouchEvent(MotionEvent event)
 {
  final int x = (int) event.getX();
  final int y = (int) event.getY();
  if (event.getAction() == MotionEvent.ACTION_DOWN)
  {
   //填色
   fillColorToSameArea(x, y);
  }

  return super.onTouchEvent(event);
 }

 /**
  * 根據x,y獲得改點顏色,進行填充
  *
  * @param x
  * @param y
  */
 private void fillColorToSameArea(int x, int y)
 {
  Bitmap bm = mBitmap;

  int pixel = bm.getPixel(x, y);
  if (pixel == Color.TRANSPARENT || (hasBorderColor && mBorderColor == pixel))
  {
   return;
  }
  int newColor = randomColor();

  int w = bm.getWidth();
  int h = bm.getHeight();
  //拿到該bitmap的顏色數組
  int[] pixels = new int[w * h];
  bm.getPixels(pixels, 0, w, 0, 0, w, h);
  //填色
  fillColor(pixels, w, h, pixel, newColor, x, y);
  //重新設置bitmap
  bm.setPixels(pixels, 0, w, 0, 0, w, h);
  setImageDrawable(new BitmapDrawable(bm));

 }
可以看到,我們在onTouchEvent中獲取(x,y),然後拿到改點坐標:
獲得點擊點顏色,獲得整個bitmap的像素數組
改變這個數組中的顏色
然後重新設置給bitmap,重新設置給ImageView
重點就是通過fillColor去改變數組中的顏色
/**
  * @param pixels 像素數組
  * @param w  寬度
  * @param h  高度
  * @param pixel 當前點的顏色
  * @param newColor 填充色
  * @param i  橫坐標
  * @param j  縱坐標
  */
 private void fillColor(int[] pixels, int w, int h, int pixel, int newColor, int i, int j)
 {
  //步驟1:將種子點(x, y)入棧;
  mStacks.push(new Point(i, j));

  //步驟2:判斷棧是否為空,
  // 如果棧為空則結束算法,否則取出棧頂元素作為當前掃描線的種子點(x, y),
  // y是當前的掃描線;
  while (!mStacks.isEmpty())
  {


   /**
    * 步驟3:從種子點(x, y)出發,沿當前掃描線向左、右兩個方向填充,
    * 直到邊界。分別標記區段的左、右端點坐標為xLeft和xRight;
    */
   Point seed = mStacks.pop();
   //L.e("seed = " + seed.x + " , seed = " + seed.y);
   int count = fillLineLeft(pixels, pixel, w, h, newColor, seed.x, seed.y);
   int left = seed.x - count + 1;
   count = fillLineRight(pixels, pixel, w, h, newColor, seed.x + 1, seed.y);
   int right = seed.x + count;


   /**
    * 步驟4:
    * 分別檢查與當前掃描線相鄰的y - 1和y + 1兩條掃描線在區間[xLeft, xRight]中的像素,
    * 從xRight開始向xLeft方向搜索,假設掃描的區間為AAABAAC(A為種子點顏色),
    * 那麼將B和C前面的A作為種子點壓入棧中,然後返回第(2)步;
    */
   //從y-1找種子
   if (seed.y - 1 >= 0)
    findSeedInNewLine(pixels, pixel, w, h, seed.y - 1, left, right);
   //從y+1找種子
   if (seed.y + 1 < h)
    findSeedInNewLine(pixels, pixel, w, h, seed.y + 1, left, right);
  }


 }
可以看到我已經很清楚的將該算法的四個步驟標識到該方法中。好了,最後就是一些依賴的細節上的方法:
 /**
  * 在新行找種子節點
  *
  * @param pixels
  * @param pixel
  * @param w
  * @param h
  * @param i
  * @param left
  * @param right
  */
 private void findSeedInNewLine(int[] pixels, int pixel, int w, int h, int i, int left, int right)
 {
  /**
   * 獲得該行的開始索引
   */
  int begin = i * w + left;
  /**
   * 獲得該行的結束索引
   */
  int end = i * w + right;

  boolean hasSeed = false;

  int rx = -1, ry = -1;

  ry = i;

  /**
   * 從end到begin,找到種子節點入棧(AAABAAAB,則B前的A為種子節點)
   */
  while (end >= begin)
  {
   if (pixels[end] == pixel)
   {
    if (!hasSeed)
    {
     rx = end % w;
     mStacks.push(new Point(rx, ry));
     hasSeed = true;
    }
   } else
   {
    hasSeed = false;
   }
   end--;
  }
 }

 /**
  * 往右填色,返回填充的個數
  *
  * @return
  */
 private int fillLineRight(int[] pixels, int pixel, int w, int h, int newColor, int x, int y)
 {
  int count = 0;

  while (x < w)
  {
   //拿到索引
   int index = y * w + x;
   if (needFillPixel(pixels, pixel, index))
   {
    pixels[index] = newColor;
    count++;
    x++;
   } else
   {
    break;
   }

  }

  return count;
 }


 /**
  * 往左填色,返回填色的數量值
  *
  * @return
  */
 private int fillLineLeft(int[] pixels, int pixel, int w, int h, int newColor, int x, int y)
 {
  int count = 0;
  while (x >= 0)
  {
   //計算出索引
   int index = y * w + x;

   if (needFillPixel(pixels, pixel, index))
   {
    pixels[index] = newColor;
    count++;
    x--;
   } else
   {
    break;
   }

  }
  return count;
 }

 private boolean needFillPixel(int[] pixels, int pixel, int index)
 {
  if (hasBorderColor)
  {
   return pixels[index] != mBorderColor;
  } else
  {
   return pixels[index] == pixel;
  }
 }

 /**
  * 返回一個隨機顏色
  *
  * @return
  */
 private int randomColor()
 {
  Random random = new Random();
  int color = Color.argb(255, random.nextInt(256), random.nextInt(256), random.nextInt(256));
  return color;
 }
ok,到此,代碼就介紹完畢了~~~
最後貼下布局文件~~
<RelativeLayout xmlns:android="http://schemas.android.com/apk/res/android"
    xmlns:tools="http://schemas.android.com/tools"
    xmlns:zhy="http://schemas.android.com/apk/res-auto"
    android:layout_width="match_parent"
    android:layout_height="match_parent"
    android:paddingLeft="@dimen/activity_horizontal_margin"
    android:paddingRight="@dimen/activity_horizontal_margin"
    android:paddingTop="@dimen/activity_vertical_margin"
    android:paddingBottom="@dimen/activity_vertical_margin"
    tools:context=".MainActivity">
 <com.zhy.colour_app_01.ColourImageView
  zhy:border_color="#FF000000"
  android:src="@drawable/image_007"
  android:background="#33ff0000"
  android:layout_width="match_parent"
  android:layout_centerInParent="true"
  android:layout_height="match_parent"/>

</RelativeLayout>


<?xml version="1.0" encoding="utf-8"?>
<resources>
 <declare-styleable name="ColourImageView">
  <attr name="border_color" format="color|reference"></attr>
 </declare-styleable>
</resources>
 Android資源之圖像資源(圖像級別資源)
圖像狀態資源只能定義有限的幾種狀態。如果需要更多的狀態,就要使用圖像級別資源。在該資源文件中可以定義任意多個圖像級別。每個圖像級別是一個整數區間,可以通過ImageVie
 Service使用全解析
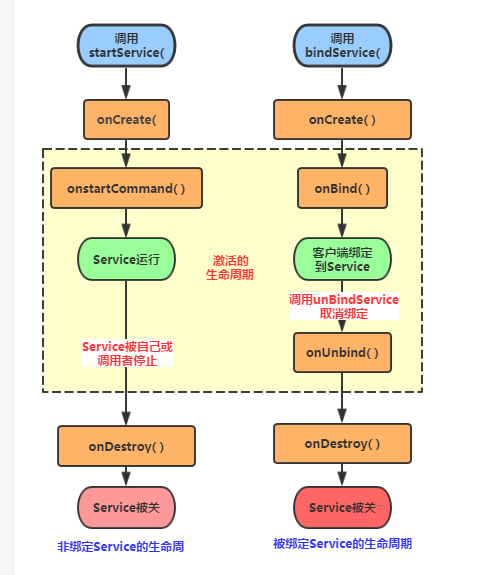
什麼是ServiceService是Android 的四大組件之一,主要處理一些耗時的後台操作邏輯,或者輪詢操作等需要長期在後台運行的任務。甚至在程序退出之後,可以讓Se
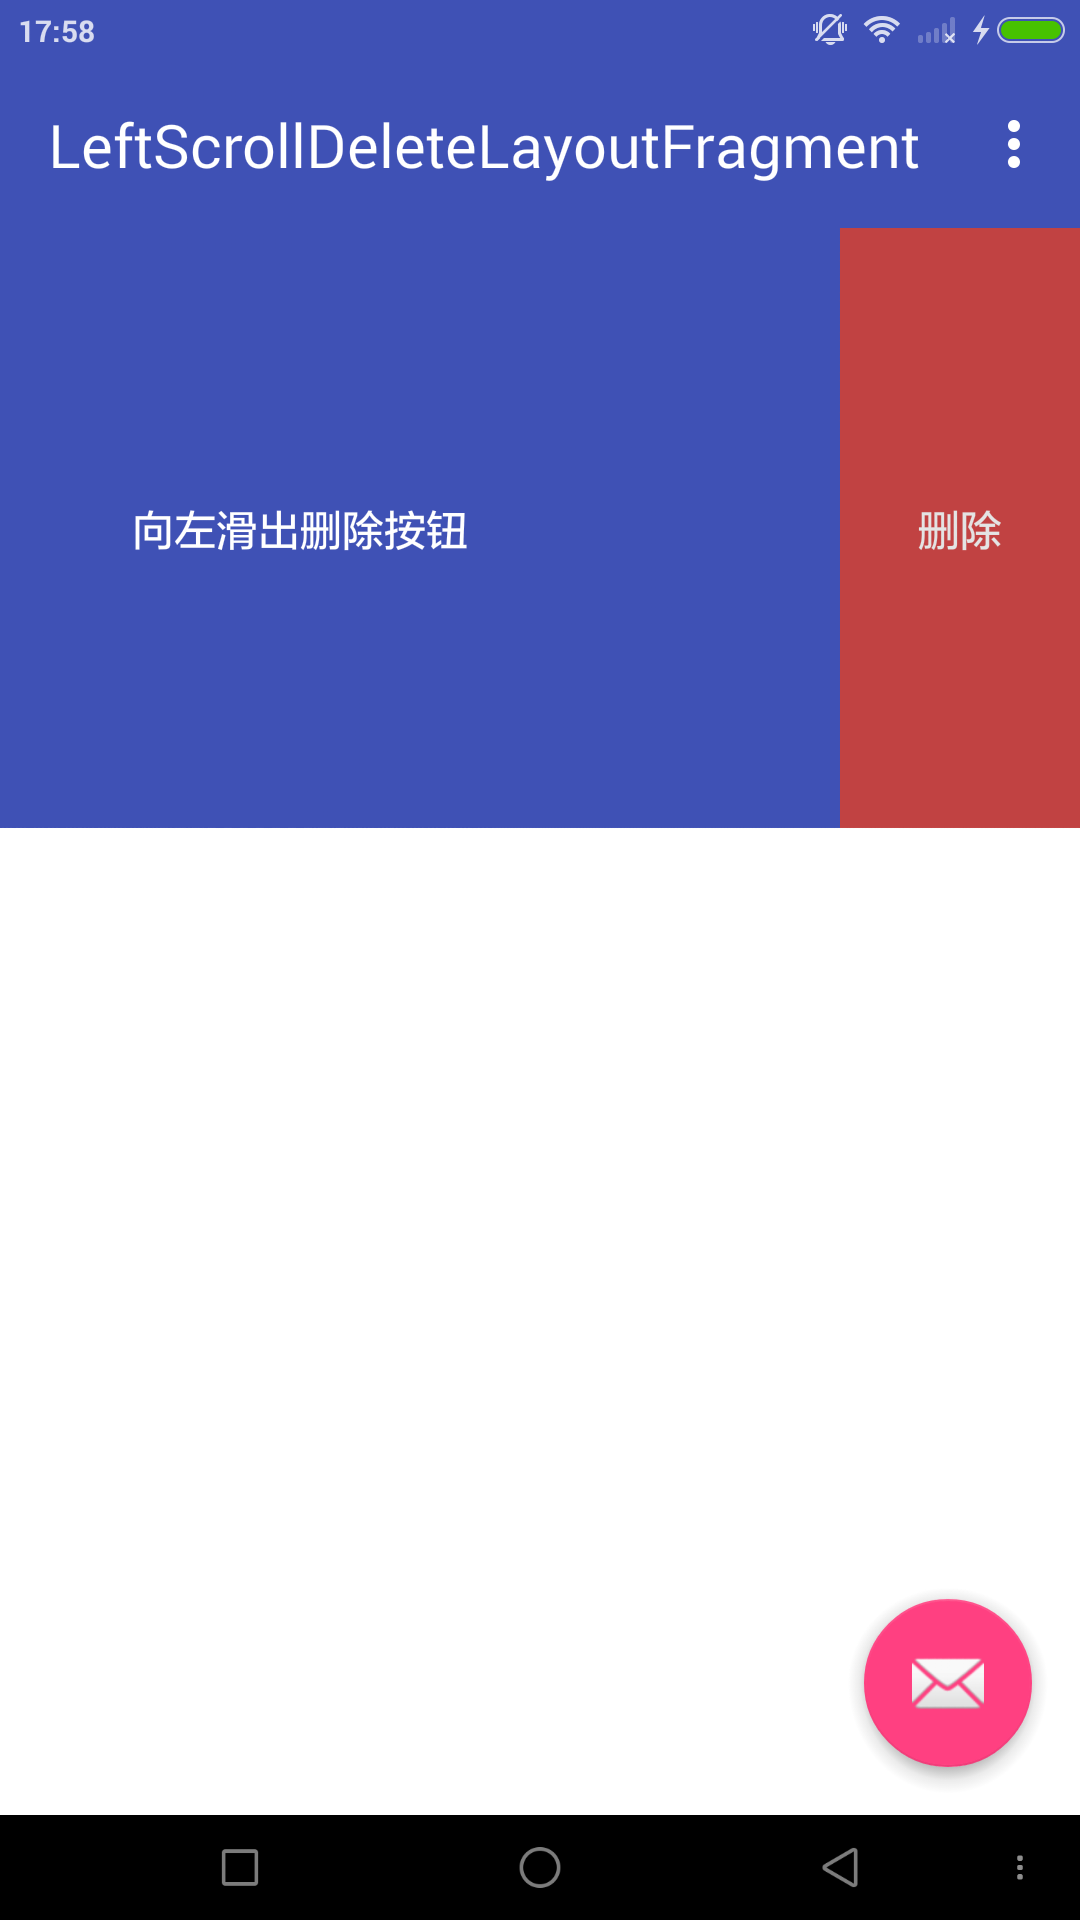
 Android四大組件之BroadcastReceiver(下)
(一)概述上節我們對BroadcastReceiver已經有了一個初步的了解了,知道兩種廣播類型:標准與有序, 動態或靜態注冊廣播接收者,監聽系統廣播,自己發送廣播!已經
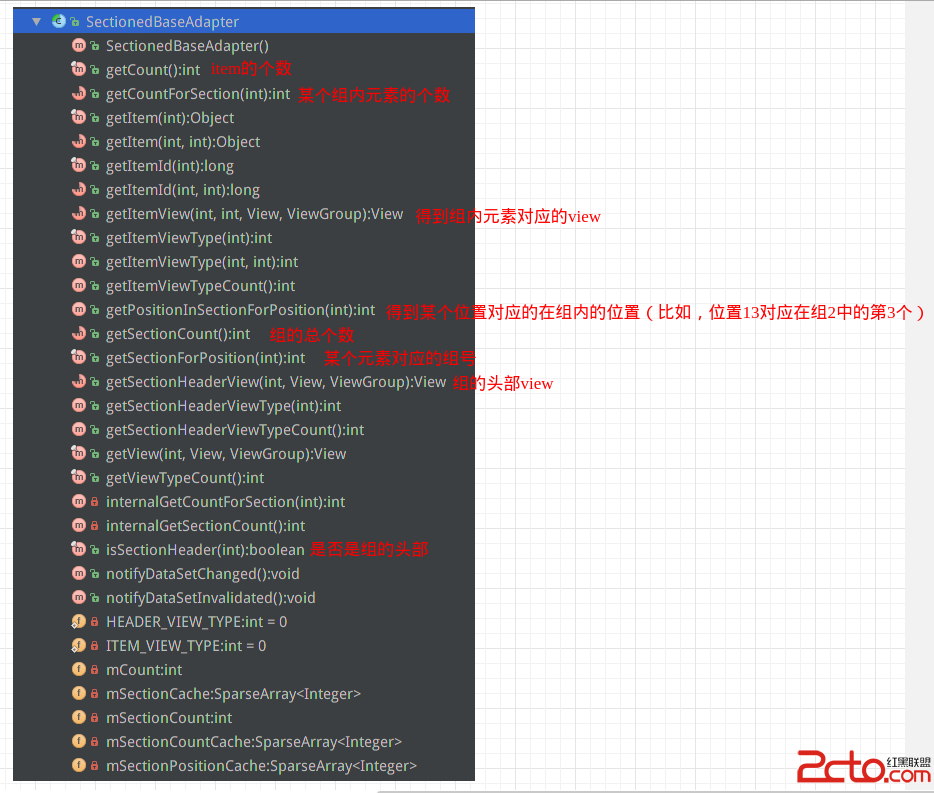 Android仿聯系人列表分組懸浮列表,PinnedHeaderListView源碼解析
github地址:https://github.com/JimiSmith/PinnedHeaderListView 關於實現類似聯系人列表,組的頭部總是懸浮在list