編輯:關於Android編程
Notification是一種具有全局效果的通知,它展示在屏幕的頂端,首先會表現為一個圖標的形式,當用戶向下滑動的時候,展示出通知具體的內容。
它是一種讓你的應用程序在沒有開啟情況下或在後台運行警示用戶。它是看不見的程序組件(Broadcast Receiver,Service和不活躍的Activity)警示用戶有需要注意的事件發生的最好途徑。
比如調用該程序的入口類;
閃光,LED,或者震動;
(1) DEFAULT_ALL 使用所有默認值,比如聲音,震動,閃屏等等
(2) DEFAULT_LIGHTS 使用默認閃光提示
(3) DEFAULT_SOUNDS 使用默認提示聲音
(4)DEFAULT_VIBRATE 使用默認手機震動
以上的效果常量可以疊加,即通過mNotifaction.defaults =DEFAULT_SOUND |DEFAULT_VIBRATE;
(最好在真機上測試,震動效果模擬器上沒有)
注意: 加入手機震動,一定要在manifest.xml中加入權限:
(1) FLAG_AUTO_CANCEL 該通知能被狀態欄的清除按鈕給清除掉
(2) FLAG_NO_CLEAR 該通知不能被狀態欄的清除按鈕給清除掉
(3) FLAG_ONGOING_EVENT 通知放置在正在運行
(4) FLAG_INSISTENT 是否一直進行,比如音樂一直播放,知道用戶響應
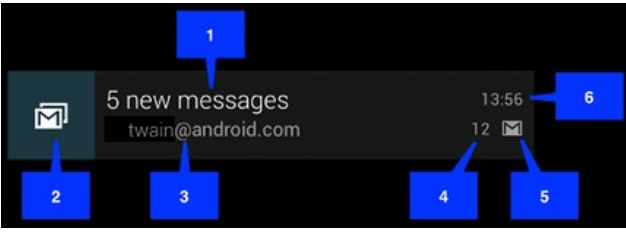
(1) contentIntent 設置PendingIntent對象,點擊時發送該Intent,
(2) defaults 添加默認效果
(3) flags 設置flag位,例如FLAG_NO_CLEAR等
(4)icon 設置圖標
(5)sound 設置聲音
(6) tickerText 顯示在狀態欄中的文字
(7) when 發送此通知的時間戳
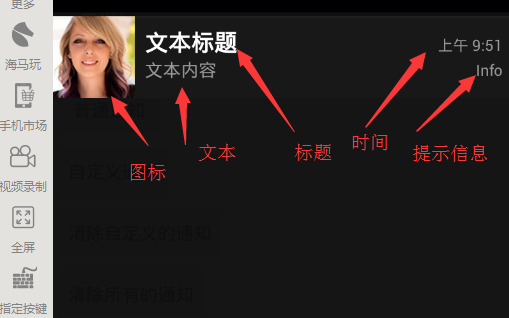
一個notification不必對上面所有的選項都進行設置,但有3項是必須的:
小圖標 setSmallIcon()
內容標題 setContentTitle()
內容 setContentText()
通知一般通過NotificationManager服務來發送一個Notification對象來完成,NotificationManager是一個重要的系統級服務,該對象位於應用程序的框架層中,應用
程序可以通過它像系統發送全局的通知。這個時候需要創建一個Notification對象,用於承載通知的內容。
通知的清除也可以通過NotificationManager服務完成。
注意:在 android:minSdkVersion <16以下時,可以使用
NotificationCompat.Builder創建。
注意: 所有的系統服務都是使用Context.getService()方法獲取,如通知管理器,音量管理器,傳感器管理器等等
更新與移除通知在使用NotificationManager.notify()發送通知的時候,需要傳遞一個標識符,用於唯一標識這個通知。對於有些場景,並不是無限的添加新的通知,有時候需要更新原有通知的信息,這個時候可以重寫構建Notification,而使用與之前通知相同標識符來發送通知,這個時候舊的通知就被被新的通知所取代,起到更新通知的效果對於一個通知,當展示在狀態欄之後,但是使用過後,如何取消呢?
Android為我們提供兩種方式移除通知,一種是Notification自己維護,使用setAutoCancel()方法設置是否維護,傳遞一個boolean類型的數據。另外一種方式使用NotificationManager通知管理器對象來維護,它通過notify()發送通知的時候,指定的通知標識Id來操作通知,可以使用cancel(int)來移除一個指定的通知,也可以使用cancelAll()移除所有的通知。
1.移除所有通知 (只是針對當前Context下的Notification) public void cancelAll()
2.移除標記為id的通知 (只是針對當前Context下的所有Notification)
public void cancel(int id)
3. 將通知加入狀態欄,標簽為tag,標記為id
public void notify(String tag ,int id, Notification notification)
4.將通知加入狀態欄,,標記為id
public void notify(int id, Notification notification)
對於一個通知而言,它顯示的消息是有限的,一般僅用於提示一些概要信息。但是一般簡短的消息,並不能表達需要告訴用戶的全部內容,所以需要綁定一個意圖,當用戶點擊通知的時候,調用一個意圖展示出一個Activity用來顯示詳細的內容。而Notification中,並不使用常規的Intent去傳遞一個意圖,而是使用PendingIntent。
根據字面意思就知道是延遲的intent,主要用來在某個事件完成後執行特定的Action。
PendingIntent包含了Intent及Context,所以就算Intent所屬程序結束,PendingIntent依然有效,可以在其他程序中使用。
1.PendingIntent的flag參數,用於標識PendingIntent的
構造選擇:
(1)FLAG_CANCEL_CURRENT: 如果構建的PendingIntent已經存在,則取消前一個,重新構建一個。
(2)FLAG_NO_CREATE: 如果前一個PendingIntent已經不存在了,將不再構建它。
(3)FLAG_ONE_SHOT: 表明這裡構建的PendingIntent只能使用一次。
(4)FLAG_UPDATE_CURRENT: 如果構建的PendingIntent已經存在,則替換它,常用。
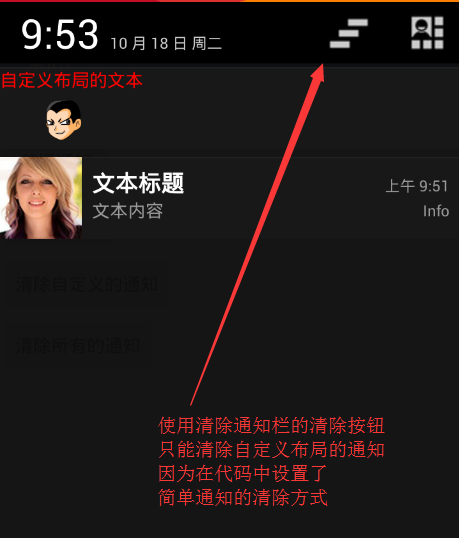
自定義布局notification和Toast一樣,通知也可以使用自定義的XML來自定義樣式,但是對於通知而言,因為它的全局性,並不能簡單的通過inflate膨脹出一個View,因為可能觸發通知的時候,響應的App已經關閉,無法獲取當指定的XML布局文件。所以需要使用單獨的一個RemoteViews類來操作。
RemoteViews 類描述了一個View對象能夠顯示在其他進程中,可以融合從一個layout資源文件實現布局。
如何實例化一個RemoteViews
RemoteViews(String packageName, int layoutId)
通過指定的布局文件新建一個RemoteViews對象。
RemoteViews可以使用它的一系列setXxx()方法通過控件的Id設置控件的屬性。
public void setOnClickPendingIntent (int viewId, PendingIntent pendingIntent)
//viewId 當點擊時將要觸發PendingIntent的視圖的id
//pendingIntent 當點擊時傳過去的PendingIntent
最後使用Notification.Builder.setContent(RemoteViews)方法設置它到一個Notification中。
本示例演示同樣通知的顯示和清除;
package com.example.myapplication;
import android.app.Notification;
import android.app.NotificationManager;
import android.app.PendingIntent;
import android.content.Intent;
import android.graphics.Color;
import android.os.Bundle;
import android.support.v7.app.AppCompatActivity;
import android.view.View;
import android.widget.RemoteViews;
public class MainActivity extends AppCompatActivity {
@Override
protected void onCreate(Bundle savedInstanceState) {
super.onCreate(savedInstanceState);
setContentView(R.layout.activity_main);
}
//創建普通的通知
public void btn1(View v) {
//這裡的通知要使用Builder對象來創建
Notification.Builder builder = new Notification.Builder(this);
//顯示在通知欄上的圖標是必須的
builder.setSmallIcon(R.mipmap.a12);
//在通知欄上顯示文字信息,可以不寫
builder.setTicker("你有一條新信息!");
//這是狀態欄上的信息
builder.setContentTitle("文本標題");//標題信息
builder.setContentText("文本內容");//文本信息
builder.setWhen(System.currentTimeMillis());//顯示發送的時間
builder.setContentInfo("Info");//文本的其他信息
//設置通知模式,參數如下
//Notification.DEFAULT_LIGHTS閃光模式
// Notification.DEFAULT_SOUND聲音模式
// Notification.DEFAULT_VIBRATE震動模式
//Notification.DEFAULT_ALL以上三中模式都選
builder.setDefaults(Notification.DEFAULT_ALL);
//創建Notification對象,生成對象 16API以上,支持低版本需要使用v4包中的notificationCompat
Notification notify = builder.build();
//設置消息不能清除
notify.flags = Notification.FLAG_NO_CLEAR;
//利用系統的Manage發送消息
NotificationManager manager = (NotificationManager) getSystemService(NOTIFICATION_SERVICE);
//發送消息
//第一個參數是通知的一個唯一標識值,
manager.notify((int) (Math.random() * 100), notify);
}
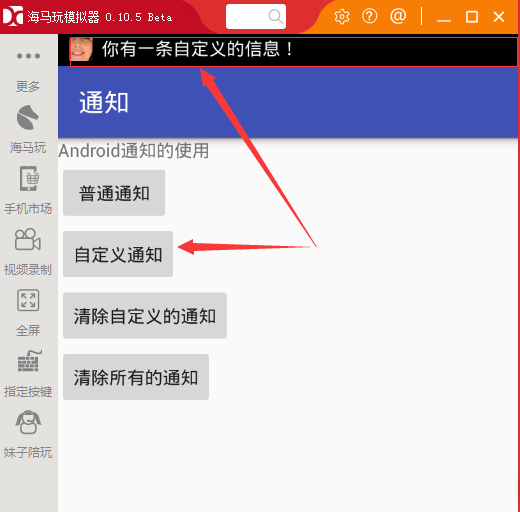
//創建自定義的通知
public void btn2(View v) {
//這裡的通知要使用Builder對象來創建
Notification.Builder builder = new Notification.Builder(this);
//顯示在通知欄上的圖標是必須的
builder.setSmallIcon(R.mipmap.a12);
//在通知欄上顯示文字信息,可以不寫
builder.setTicker("你有一條自定義的信息!");
//這是狀態欄上的信息
/* builder.setContentTitle("文本標題");//標題信息
builder.setContentText("文本內容");//文本信息
builder.setWhen(System.currentTimeMillis());//顯示發送的時間
builder.setContentInfo("Info");//文本的其他信息*/
//設置通知模式
//Notification.DEFAULT_ALL以上三中模式都選
builder.setDefaults(Notification.DEFAULT_ALL);
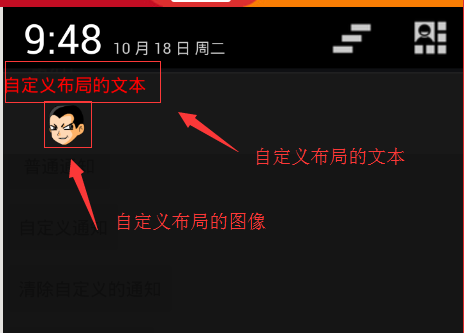
//給通知設置自定義布局
//這裡的View布局是RemoteViews類的布局,第一個參數是包名,第二個參數是布局文件名
RemoteViews view = new RemoteViews(getPackageName(), R.layout.activity_notification);
//給自定義布局中的文本設置紅色顏色
view.setTextColor(R.id.notification_tv, Color.RED);
//給builder對象添加布局
builder.setContent(view);
//給view裡面的文本控件添加監聽事件
//點擊文本後要跳轉去的頁面
Intent intent = new Intent(this, MyTextView.class);
//下面的方法有四個參數:
// 第一個參數代表的是上下文
//第二個參數是一個請求碼
//第三個參數是是代表意圖對象
//第四個參數是是代表跳轉頁面的形式
PendingIntent intent_tv = PendingIntent.getActivity(this, 11, intent, PendingIntent.FLAG_UPDATE_CURRENT);
view.setOnClickPendingIntent(R.id.notification_tv, intent_tv);
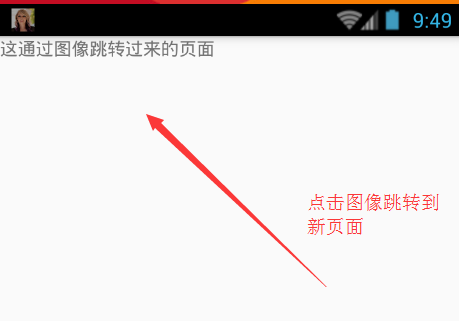
//給布局裡的圖像控件添加點擊監聽事件,跟上面文本監聽事件一樣的
//點擊文本後要跳轉去的頁面
Intent intent2 = new Intent(this, MyImageView.class);
//下面的方法有四個參數:
// 第一個參數代表的是上下文
//第二個參數是一個請求碼
//第三個參數是是代表意圖對象
//第四個參數是是代表跳轉頁面的形式
PendingIntent intent_iv = PendingIntent.getActivity(this, 12, intent2, PendingIntent.FLAG_UPDATE_CURRENT);
view.setOnClickPendingIntent(R.id.notification_iv, intent_iv);
//創建Notification對象,生成對象 16API以上,支持低版本需要使用v4包中的notificationCompat
Notification notify = builder.build();
//設置消息可以使用通知欄上的清除按鈕清除消息
notify.flags = Notification.FLAG_AUTO_CANCEL;
//利用系統的Manage發送消息
NotificationManager manager = (NotificationManager) getSystemService(NOTIFICATION_SERVICE);
//發送消息
//第一個參數是通知的一個唯一標識值,
manager.notify(11, notify);
}
//清除自定義的通知
public void btn3(View v) {
//清除消息也用到manager對象
NotificationManager manager = (NotificationManager) getSystemService(NOTIFICATION_SERVICE);
//清除某一條通知,必須知道它的通知的標識值
manager.cancel(11);
}
//清除所有的通知
public void btn4(View v) {
//清除消息也用到manager對象
NotificationManager manager = (NotificationManager) getSystemService(NOTIFICATION_SERVICE);
//清除所有的通知
manager.cancelAll();
}
}
2.點擊自定義布局文件的文本跳轉頁面的MyTextView.java代碼
package com.example.myapplication;
import android.app.Activity;
import android.os.Bundle;
import android.widget.TextView;
/**
* Created by Administrator on 2016/10/17 0017.
*/
public class MyTextView extends Activity {
@Override
protected void onCreate(Bundle savedInstanceState) {
super.onCreate(savedInstanceState);
TextView tv = new TextView(this);
tv.setText("這通過文本跳轉過來的頁面");
//顯示只有一個文本布局的View
setContentView(tv);
}
}
2.點擊自定義布局文件的圖像跳轉頁面的MyImageView.java代碼
package com.example.myapplication;
import android.app.Activity;
import android.os.Bundle;
import android.widget.TextView;
/**
* Created by Administrator on 2016/10/17 0017.
*/
public class MyImageView extends Activity {
@Override
protected void onCreate(Bundle savedInstanceState) {
super.onCreate(savedInstanceState);
TextView tv = new TextView(this);
tv.setText("這通過圖像跳轉過來的頁面");
//顯示只有一個文本布局的View
setContentView(tv);
}
}
上面程序添加了兩個Activity,所以要在AndroidManifest裡面注冊一下。
以上就是Android通知相關介紹。
自定義布局的通知一般用於音樂控制,結合Service來使用。其余情況基本使用的是普通的通知。
 Android6.0權限系統
Android權限系統是一個非常重要的安全問題,因為它只有在安裝時會詢問一次。一旦軟件本安裝之後,應用程序可以在用戶毫不知情的情況下使用這些權限來獲取所有的內容。很多壞蛋
 Android項目之_硅谷商城項目全套源碼解析(四、分類)
一、簡介上篇博客概括的介紹了硅谷商城項目的首頁技術要點。本篇內容給大家講解硅谷商城項目分類,分類頁面用的技術包括:采用FlycoTabLayout實現標簽和分類切換、布局
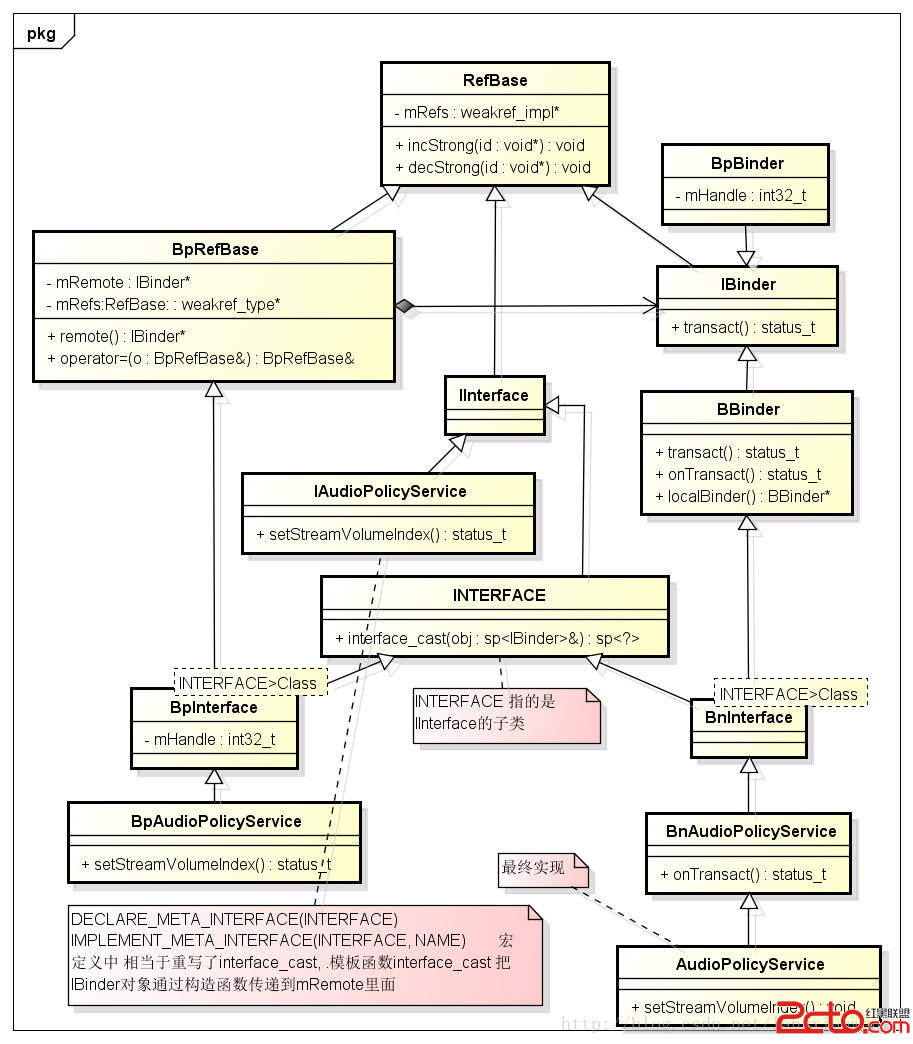 Android framework回顧(3)binder利用及IBinder BpRefbase IInterface INTERFACE 之間關系
status_t AudioSystem::setStreamVolumeIndex(audio_stream_type_t stream, int index, aud
 Android實現卡片翻轉動畫
最近項目上用到了卡片的翻轉效果,大致研究了下,也參考了網上的一些Demo,簡單實現如下:activity_main.xml<?xml version=1.0