編輯:關於Android編程
大家在平時的開發中,對於setContentView肯定不陌生,那麼對其內部的實現會不會比較好奇呢~~~有幸終於能看到一些PhoneWindow神馬的源碼,今天就帶大家來跑一回源碼~~
首先不用說,進入Activity的setContentView
 public void setContentView(int layoutResID) {
        getWindow().setContentView(layoutResID);
        initActionBar();
    }
可以看到裡面獲取了Window,然後調用了Window的setContentView
這裡的Window的實現類是PhoneWindow(package com.android.internal.policy.impl;),我們直接看它的實現:
 @Override
    public void setContentView(int layoutResID) {
        if (mContentParent == null) {
            installDecor();
        } else {
            mContentParent.removeAllViews();
        }
        mLayoutInflater.inflate(layoutResID, mContentParent);
        final Callback cb = getCallback();
        if (cb != null && !isDestroyed()) {
            cb.onContentChanged();
        }
    }
從這裡就能看出來mContentParent是個ViewGroup且包裹我們整個布局文件;而installDecor()估計就是去初始化我們這個mContentParent,一會我們會去驗證。
接下來,通過getCallBack拿到了一個CallBack對象,其實這個獲取到的這個CallBack就是我們Activity自己,你可以去看我們的Activity是實現了CallBack接口的。
這個Callback明顯就是一個回調,當PhoneWindow接收到系統分發給它的觸摸、IO、菜單等相關的事件時,可以回調相應的Activity進行處理。至於Callback可以回調哪些方法,自己看下這個接口的聲明方法即可。當然了這裡不是我們的關鍵,因為我們的setContentView裡面只是回調了onContentChanged,而onContentChanged在Activity中是空實現。
好了,接下來去看我們的installDecor()
private void installDecor() {
	        if (mDecor == null) {
	            mDecor = generateDecor();
	            mDecor.setDescendantFocusability(ViewGroup.FOCUS_AFTER_DESCENDANTS);
	            mDecor.setIsRootNamespace(true);
	            //...
	            }
	        }
	        if (mContentParent == null) {
	            mContentParent = generateLayout(mDecor);
	            mTitleView = (TextView)findViewById(com.android.internal.R.id.title);
	            if (mTitleView != null) {
	               //根據FEATURE_NO_TITLE隱藏,或者設置mTitleView的值
	            	//...
	            } else {
	                mActionBar = (ActionBarView) findViewById(com.android.internal.R.id.action_bar);
	                if (mActionBar != null) {
	                	//設置ActionBar標題、圖標神馬的;根據FEATURE初始化Actionbar的一些顯示
	                	//...
	                }
	            }
	        }
	}
可以看到這裡不僅初始化mContentParent,而且在之前先調用generateDecor();初始化了一個mDecor,mDecor是DecorView對象,為FrameLayout的子類。
在得到mDecor以後設置其焦點的獲取方式為,當其子孫都不需要時,自己才獲取。
然後通過 generateLayout(mDecor);把mDecor做為參數傳入,然後獲取到了我們的mContentParent;
接下裡就開始通過findViewById進行獲取控件了,而這裡的findViewById的代碼是這樣的:
 public View findViewById(int id) {
        return getDecorView().findViewById(id);
    }
這裡我們猜測下,首先去初始化mDecor,然後通過mDecor初始化了mContentParent,接下來mDecor就可以使用findViewById方法了。那麼我覺得,在初始化mDecor的方法
generateDecor()中,一定為我們的mDecor放入了布局或者控件(最簡單的就是使用inflate壓入了布局文件),而mContentParent可能就是mDecor中的某個子View。
是不是這樣呢?
我們一起來先看看generateDecor()方法的實現:
protected DecorView generateDecor() {
        return new DecorView(getContext(), -1);
    }
  public DecorView(Context context, int featureId) {
            super(context);
            mFeatureId = featureId;
        }
很遺憾,我們的generateDecor()只是初始化了一個FrameLayout對象,並沒有在其內部壓入布局文件,看來我們的猜測有些問題;不過沒事,既然此方法沒有,那麼generateLayout(mDecor);中一定設置了layout文件,並且這名字也很像這麼回事。
protected ViewGroup generateLayout(DecorView decor) {
			        // Apply data from current theme.
			        TypedArray a = getWindowStyle();
			        //...Window_windowIsFloating,Window_windowNoTitle,Window_windowActionBar...
			        //首先通過WindowStyle中設置的各種屬性,對Window進行requestFeature或者setFlags

			        if (a.getBoolean(com.android.internal.R.styleable.Window_windowNoTitle, false)) {
			            requestFeature(FEATURE_NO_TITLE);
			        }
			        //...
			        if (a.getBoolean(com.android.internal.R.styleable.Window_windowFullscreen, false)) {
			            setFlags(FLAG_FULLSCREEN, FLAG_FULLSCREEN & (~getForcedWindowFlags()));
			        }
			        //...根據當前sdk的版本確定是否需要menukey
			        WindowManager.LayoutParams params = getAttributes();
			        //通過a中設置的屬性,設置  params.softInputMode 軟鍵盤的模式;
			        //如果當前是浮動Activity,在params中設置FLAG_DIM_BEHIND並記錄dimAmount的值。
			        //以及在params.windowAnimations記錄WindowAnimationStyle

			        // Inflate the window decor.
			        int layoutResource;
			        int features = getLocalFeatures();
			        // System.out.println(Features: 0x + Integer.toHexString(features));
			        if ((features & ((1 << FEATURE_LEFT_ICON) | (1 << FEATURE_RIGHT_ICON))) != 0) {
			            if (mIsFloating) {
			                TypedValue res = new TypedValue();
			                getContext().getTheme().resolveAttribute(
			                        com.android.internal.R.attr.dialogTitleIconsDecorLayout, res, true);
			                layoutResource = res.resourceId;
			            } else {
			                layoutResource = com.android.internal.R.layout.screen_title_icons;
			            }
			            // XXX Remove this once action bar supports these features.
			            removeFeature(FEATURE_ACTION_BAR);
			            // System.out.println(Title Icons!);
			        } else if ((features & ((1 << FEATURE_PROGRESS) | (1 << FEATURE_INDETERMINATE_PROGRESS))) != 0
			                && (features & (1 << FEATURE_ACTION_BAR)) == 0) {
			            // Special case for a window with only a progress bar (and title).
			            // XXX Need to have a no-title version of embedded windows.
			            layoutResource = com.android.internal.R.layout.screen_progress;
			            // System.out.println(Progress!);
			        } else if ((features & (1 << FEATURE_CUSTOM_TITLE)) != 0) {
			            // Special case for a window with a custom title.
			            // If the window is floating, we need a dialog layout
			            if (mIsFloating) {
			                TypedValue res = new TypedValue();
			                getContext().getTheme().resolveAttribute(
			                        com.android.internal.R.attr.dialogCustomTitleDecorLayout, res, true);
			                layoutResource = res.resourceId;
			            } else {
			                layoutResource = com.android.internal.R.layout.screen_custom_title;
			            }
			            // XXX Remove this once action bar supports these features.
			            removeFeature(FEATURE_ACTION_BAR);
			        } else if ((features & (1 << FEATURE_NO_TITLE)) == 0) {
			            // If no other features and not embedded, only need a title.
			            // If the window is floating, we need a dialog layout
			            if (mIsFloating) {
			                TypedValue res = new TypedValue();
			                getContext().getTheme().resolveAttribute(
			                        com.android.internal.R.attr.dialogTitleDecorLayout, res, true);
			                layoutResource = res.resourceId;
			            } else if ((features & (1 << FEATURE_ACTION_BAR)) != 0) {
			                layoutResource = com.android.internal.R.layout.screen_action_bar;
			            } else {
			                layoutResource = com.android.internal.R.layout.screen_title;
			            }
			            // System.out.println(Title!);
			        } else if ((features & (1 << FEATURE_ACTION_MODE_OVERLAY)) != 0) {
			            layoutResource = com.android.internal.R.layout.screen_simple_overlay_action_mode;
			        } else {
			            // Embedded, so no decoration is needed.
			            layoutResource = com.android.internal.R.layout.screen_simple;
			            // System.out.println(Simple!);
			        }


			        View in = mLayoutInflater.inflate(layoutResource, null);
			        decor.addView(in, new ViewGroup.LayoutParams(MATCH_PARENT, MATCH_PARENT));

			        ViewGroup contentParent = (ViewGroup)findViewById(ID_ANDROID_CONTENT);
			        //...

			        return contentParent;
			    }
	     }
然後就根據這些屬性的值,對我們的Window各種requestFeature,setFlags等等。所以這裡就是解析我們為Activity設置theme的地方,至於theme一般可以在AndroidManifest裡面進行設置。
接下來就到關鍵的部分了,21-75行:通過對features和mIsFloating的判斷,為layoutResource進行賦值,至於值可以為R.layout.screen_custom_title;R.layout.screen_action_bar;等等。至於features,除了theme中設置的,我們也可以在Activity的onCreate的setContentView之前進行requestFeature,也解釋了,為什麼需要在setContentView前調用requestFeature設置全屏什麼的。
得到了layoutResource以後,78行,通過LayoutInflater把布局轉化成view,加入到我們的decor,即傳入的mDecor中。
接下來81行:通過mDecor.findViewById傳入R.id.content(相信這個id大家或多或少都聽說過),返回mDecor(布局)中的id為content的View,一般為FrameLayout。
好了,可以看到我們的mDecor是一個FrameLayout,然後會根據theme去選擇系統中的布局文件,將布局文件通過inflate轉化為view,加入到mDecor中;這些布局文件中都包含一個id為content的FrameLayout,將其引用返回給mContentParent。
等我們的mContentParent有值了以後,還記得干嘛了麼?再貼一次PhoneWindow的setContentView
  @Override
    public void setContentView(int layoutResID) {
        if (mContentParent == null) {
            installDecor();
        } else {
            mContentParent.removeAllViews();
        }
        mLayoutInflater.inflate(layoutResID, mContentParent);
        final Callback cb = getCallback();
        if (cb != null && !isDestroyed()) {
            cb.onContentChanged();
        }
    }
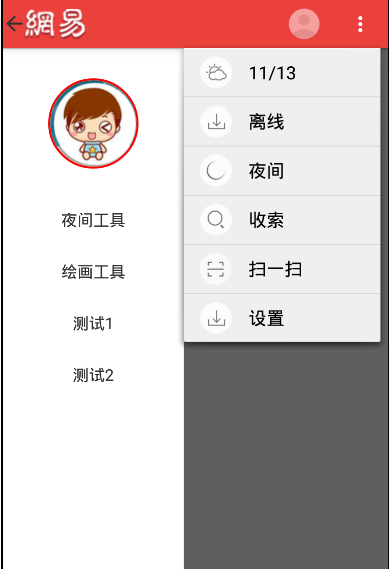 Android實現仿網易新聞主界面設計
下面先來一張效果圖 根據圖片分析,要實現的有側邊欄DrawerLayout,ActionBar的顏色和菜單以及ActionBarDrawerTogg
 Android 物理游戲之重力系統開發示例代碼
本節為大家提供有關物理游戲的知識,講解了一個簡單的圓形自由落體Demo的編寫。本文要介紹的重力系統實際上是類似的。 &nbs
 Java操作Ant壓縮和解壓文件及批量打包Anroid應用
實現zip/tar的壓縮與解壓java中實際是提供了對 zip等壓縮格式的支持,但是為什麼這裡會用到ant呢?原因主要有兩個:1. java提供的類對於包括有
 Android中實現監聽ScrollView滑動事件
時候我們需要監聽ScroView的滑動情況,比如滑動了多少距離,是否滑到布局的頂部或者底部。可惜的是SDK並沒有相應的方法,不過倒是提供了一個 復制代碼 代碼如下:pro