編輯:關於Android編程
總結一下,Android按鍵事件發布流程
//InputReader.cpp
void InputReader::loopOnce() {
     ...
     size_t count = mEventHub->getEvents(timeoutMillis, mEventBuffer, EVENT_BUFFER_SIZE);

     if (count) {
        processEventsLocked(mEventBuffer, count);
     }
     ...
 }
InputReader線程啟動後,循環調用loopOnce,loopOnce調用mEventHub的getEvents函數,有事件返回底層事件數count,沒有則休眠。//InputReader.cpp
void InputReader::processEventsLocked(const RawEvent* rawEvents, size_t count) {
...
processEventsForDeviceLocked(deviceId, rawEvent, batchSize);
...
}
隨後調動上述方法,把事件發送給指定設備。//InputReader.cpp
void InputReader::processEventsForDeviceLocked(int32_t deviceId,
const RawEvent* rawEvents, size_t count) {
...
device->process(rawEvents, count);
...
}
設備處理該事件//InputReader.cpp
void InputDevice::process(const RawEvent* rawEvents, size_t count) {
...
mapper->process(rawEvent);
...
}
每個設備可能有多種mapper,比如既有按鍵又有觸摸板,把事件發給相應的mapper
//InputReader.cpp
void KeyboardInputMapper::process(const RawEvent* rawEvent) {
    ...
    processKey(rawEvent->when, rawEvent->value != 0, keyCode, scanCode, flags);
    ...

}
鍵盤mapper處理事件
//InputReader.cpp
void KeyboardInputMapper::processKey(nsecs_t when, bool down, int32_t keyCode,
        int32_t scanCode, uint32_t policyFlags) {
    ...
    getListener()->notifyKey(&args);
    ...

}
調用InputDispatcher的notifyKey函數。//InputDispatcher.cpp
void InputDispatcher::notifyKey(const NotifyKeyArgs* args) {
....
needWake = enqueueInboundEventLocked(newEntry);
if(needWake){
mLooper->wake();
}
}notify函數,將事件加入inputDispatcher的 inbound隊列,此時應需要選擇是否喚醒inputDispatcher線程//InputDispatcher.cpp
bool InputDispatcher::enqueueInboundEventLocked(EventEntry* entry) {
bool needWake = mInboundQueue.isEmpty();
mInboundQueue.enqueueAtTail(entry);
....
return needWake;
}
//InputDispatcher.cpp
void InputDispatcher::dispatchOnce(){
  ...
   dispatchOnceInnerLocked(&nextWakeupTime);
  ...
   mLooper->pollOnce(timeoutMillis);
}喚醒後,inputdispatcher線程,繼續執行dispatchOnce函數,如果沒有事件,則休眠在looper的pollOnce函數。//InputDispatcher.cpp
void InputDispatcher::dispatchOnceInnerLocked(nsecs_t* nextWakeupTime) {
...
dispatchKeyLocked(currentTime, typedEntry, &dropReason, nextWakeupTime);
...
}
如果有事件發生,則發布。
//InputDispatcher.cpp
bool InputDispatcher::dispatchKeyLocked(nsecs_t currentTime, KeyEntry* entry,
        DropReason* dropReason, nsecs_t* nextWakeupTime) {

     ...
     int32_t injectionResult = findFocusedWindowTargetsLocked(currentTime,
            entry, inputTargets, nextWakeupTime);


     dispatchEventLocked(currentTime, entry, inputTargets);
     ...
}
首先尋找獲得焦點的窗口,並將事件發送給它
//InputDispatcher.cpp
void InputDispatcher::dispatchEventLocked(nsecs_t currentTime,
        EventEntry* eventEntry, const Vector& inputTargets) {
      ...
    for (size_t i = 0; i < inputTargets.size(); i++) {
        const InputTarget& inputTarget = inputTargets.itemAt(i);
        ssize_t connectionIndex = getConnectionIndexLocked(inputTarget.inputChannel);
        if (connectionIndex >= 0) {
            sp connection = mConnectionsByFd.valueAt(connectionIndex);
            prepareDispatchCycleLocked(currentTime, connection, eventEntry, &inputTarget);
        }
       ...
    }
}
//InputDispatcher.cpp
void InputDispatcher::prepareDispatchCycleLocked(nsecs_t currentTime,
        const sp& connection, EventEntry* eventEntry, const InputTarget* inputTarget){
   ...
   enqueueDispatchEntriesLocked(currentTime, connection,
                    splitMotionEntry, inputTarget);
   ...
 }
//InputDispathcer.cpp
void InputDispatcher::enqueueDispatchEntriesLocked(nsecs_t currentTime,
const sp& connection, EventEntry* eventEntry, const InputTarget* inputTarget) {
...
startDispatchCycleLocked(currentTime, connection);
...
}
將事件加入到outbound隊列,准備發送到app//InputDispatcher.cpp
void InputDispatcher::startDispatchCycleLocked(nsecs_t currentTime,
const sp& connection){
...
status = connection->inputPublisher.publishKeyEvent(dispatchEntry->seq,
keyEntry->deviceId, keyEntry->source,
dispatchEntry->resolvedAction, dispatchEntry->resolvedFlags,
keyEntry->keyCode, keyEntry->scanCode,
keyEntry->metaState, keyEntry->repeatCount, keyEntry->downTime,
keyEntry->eventTime);
...
}
//InputTransport.cpp
status_t InputPublisher::publishKeyEvent(
        uint32_t seq,
        int32_t deviceId,
        int32_t source,
        int32_t action,
        int32_t flags,
        int32_t keyCode,
        int32_t scanCode,
        int32_t metaState,
        int32_t repeatCount,
        nsecs_t downTime,
        nsecs_t eventTime) {

    ...
    return mChannel->sendMessage(&msg);
}
通過通道,發送事件消息//InputTransport.cpp
status_t InputChannel::sendMessage(const InputMessage* msg) {
size_t msgLength = msg->size();
ssize_t nWrite;
do {
nWrite = ::send(mFd, msg, msgLength, MSG_DONTWAIT | MSG_NOSIGNAL);
...
}
//Looper.cpp
int Looper::pollInner(int timeoutMillis) {
    struct epoll_event eventItems[EPOLL_MAX_EVENTS];
    //等待消息
    int eventCount = epoll_wait(mEpollFd, eventItems, EPOLL_MAX_EVENTS, timeoutMillis);
    …

Done:
    for (size_t i = 0; i < mResponses.size(); i++) {
        Response& response = mResponses.editItemAt(i);
        if (response.request.ident == ALOOPER_POLL_CALLBACK) {
            int fd = response.request.fd;
            int events = response.events;
            void* data = response.request.data;
            // callback--------NativeInputEventRecieverd
            int callbackResult = response.request.callback->handleEvent(fd, events, data);
            if (callbackResult == 0) {
                removeFd(fd);
            }
            response.request.callback.clear();
            result = ALOOPER_POLL_CALLBACK;
        }
    }
    return result;
}
app looper會監測channel下socket fd,當fd發生變化,回調當時注冊的函數NativeInputEventReciever//android_view_InputEventReceiver.cpp
int NativeInputEventReceiver::handleEvent(int receiveFd, int events, void* data) {
...
status_t status = consumeEvents(env, false /*consumeBatches*/, -1, NULL);
...
}
//android_view_InputEventReceiver.cpp

status_t NativeInputEventReceiver::consumeEvents(JNIEnv* env, bool consumeBatches, nsecs_t frameTime, bool* outConsumedBatch) {
....
  status_t status = mInputConsumer.consume(&mInputEventFactory,
                consumeBatches, frameTime, &seq, &inputEvent);
...
env->CallVoidMethod(receiverObj.get(),
                        gInputEventReceiverClassInfo.dispatchInputEvent, seq, inputEventObj);
...

}
通過jni調用java函數,dispatchInputevent//InputTransport.cpp
status_t InputConsumer::consume(InputEventFactoryInterface* factory,
bool consumeBatches, nsecs_t frameTime, uint32_t* outSeq, InputEvent** outEvent) {
...
status_t result = mChannel->receiveMessage(&mMsg);
...
}
//通過通道收取消息,初始化按鍵事件 //InputEventReceiver.java
// Called from native code.
@SuppressWarnings("unused")
private void dispatchInputEvent(int seq, InputEvent event) {
mSeqMap.put(event.getSequenceNumber(), seq);
onInputEvent(event);
} 此處onInputEent調用重寫的子類方法。即WindowInputEventReceiver的方法//ViewRootImpl.java
final class WindowInputEventReceiver extends InputEventReceiver {
public WindowInputEventReceiver(InputChannel inputChannel, Looper looper) {
super(inputChannel, looper);
}
@Override
public void onInputEvent(InputEvent event) {
enqueueInputEvent(event, this, 0, true);
}//ViewRootImpl.java
void enqueueInputEvent(InputEvent event,
InputEventReceiver receiver, int flags, boolean processImmediately) {
QueuedInputEvent q = obtainQueuedInputEvent(event, receiver, flags);
...
if (processImmediately) {
doProcessInputEvents();
} else {
scheduleProcessInputEvents();
}
}
 Android編程繪制圓形圖片的方法
本文實例講述了Android編程繪制圓形圖片的方法。分享給大家供大家參考,具體如下:效果圖如下:第一步:新建RoundView自定義控件繼承Viewpackage com
 Android中二維碼的生成方法(普通二維碼、中心Logo 二維碼、及掃描解析二維碼)
首先聲明我們通篇用的都是Google開源框架Zxing,要實現的功能有三個 ,生成普通二維碼、生成帶有中心圖片Logo 的二維碼,掃描解析二維碼,直接上效果圖吧首先我們需
 ListView常用拓展
一、實現ListView下拉刷新第一步:添加頂部下拉加載界面,即ListView的header頭布局1、創建layout布局文件head_layout2、創建一個自定義L
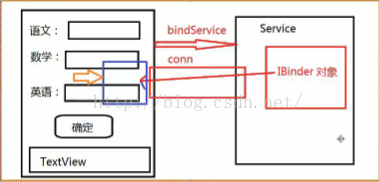 Service 入門——service調用執行順序&利用service模擬完成一個後台服務
package com.example.xh.myapplication;import android.content.ComponentName;import andr