編輯:關於Android編程
最近工作的項目,需要用到cordova進行插件開發,具體Cordova的作用,就不再贅述,大家可以自行的去百度就OK了,直接開始。具體的流程,我將已一個小的Demo進行推進講解。也是剛剛接觸,太理論的基礎東西我也說不好,還是先跑起來一個Demo,才有繼續學下去的動力~大家多多指教~
Step1.准備工作:
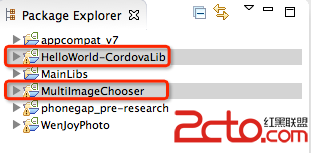
首先將我提供的Demo實例包中的HelloWorld-CordovaLib引入到工作空間中,我是使用的Eclipse,接著創建工程MultiImageChooser,同時將HelloWorld-CordovaLib作為Library引入到MultiImageChooser中:
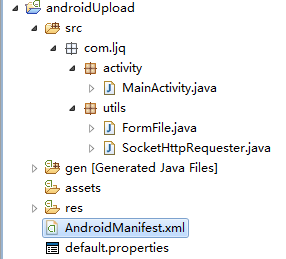
接著,按照Demo實例包中的目錄結構,引入Cordova所需要的文件,完成後的目錄結構如下所示:
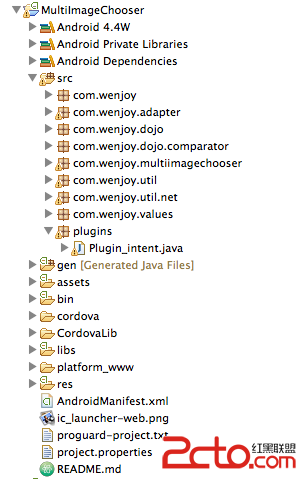
其中,res文件夾下還有一個xml文件夾,記得一並拷過去哦~
截至到現在,基本的准備工作就算是完成了。
Step2.插件的開發
插件的編寫,是為了讓JS可以調用我的Activity,其實編寫起來還是比較簡單的。
a.在src目錄下建立包plugins,編寫插件類Plugin_intent
package plugins;

import org.apache.cordova.CallbackContext;
import org.apache.cordova.CordovaPlugin;

import android.content.Intent;
import android.util.Log;
import android.widget.Toast;

import com.wenjoy.dojo.ResponseJSON;
import com.wenjoy.multiimagechooser.MainActivity;

/**
 * js調用java方法
 *
 * 必須繼承CordovaPlugin CordovaPlugin裡面有實現cordovaActivity的方法
 * 提供startActivityForResult();
 *
 * 我使用的 cordova 3.3.0版本
 *
 * @author XueQi
 *
 */
public class Plugin_intent extends CordovaPlugin {
	private String infos;

	/**
	 * 注意 構造方法不能為
	 *
	 * Plugin_intent(){}
	 *
	 * 可以不寫或者 定義為如下
	 *
	 */
	public Plugin_intent() {
	}

	CallbackContext callbackContext;

	@Override
	public boolean execute(String action, org.json.JSONArray args,
			CallbackContext callbackContext) throws org.json.JSONException {
		this.callbackContext = callbackContext;
		Log.i(123, action);

		if (action.equals(intent)) {
			// 獲取JS傳遞的args的第一個參數
			infos = args.getString(0);
			this.function();
			return true;
		}
		return false;

	}

	// 方法執行體
	private void function() {
		// cordova.getActivity() 獲取當前activity的this
		Log.i(123, cordova.getActivity().toString());
		Intent intent = new Intent(cordova.getActivity(), MainActivity.class);
		intent.putExtra(infos, infos);
		cordova.startActivityForResult((CordovaPlugin) this, intent, 200);

	}

	@Override
	public void onActivityResult(int requestCode, int resultCode, Intent intent) {

		super.onActivityResult(requestCode, resultCode, intent);
		// 傳遞返回值 給js方法
		callbackContext.success(com.alibaba.fastjson.JSONArray
				.toJSONString(ResponseJSON.getInstance().getJsonObjects()));
		if (ResponseJSON.getInstance().getJsonObjects() != null
				&& ResponseJSON.getInstance().getJsonObjects().size() > 0) {
			Toast.makeText(cordova.getActivity(), 恭喜,上傳完成, 1000).show();
		}
	}

}
b.方法編寫完成後,要在res/xml/config.xml下注冊,寫在widget標簽中添加
feature的name很重要,一會在JS中要用到。
c.編寫插件JS文件,在assert/www/plugins下,創建intent.js文件
cordova.define(org.apache.cordova.intent, function(require, exports, module) { /*
 *
 * Licensed to the Apache Software Foundation (ASF) under one
 * or more contributor license agreements.  See the NOTICE file
 * distributed with this work for additional information
 * regarding copyright ownership.  The ASF licenses this file
 * to you under the Apache License, Version 2.0 (the
 * License); you may not use this file except in compliance
 * with the License.  You may obtain a copy of the License at
 *
 *   http://www.apache.org/licenses/LICENSE-2.0
 *
 * Unless required by applicable law or agreed to in writing,
 * software distributed under the License is distributed on an
 * AS IS BASIS, WITHOUT WARRANTIES OR CONDITIONS OF ANY
 * KIND, either express or implied.  See the License for the
 * specific language governing permissions and limitations
 * under the License.
 *
*/

var exec = require('cordova/exec');

/**
 * Provides access to the vibration mechanism on the device.
 */

module.exports = {

    /**
     * 一共5個參數
       第一個 :成功會掉
       第二個 :失敗回調
       第三個 :將要調用的類的配置名字(在config.xml中配置 稍後在下面會講解)
       第四個 :調用的方法名(一個類裡可能有多個方法 靠這個參數區分)
       第五個 :傳遞的參數  以json的格式
     */
    demo: function(mills) {
        exec(function(winParam){
        	alert(winParam);//執行成功,winParam是類中callbackContext.success傳遞的參數
        }, null, Demo, intent, [mills]);
    },
};

});
demo:定義被JS調用的方法名
Demo:就是我們剛才在config.xml中配置的插件類的名字
mills:這裡我始終只能傳遞一個參數,所以,我現在的解決方式是拼接一個字符串,例如:'aaa,nnn,ccc',用逗號分割三個參數
Step3.使用插件
截止到現在,整個插件就OK啦,可以創建一個html和Activiry了,這裡我只列出LUNCH Activity的編寫和html頁面
在assert/www下建立index.html文件,很簡單
package com.wenjoy.multiimagechooser;

import org.apache.cordova.CordovaActivity;

import android.content.Intent;
import android.os.Bundle;

/**
 * 裝載HTML頁面的Activity
 *
 * @author XueQi
 *
 */
public class ViewActivity extends CordovaActivity {
	@Override
	public void onCreate(Bundle savedInstanceState) {
		super.onCreate(savedInstanceState);
		super.init();
		// Set by  in config.xml
		super.loadUrl(file:///android_asset/www/index.html);
		// super.loadUrl(file:///android_asset/www/index.html)
	}

	@Override
	protected void onActivityResult(int requestCode, int resultCode,
			Intent intent) {
		super.onActivityResult(requestCode, resultCode, intent);

	}
}
最後,至於權限什麼的,大家就自己添加好了。
 AndroidStudio的debug功能詳解
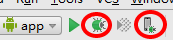
運行debug模式 1. 進入debug- 點擊圖中紅色圓圈圈起的左邊綠色按鈕,運行app的debug模式,快捷鍵Shift+F9- 點擊圖中紅色圓圈圈起的右邊按鈕,可以
 android開源系列:CircleImageView自定義圓形控件的使用
主要的類: package de.hdodenhof.circleimageview; import edu.njupt.zhb.main.
 Android開發之控制手機音頻
本實例通過MediaPlayer播放一首音樂並通過AudioManager控制手機音頻,關於AudioManager的詳解可參照:Android開發之AudioManag
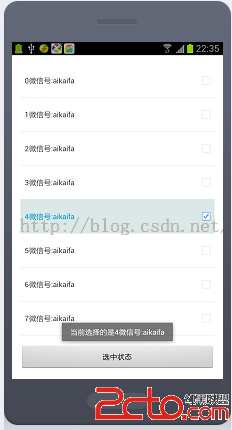 (Android)五分鐘讓你輕松學會ListView單選和多選功能
在實現ListView單選時,我們可以在Adapter中自己創建一個selectPosition參數,這樣是能實現需求。但加入要是再加一個多選接著又在Adapter中創建