編輯:關於Android編程
FragmentTabHost是support-v包下提供的用於集成和管理Fragment頁面的組件.
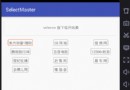
今天要實現的效果圖如下:
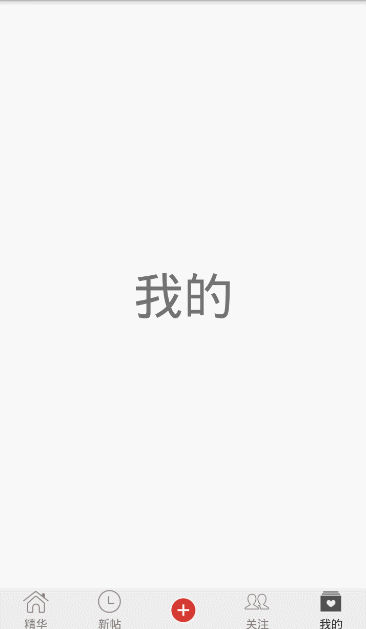
整體結構是MainActivity+5個模塊的Fragment.
MainActivity的布局如下:
<?xml version="1.0" encoding="utf-8"?>
<LinearLayout xmlns:android="http://schemas.android.com/apk/res/android"
    android:layout_width="match_parent"
    android:layout_height="match_parent"
    android:orientation="vertical">
 <!--真正的內容視圖,用於展示Fragment-->
 <FrameLayout
  android:id="@+id/real_tabcontent"
  android:layout_width="match_parent"
  android:layout_height="0dp"
  android:layout_weight="1"/>

 <!--tabhost,必須使用系統的id-->
 <android.support.v4.app.FragmentTabHost
  android:id="@android:id/tabhost"
  android:layout_width="match_parent"
  android:layout_height="wrap_content"
  >
  <!--tabcontent,必須使用系統的id-->
  <FrameLayout
   android:id="@android:id/tabcontent"
   android:layout_width="0dp"
   android:layout_height="0dp"
   android:layout_weight="0"/>
 </android.support.v4.app.FragmentTabHost>

</LinearLayout>
每個tab的布局如下:
<?xml version="1.0" encoding="utf-8"?>
<LinearLayout xmlns:android="http://schemas.android.com/apk/res/android"
    android:layout_width="match_parent"
    android:layout_height="wrap_content"
    android:gravity="center"
    android:orientation="vertical">
 <!--tab圖片-->
 <ImageView
  android:id="@+id/iv_tab"
  android:layout_width="26dp"
  android:layout_height="26dp"
  />
 <!--tab名字-->
 <TextView
  android:id="@+id/tv_tab"
  android:layout_width="wrap_content"
  android:layout_height="wrap_content"
  android:layout_marginTop="1dp"
  android:textSize="12sp"/>
</LinearLayout>
MainActivity代碼如下:
package blog.csdn.net.mchenys.bsbdj.modul.main;

import android.content.res.ColorStateList;
import android.os.Bundle;
import android.support.v4.app.FragmentTabHost;
import android.text.TextUtils;
import android.view.View;
import android.widget.ImageView;
import android.widget.TabHost;
import android.widget.TextView;

import blog.csdn.net.mchenys.bsbdj.R;
import blog.csdn.net.mchenys.bsbdj.common.base.BaseActivity;
import blog.csdn.net.mchenys.bsbdj.modul.attention.view.AttentionFragment;
import blog.csdn.net.mchenys.bsbdj.modul.essence.view.EssenceFragment;
import blog.csdn.net.mchenys.bsbdj.modul.mine.view.MineFragment;
import blog.csdn.net.mchenys.bsbdj.modul.newpost.view.NewpostFragment;
import blog.csdn.net.mchenys.bsbdj.modul.publish.view.PublishFragment;
import blog.csdn.net.mchenys.bsbdj.mvp.presenter.impl.MvpBasePresenter;
/**
 * Created by mChenys on 2016/5/27.
 */
public class MainActivity extends BaseActivity {

 //定義數組來存放tab的圖片選擇器
 private int[] mTabImage = {R.drawable.main_bottom_essence_selector,
   R.drawable.main_bottom_latest_selector,
   R.drawable.main_bottom_writeposts_selector,
   R.drawable.main_bottom_news_selector,
   R.drawable.main_bottom_my_selector};

 //tab選項卡的文字
 private String[] mTabTitle = {"精華", "新帖", "", "關注", "我的"};

 //每個tab對應的Fragment的字節碼對象
 private Class[] fragmentArray = {EssenceFragment.class, NewpostFragment.class,
   PublishFragment.class, AttentionFragment.class, MineFragment.class};

 @Override
 protected boolean isHomePage() {
  return true;
 }

 @Override
 public Integer getLayoutResId() {
  return R.layout.activity_main;
 }

 @Override
 public void initView() {
  //獲取tabhost
  FragmentTabHost tabHost = (FragmentTabHost) findViewById(android.R.id.tabhost);
  //綁定tabContent
  tabHost.setup(this, getSupportFragmentManager(), R.id.real_tabcontent);
  //去掉分割線
  tabHost.getTabWidget().setDividerDrawable(null);
  for (int i = 0; i < fragmentArray.length; i++) {
   //綁定Fragment,添加到的FragmentTabHost
   //設置tab的名稱和view
   TabHost.TabSpec tabSpec = tabHost.
     newTabSpec(mTabTitle[i]).
     setIndicator(getTabItemView(i));
   Bundle bundle = new Bundle();
   bundle.putString("title", mTabTitle[i]);
   //添加tab和關聯對應的fragment
   tabHost.addTab(tabSpec, fragmentArray[i], bundle);
   //設置tab的背景色
   tabHost.getTabWidget().
     getChildAt(i).
     setBackgroundColor(getResources().getColor(R.color.bgColor));
  }
  //默認選中第一個tab
  tabHost.setCurrentTab(0);
  //設置tab的切換監聽
  tabHost.setOnTabChangedListener(new TabHost.OnTabChangeListener() {
   @Override
   public void onTabChanged(String tabId) {
    //可以在這裡監聽tab的切換
   }
  });
 }

 //tab的字體選擇器
 ColorStateList mColorStateList;

 /**
  * 給Tab按鈕設置圖標和文字
  */
 private View getTabItemView(int index) {
  View view = getLayoutInflater().inflate(R.layout.view_tab_indicator, null);
  ImageView imageView = (ImageView) view.findViewById(R.id.iv_tab);
  TextView textView = (TextView) view.findViewById(R.id.tv_tab);
  //設置圖片選擇器
  imageView.setImageResource(mTabImage[index]);
  //設置字體選擇器
  if (mColorStateList == null) {
   mColorStateList = getResources().
     getColorStateList(R.color.main_bottom_text_selector);
   textView.setTextColor(mColorStateList);
  }
  //設置tab的文字
  if (TextUtils.isEmpty(mTabTitle[index])) {
   //如果沒有名稱,則隱藏tab下的textView
   textView.setVisibility(View.GONE);
  } else {
   textView.setVisibility(View.VISIBLE);
   textView.setText(mTabTitle[index]);
  }
  return view;
 }


 @Override
 public void initListener() {

 }

 @Override
 public void initData() {

 }

 @Override
 public void reLoadData() {

 }

 @Override
 public void onClick(View v) {

 }

 @Override
 public MvpBasePresenter bindPresenter() {
  return null;
 }
}
最後附上字體選擇器
<?xml version="1.0" encoding="utf-8"?>
<selector xmlns:android="http://schemas.android.com/apk/res/android">
 <item android:state_selected="false" android:color="@color/main_bottom_text_normal" />
 <item android:state_selected="true" android:color="@color/main_bottom_text_select" />
</selector>
圖片選擇器有5個,這裡附上一個,其他類似:
<?xml version="1.0" encoding="utf-8"?>
<selector
 xmlns:android="http://schemas.android.com/apk/res/android">
 <item android:state_selected="false" android:drawable="@drawable/main_bottom_essence_normal" />
 <item android:state_selected="true" android:drawable="@drawable/main_bottom_essence_press" />
</selector>
以上就是本文的全部內容,希望對大家的學習有所幫助,也希望大家多多支持本站。
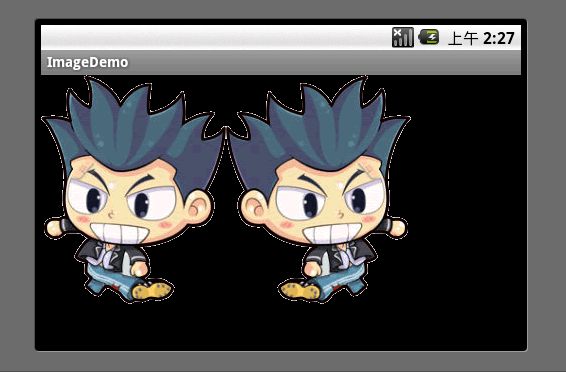 android實現圖片反轉效果
可能有些同學不明白,為啥要圖片反轉(不是旋轉哦),我們在游戲開發中,為了節省圖片資源(空間) 有可能會使用到圖片反轉,例如,一個人物圖片,面向左,或右,如果不能實現圖片反
 android仿IOS,滑動隱藏底部ScrollView
在我們開發android app時,會有很多效果都需要模仿IOS,最近在做一個頁面時,其中用到了 ScrollView,但要做成IOS那種在ScrollView滑動時,浮
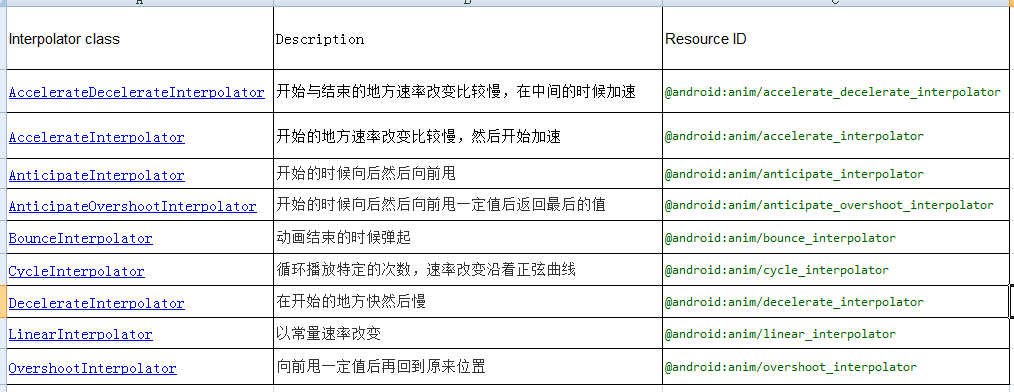 Android動畫TimeInterpolator(插值器)和TypeEvaluator(估值器)分析
這篇文章繼續分析Android動畫的TimeInterpolator(插值器)和TypeEvaluator(估值器)的簡單實現,以及分別去自定義插值器和估值器。一,Tim
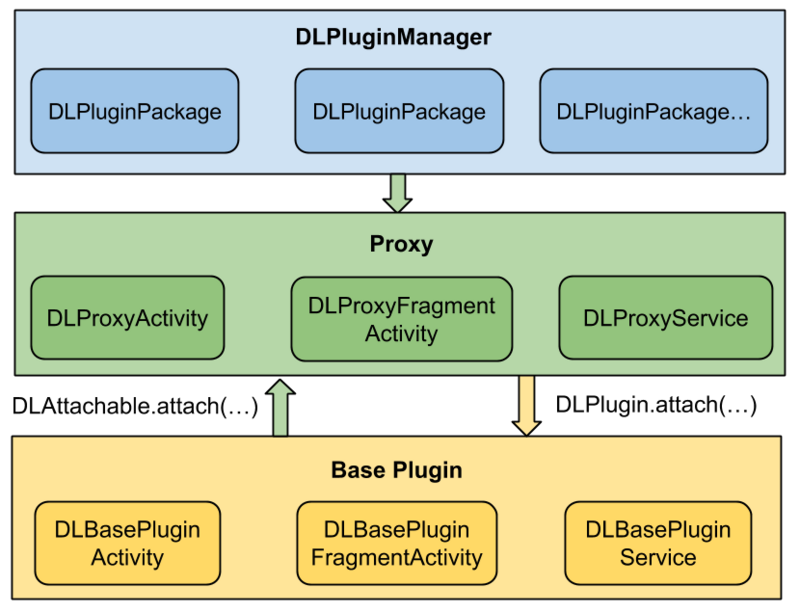 拆輪子之動態加載DynamicLoadApk
動態加載是什麼應用在運行的時候通過加載一些本地不存在的可執行文件實現一些特定的功能,Android中動態加載的核心思想是動態調用外部的Dex文件,極端的情況下,Andro
 安卓實戰開發之CardView的selector及GrideView的item按下狀態保留selector(state_activated)的實現
android的selector對於android開發者而言再熟悉不過了
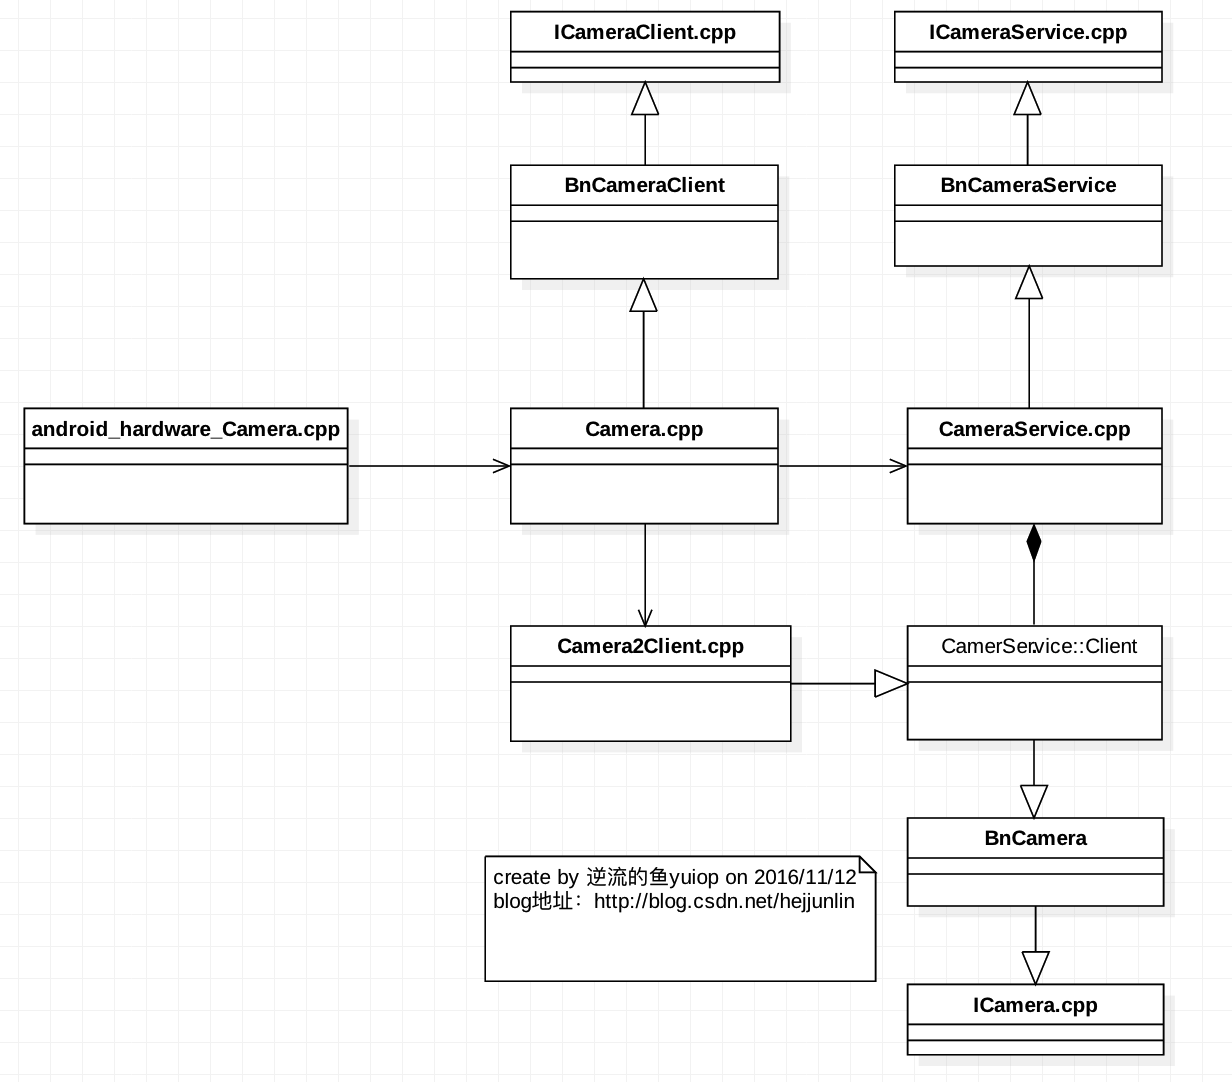 Android Multimedia框架總結(十九)Camera2框架C/S模型之CameraService啟動及與Client連接過程
Agenda:一張圖看Camera2框架類圖 CameraService