編輯:關於Android編程
我們聊聊我們常寫的登錄界面,這個界面我相信很多人都寫過,而且也沒什麼難度,但是如果要實現比較不一般的效果,那就要花點心思了,先看看項目的效果吧:
我一直都不知道怎麼在編輯框連設置圖片大小,所以這個圖不怎麼樣適配編輯框了,大家先湊合著看看。
我先講講思路,當我們輸入完賬號跟密碼之後,點擊登錄,那這個輸入框就慢慢的消失,在消失後,緊接著就出現這個進度的界面。
思路有了,那我們就開始編碼了:
新建一個項目,然後系統生成了一個MainActivity.java文件和activity_main.xml文件。先在activity_main裡面操作:
代碼如下:
<RelativeLayout xmlns:android="http://schemas.android.com/apk/res/android"
  xmlns:tools="http://schemas.android.com/tools"
  android:layout_width="match_parent"
  android:layout_height="match_parent"
  android:background="#7adfb8"
  tools:context=".MainActivity" >

  <include
    android:id="@+id/main_title"
    layout="@layout/title_layout" />

  <LinearLayout
    android:layout_width="match_parent"
    android:layout_height="wrap_content"
    android:layout_below="@+id/main_title"
    android:orientation="vertical" >

    <ImageView
      android:layout_width="55dip"
      android:layout_height="55dip"
      android:layout_gravity="center_horizontal"
      android:src="@drawable/project_detail_cir" />

    <TextView
      android:layout_width="fill_parent"
      android:layout_height="wrap_content"
      android:layout_marginTop="5dip"
      android:gravity="center"
      android:text="FIREFLY FOREST"
      android:textColor="#ffffff"
      android:textSize="24sp" />

    <TextView
      android:layout_width="fill_parent"
      android:layout_height="wrap_content"
      android:gravity="center"
      android:text="SHOW YOUR IDEAS"
      android:textColor="#ffffff"
      android:textSize="16sp" />
  </LinearLayout>

  <RelativeLayout
    android:layout_width="match_parent"
    android:layout_height="wrap_content"
    android:layout_centerInParent="true" >

    <include
      android:id="@+id/input_layout"
      android:layout_width="match_parent"
      android:layout_height="130dip"
      layout="@layout/input_layout" />

    <include
      android:id="@+id/layout_progress"
      android:layout_width="match_parent"
      android:layout_height="130dip"
      layout="@layout/layout_progress"
      android:visibility="gone" />

    <TextView
      android:id="@+id/main_btn_login"
      android:layout_width="wrap_content"
      android:layout_height="wrap_content"
      android:layout_below="@+id/input_layout"
      android:layout_centerInParent="true"
      android:layout_marginTop="15dip"
      android:background="@drawable/text_bg"
      android:gravity="center"
      android:paddingBottom="2dip"
      android:paddingLeft="15dip"
      android:paddingRight="15dip"
      android:paddingTop="2dip"
      android:text="Login"
      android:textColor="#ffffff"
      android:textSize="20sp" />
  </RelativeLayout>

</RelativeLayout>
這裡我引用外面的三個布局,再加上一個TextView寫的按鈕,標題所引用的文件:
title_layout.xml
<?xml version="1.0" encoding="utf-8"?>
<RelativeLayout xmlns:android="http://schemas.android.com/apk/res/android"
  android:layout_width="match_parent"
  android:layout_height="50dip"
  android:gravity="center_vertical"
  android:padding="10dip" >

  <ImageView
    android:layout_width="wrap_content"
    android:layout_height="wrap_content"
    android:src="@drawable/back" />

  <TextView
    android:layout_width="wrap_content"
    android:layout_height="wrap_content"
    android:textColor="#ffffff"
    android:layout_alignParentRight="true"
    android:layout_centerVertical="true"
    android:textSize="20sp"
    android:text="Sign up"
    />
</RelativeLayout>
輸入框引用的文件:input_layout.xml
<?xml version="1.0" encoding="utf-8"?>
<LinearLayout xmlns:android="http://schemas.android.com/apk/res/android"
  android:layout_width="match_parent"
  android:layout_height="wrap_content"
  android:orientation="vertical" >

  <LinearLayout
    android:layout_width="match_parent"
    android:layout_height="wrap_content"
    android:layout_margin="20dip"
    android:background="@drawable/radius_drawable_bg"
    android:orientation="vertical"
    android:padding="10dip" >

    <LinearLayout
      android:id="@+id/input_layout_name"
      android:layout_width="match_parent"
      android:layout_height="wrap_content"
      android:gravity="center_vertical"
      android:orientation="horizontal" >

      <ImageView
        android:layout_width="wrap_content"
        android:layout_height="wrap_content"
        android:src="@drawable/paw_code" />

      <EditText
        android:layout_width="match_parent"
        android:layout_height="wrap_content"
        android:layout_marginLeft="10dip"
        android:background="#00000000"
        android:hint="賬號/用戶名/郵箱"
        android:padding="5dip"
        android:textSize="16sp" />
    </LinearLayout>

    <View
      android:layout_width="match_parent"
      android:layout_height="1px"
      android:layout_marginBottom="5dip"
      android:layout_marginTop="5dip"
      android:background="#eeeeee" />

    <LinearLayout
      android:id="@+id/input_layout_psw"
      android:layout_width="match_parent"
      android:layout_height="wrap_content"
      android:gravity="center_vertical"
      android:orientation="horizontal" >

      <ImageView
        android:layout_width="wrap_content"
        android:layout_height="wrap_content"
        android:src="@drawable/paw_left" />

      <EditText
        android:layout_width="match_parent"
        android:layout_height="wrap_content"
        android:layout_marginLeft="10dip"
        android:background="#00000000"
        android:hint="密碼"
        android:inputType="textPassword"
        android:padding="5dip"
        android:textSize="16sp" />
    </LinearLayout>
  </LinearLayout>
</LinearLayout>
還有一個加載進度的界面:layout_progress.xml
<?xml version="1.0" encoding="utf-8"?>
<LinearLayout xmlns:android="http://schemas.android.com/apk/res/android"
  android:layout_width="match_parent"
  android:layout_height="wrap_content"
  android:orientation="vertical" >

  <LinearLayout
    android:layout_width="wrap_content"
    android:layout_height="wrap_content"
    android:layout_gravity="center"
    android:layout_margin="20dip"
    android:background="@drawable/rotate_layout_bg"
    android:orientation="vertical"
    android:padding="10dip" >

    <ProgressBar
      android:id="@+id/progressBar2"
      android:layout_width="wrap_content"
       android:layout_margin="10dip"
      android:layout_height="wrap_content" />
  </LinearLayout>

</LinearLayout>
當然,我這裡還用到了drawable文件:radius_drawable_bg.xml,這個文件是輸入框的圓角矩形背景:
<?xml version="1.0" encoding="utf-8"?>
<shape xmlns:android="http://schemas.android.com/apk/res/android" >
  <corners android:radius="5dip"/>
  <solid android:color="#ffffff"/>

</shape>
還有進度的白色圓形背景:rotate_layout_bg.xml
<?xml version="1.0" encoding="utf-8"?>
<shape xmlns:android="http://schemas.android.com/apk/res/android"
  android:shape="oval" >

  <corners android:radius="60dip" />

  <solid android:color="#ffffff" />

</shape>
除此之外,還有一個按鈕的描邊背景text_bg.xml
<?xml version="1.0" encoding="utf-8"?>
<shape xmlns:android="http://schemas.android.com/apk/res/android"
  >

  <corners android:radius="50dip"/>

  <stroke
    android:width="1dip"
    android:color="#ffffff" />

</shape>
至此,我們的前期界面的編寫就完成了,不難,很容易理解,下面開始處理MainActivity.java文件,先看看這裡的初始化操作;
  private TextView mBtnLogin;

  private View progress;

  private View mInputLayout;

  private float mWidth, mHeight;

  private LinearLayout mName, mPsw;

  private void initView() {
    mBtnLogin = (TextView) findViewById(R.id.main_btn_login);
    progress = findViewById(R.id.layout_progress);
    mInputLayout = findViewById(R.id.input_layout);
    mName = (LinearLayout) findViewById(R.id.input_layout_name);
    mPsw = (LinearLayout) findViewById(R.id.input_layout_psw);

    mBtnLogin.setOnClickListener(this);
  }
這裡主要就是加載控件了,不需要多解釋,重點看看動畫的處理:
/**
   * 輸入框的動畫效果
   *
   * @param view
   *      控件
   * @param w
   *      寬
   * @param h
   *      高
   */
  private void inputAnimator(final View view, float w, float h) {

    AnimatorSet set = new AnimatorSet();

    ValueAnimator animator = ValueAnimator.ofFloat(0, w);
    animator.addUpdateListener(new AnimatorUpdateListener() {

      @Override
      public void onAnimationUpdate(ValueAnimator animation) {
        float value = (Float) animation.getAnimatedValue();
        ViewGroup.MarginLayoutParams params = (MarginLayoutParams) view
            .getLayoutParams();
        params.leftMargin = (int) value;
        params.rightMargin = (int) value;
        view.setLayoutParams(params);
      }
    });

    ObjectAnimator animator2 = ObjectAnimator.ofFloat(mInputLayout,
        "scaleX", 1f, 0.5f);
    set.setDuration(1000);
    set.setInterpolator(new AccelerateDecelerateInterpolator());
    set.playTogether(animator, animator2);
    set.start();
    set.addListener(new AnimatorListener() {

      @Override
      public void onAnimationStart(Animator animation) {

      }

      @Override
      public void onAnimationRepeat(Animator animation) {

      }

      @Override
      public void onAnimationEnd(Animator animation) {
        /**
         * 動畫結束後,先顯示加載的動畫,然後再隱藏輸入框
         */
        progress.setVisibility(View.VISIBLE);
        progressAnimator(progress);
        mInputLayout.setVisibility(View.INVISIBLE);

      }

      @Override
      public void onAnimationCancel(Animator animation) {

      }
    });

  }
這裡用到的知識點還是挺多,例如:屬性動畫容器、插值器、屬性動畫的監聽、動態的設置控件的相對位置;一開始可能不容易理解,沒關系,以後我會在博客裡都講到。我就說一下這裡的思路;
當我們開啟這個動畫的時候,先是設置相對位置,同時處理在X軸的縮放,然後我們監聽到的生命周期,並且在動畫結束的時候,隱藏當前布局,開啟另外一個布局的顯示動畫,看到另外一個動畫:
/**
   * 出現進度動畫
   *
   * @param view
   */
  private void progressAnimator(final View view) {
    PropertyValuesHolder animator = PropertyValuesHolder.ofFloat("scaleX",
        0.5f, 1f);
    PropertyValuesHolder animator2 = PropertyValuesHolder.ofFloat("scaleY",
        0.5f, 1f);
    ObjectAnimator animator3 = ObjectAnimator.ofPropertyValuesHolder(view,
        animator, animator2);
    animator3.setDuration(1000);
    animator3.setInterpolator(new JellyInterpolator());
    animator3.start();

  }
其實這裡的套路是一樣的但是不同的是,這裡我用到了自己的插值器;
JellyInterpolator.java:
public class JellyInterpolator extends LinearInterpolator {
  private float factor;

  public JellyInterpolator() {
    this.factor = 0.15f;
  }

  @Override
  public float getInterpolation(float input) {
    return (float) (Math.pow(2, -10 * input)
        * Math.sin((input - factor / 4) * (2 * Math.PI) / factor) + 1);
  }
}
讓動畫更有動感。下面我貼上MainActivity的全部代碼;
public class MainActivity extends Activity implements OnClickListener {

  private TextView mBtnLogin;

  private View progress;

  private View mInputLayout;

  private float mWidth, mHeight;

  private LinearLayout mName, mPsw;

  @Override
  protected void onCreate(Bundle savedInstanceState) {
    super.onCreate(savedInstanceState);
    requestWindowFeature(Window.FEATURE_NO_TITLE);
    setContentView(R.layout.activity_main);

    initView();
  }

  private void initView() {
    mBtnLogin = (TextView) findViewById(R.id.main_btn_login);
    progress = findViewById(R.id.layout_progress);
    mInputLayout = findViewById(R.id.input_layout);
    mName = (LinearLayout) findViewById(R.id.input_layout_name);
    mPsw = (LinearLayout) findViewById(R.id.input_layout_psw);

    mBtnLogin.setOnClickListener(this);
  }

  @Override
  public void onClick(View v) {

    // 計算出控件的高與寬
    mWidth = mBtnLogin.getMeasuredWidth();
    mHeight = mBtnLogin.getMeasuredHeight();
    // 隱藏輸入框
    mName.setVisibility(View.INVISIBLE);
    mPsw.setVisibility(View.INVISIBLE);

    inputAnimator(mInputLayout, mWidth, mHeight);

  }

  /**
   * 輸入框的動畫效果
   *
   * @param view
   *      控件
   * @param w
   *      寬
   * @param h
   *      高
   */
  private void inputAnimator(final View view, float w, float h) {

    AnimatorSet set = new AnimatorSet();

    ValueAnimator animator = ValueAnimator.ofFloat(0, w);
    animator.addUpdateListener(new AnimatorUpdateListener() {

      @Override
      public void onAnimationUpdate(ValueAnimator animation) {
        float value = (Float) animation.getAnimatedValue();
        ViewGroup.MarginLayoutParams params = (MarginLayoutParams) view
            .getLayoutParams();
        params.leftMargin = (int) value;
        params.rightMargin = (int) value;
        view.setLayoutParams(params);
      }
    });

    ObjectAnimator animator2 = ObjectAnimator.ofFloat(mInputLayout,
        "scaleX", 1f, 0.5f);
    set.setDuration(1000);
    set.setInterpolator(new AccelerateDecelerateInterpolator());
    set.playTogether(animator, animator2);
    set.start();
    set.addListener(new AnimatorListener() {

      @Override
      public void onAnimationStart(Animator animation) {

      }

      @Override
      public void onAnimationRepeat(Animator animation) {

      }

      @Override
      public void onAnimationEnd(Animator animation) {
        /**
         * 動畫結束後,先顯示加載的動畫,然後再隱藏輸入框
         */
        progress.setVisibility(View.VISIBLE);
        progressAnimator(progress);
        mInputLayout.setVisibility(View.INVISIBLE);

      }

      @Override
      public void onAnimationCancel(Animator animation) {

      }
    });

  }

  /**
   * 出現進度動畫
   *
   * @param view
   */
  private void progressAnimator(final View view) {
    PropertyValuesHolder animator = PropertyValuesHolder.ofFloat("scaleX",
        0.5f, 1f);
    PropertyValuesHolder animator2 = PropertyValuesHolder.ofFloat("scaleY",
        0.5f, 1f);
    ObjectAnimator animator3 = ObjectAnimator.ofPropertyValuesHolder(view,
        animator, animator2);
    animator3.setDuration(1000);
    animator3.setInterpolator(new JellyInterpolator());
    animator3.start();

  }
}
至此,所有的操作已經完成了,運行項目後點擊登錄按鈕,就可以看到效果了。
源碼下載:http://xiazai.jb51.net/201607/yuanma/LoginProject(jb51.net).rar
以上就是本文的全部內容,希望對大家的學習有所幫助,也希望大家多多支持本站。
 Android Activity啟動模式之singleTask實例詳解
本文實例分析了Android Activity啟動模式之singleTask。分享給大家供大家參考,具體如下:前面的文章介紹了Android 活動Activity的啟動模
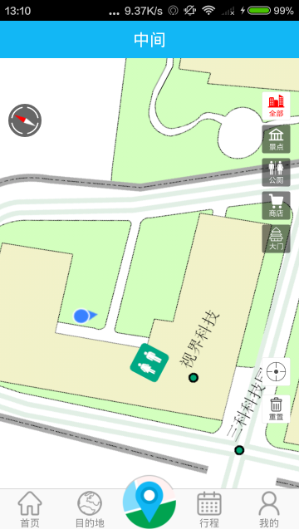 Arcgis地圖常用操作
效果圖 功能簡介 這個頁面用到了添加圖層,添加覆蓋物,覆蓋物的事件處理,地圖的旋轉、縮放,高德定位,地圖分層顯隱,關鍵詞搜索等功能。 本篇博
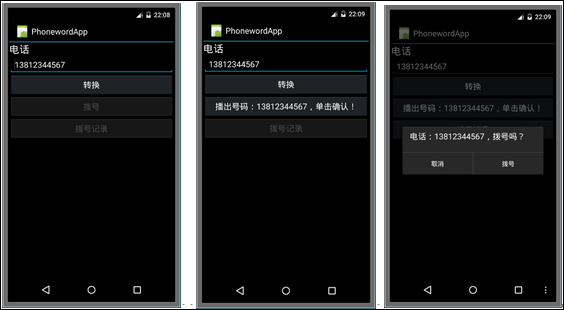 第1個Android應用程序 Android制作簡單單頁導航
本例子演示如何添加一個簡單的單頁導航,在此基礎上,再演示如何在第2個頁面中顯示第1個頁面中撥打過的所有電話號碼。(1)通過該例子理解Android App的基本架構。(2
 Android學習能力之統計日志上傳設計
一款軟件就像一個孩子,不斷的在學習,在探索,當孩子犯下錯誤的時候,我們可以去包容,當孩子犯不改的時候,獲取他就不再讓人喜歡,甚至是去拋棄他。人之常情的問題,也是做軟件的我