編輯:關於Android編程
前言
在一些APP中我們可以看到一些存放標簽的容器控件,和我們平時使用的一些布局方式有些不同,它們一般都可以自動適應屏幕的寬度進行布局,根據對自定義控件的一些理解,今天寫一個簡單的標簽容器控件,給大家參考學習。
下面這個是我在手機上截取的一個實例,是在MIUI8系統上截取的

這個是我實現的效果圖

原理介紹
根據對整個控件的效果分析,大致可以將控件分別從以下這幾個角度進行分析:
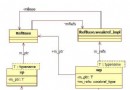
1.首先涉及到自定義的ViewGroup,因為現有的控件沒法滿足我們的布局效果,就涉及到要重寫onMeasure和onLayout,這裡需要注意的問題是自定義View的時候,我們需要考慮到View的Padding屬性,而在自定義ViewGroup中我們需要在onLayout中考慮Child控件的margin屬性否則子類設置這個屬性將會失效。整個View的繪制流程是這樣的:
最頂層的ViewRoot執行performTraversals然後分別開始對各個View進行層級的測量、布局、繪制,整個流程是一層一層進行的,也就是說父視圖測量時會調用子視圖的測量方法,子視圖調孫視圖方法,一直測量到葉子節點,performTraversals這個函數翻譯過來很直白,執行遍歷,就說明了這種層級關系。
2.該控件形式上和ListView的形式比較相近,所以在這裡我也模仿ListView的Adapter模式實現了對控件內容的操作,這裡對ListView的setAdapter和Adapter的notifyDataSetChanged方法做個簡單的解釋:
在ListView調用setAdapter後,ListView會去注冊一個Observer對象到這個adapter上,然後當我們在改變設置到adapter上的數據發改變時,我們會調用adapter的notifyDataSetChanged方法,這個方法就會通知所有監聽了該Adapter數據改變時的Observer對象,這就是典型的監聽者模式,這時由於ListView中的內部成員對象監聽了該事件,就可以知道數據源發生了改變,我們需要對真個控件重新進行繪制了,下面來一些相關的源碼。
Adapter的notifyDataSetChanged
public void notifyDataSetChanged() {
    mDataSetObservable.notifyChanged();
  }
ListView的setAdapter方法
@Override
  public void setAdapter(ListAdapter adapter) {
    /**
     *每次設置新的適配的時候,如果現在有的話會做一個解除監聽的操作
     */
    if (mAdapter != null && mDataSetObserver != null) {
      mAdapter.unregisterDataSetObserver(mDataSetObserver);
    }

    resetList();
    mRecycler.clear();
    /** 省略部分代碼.....  */
    if (mAdapter != null) {
      mAreAllItemsSelectable = mAdapter.areAllItemsEnabled();
      mOldItemCount = mItemCount;
      mItemCount = mAdapter.getCount();
      checkFocus();

      /**
      *在這裡對adapter設置了監聽,
      *使用的是AdapterDataSetObserver類的對象,該對象定義在ListView的父類AdapterView中
      */
      mDataSetObserver = new AdapterDataSetObserver();
      mAdapter.registerDataSetObserver(mDataSetObserver);
      /** 省略 */
    } else {
      /** 省略 */
    }

    requestLayout();
  }
AdapterView中的內部類AdapterDataSetObserver
class AdapterDataSetObserver extends DataSetObserver {

    private Parcelable mInstanceState = null;

    @Override
    public void onChanged() {
      /* ***代碼略*** */
      checkFocus();
      requestLayout();
    }

    @Override
    public void onInvalidated() {
      /* ***代碼略*** */
      checkFocus();
      requestLayout();
    }

    public void clearSavedState() {
      mInstanceState = null;
    }
  }
一段偽代碼表示
ListView{
  Observer observer{
     onChange(){
       change;
     }
  }

  setAdapter(Adapter adapter){
     adapter.register(observer);
  }
}

Adapter{
  List<Observer> mObservable;
  register(observer){
    mObservable.add(observer);
  }
  notifyDataSetChanged(){
    for(i-->mObserverable.size()){
      mObserverable.get(i).onChange
    }
  }
}
實現過程
獲取ViewItem的接口
package humoursz.gridtag.test.adapter;

import android.view.View;

import java.util.List;

/**
 * Created by zhangzhiquan on 2016/7/19.
 */
public interface GrideTagBaseAdapter {
  List<View> getViews();
}
抽象適配器AbsGridTagsAdapter
package humoursz.gridtag.test.adapter;

import android.database.DataSetObservable;
import android.database.DataSetObserver;

/**
 * Created by zhangzhiquan on 2016/7/19.
 */
public abstract class AbsGridTagsAdapter implements GrideTagBaseAdapter {

  DataSetObservable mObservable = new DataSetObservable();

  public void notification(){
    mObservable.notifyChanged();
  }
  public void registerObserve(DataSetObserver observer){
    mObservable.registerObserver(observer);
  }
  public void unregisterObserve(DataSetObserver observer){
    mObservable.unregisterObserver(observer);
  }
}
此效果中的需要的適配器,實現了getView接口,主要是模仿了ListView的BaseAdapter
package humoursz.gridtag.test.adapter;

import android.content.Context;
import android.view.LayoutInflater;
import android.view.View;
import android.widget.TextView;


import java.util.ArrayList;
import java.util.List;

import humoursz.gridtag.test.R;
import humoursz.gridtag.test.util.UIUtil;
import humoursz.gridtag.test.widget.GridTagView;

/**
 * Created by zhangzhiquan on 2016/7/19.
 */
public class MyGridTagAdapter extends AbsGridTagsAdapter {

  private Context mContext;

  private List<String> mTags;

  public MyGridTagAdapter(Context context, List<String> tags) {
    mContext = context;
    mTags = tags;
  }

  @Override
  public List<View> getViews() {
    List<View> list = new ArrayList<>();
    for (int i = 0; i < mTags.size(); i++) {

      TextView tv = (TextView) LayoutInflater.from(mContext)
          .inflate(R.layout.grid_tag_item_text, null);

      tv.setText(mTags.get(i));

      GridTagView.LayoutParams lp = new GridTagView
          .LayoutParams(GridTagView.LayoutParams.WRAP_CONTENT
          ,GridTagView.LayoutParams.WRAP_CONTENT);

      lp.margin(UIUtil.dp2px(mContext, 5));

      tv.setLayoutParams(lp);

      list.add(tv);
    }
    return list;
  }
}
最後是主角GridTagsView控件
package humoursz.gridtag.test.widget;

import android.content.Context;
import android.database.DataSetObserver;
import android.util.AttributeSet;
import android.util.Log;
import android.view.View;
import android.view.ViewGroup;


import java.util.List;

import humoursz.gridtag.test.adapter.AbsGridTagsAdapter;

/**
 * Created by zhangzhiquan on 2016/7/18.
 */
public class GridTagView extends ViewGroup {

  private int mLines = 1;

  private int mWidthSize = 0;

  private AbsGridTagsAdapter mAdapter;

  private GTObserver mObserver = new GTObserver();

  public GridTagView(Context context) {
    this(context, null);
  }

  public GridTagView(Context context, AttributeSet attrs) {
    this(context, attrs, 0);
  }

  public GridTagView(Context context, AttributeSet attrs, int defStyleAttr) {
    super(context, attrs, defStyleAttr);
  }

  public void setAdapter(AbsGridTagsAdapter adapter) {
    if (mAdapter != null) {
      mAdapter.unregisterObserve(mObserver);
    }
    mAdapter = adapter;
    mAdapter.registerObserve(mObserver);
    mAdapter.notification();
  }

  @Override
  protected void onMeasure(int widthMeasureSpec, int heightMeasureSpec) {
    int widthSize = MeasureSpec.getSize(widthMeasureSpec);
    int heightSize = MeasureSpec.getSize(heightMeasureSpec);
    int curWidthSize = 0;
    int childHeight = 0;
    mLines = 1;
    for (int i = 0; i < getChildCount(); ++i) {
      View child = getChildAt(i);
      measureChild(child, widthMeasureSpec, heightMeasureSpec);
      curWidthSize += getChildRealWidthSize(child);
      if (curWidthSize > widthSize) {
        /**
         * 計算一共需要多少行,用於計算控件的高度
         * 計算方法是,如果當前控件放下後寬度超過
         * 容器本身的高度,就放到下一行
         */
        curWidthSize = getChildRealWidthSize(child);
        mLines++;
      }
      if (childHeight == 0) {
        /**
         * 在第一次計算時拿到字視圖的高度作為計算基礎
         */
        childHeight = getChildRealHeightSize(child);
      }
    }
    mWidthSize = widthSize;
    setMeasuredDimension(widthSize, childHeight == 0 ? heightSize : childHeight * mLines);

  }

  @Override
  protected void onLayout(boolean changed, int l, int t, int r, int b) {
    if (getChildCount() == 0)
      return;
    int childCount = getChildCount();
    LayoutParams lp = getChildLayoutParams(getChildAt(0));
    /**
     * 初始的左邊界在自身的padding left和child的margin後
     * 初始的上邊界原理相同
     */
    int left = getPaddingLeft() + lp.leftMargin;
    int top = getPaddingTop() + lp.topMargin;
    int curLeft = left;
    for (int i = 0; i < childCount; ++i) {
      View child = getChildAt(i);

      int right = curLeft + getChildRealWidthSize(child);
      /**
       * 計算如果放下當前試圖後整個一行到右側的距離
       * 如果超過控件寬那就放到下一行,並且左邊距還原,上邊距等於下一行的開始
       */
      if (right > mWidthSize) {
        top += getChildRealHeightSize(child);
        curLeft = left;
      }
      child.layout(curLeft, top, curLeft + child.getMeasuredWidth(), top + child.getMeasuredHeight());
      /**
       * 下一個控件的左邊開始距離是上一個控件的右邊
       */
      curLeft += getChildRealWidthSize(child);
    }
  }

  /**
   * 獲取childView實際占用寬度
   * @param child
   * @return 控件實際占用的寬度,需要算上margin否則margin不生效
   */
  private int getChildRealWidthSize(View child) {
    LayoutParams lp = getChildLayoutParams(child);
    int size = child.getMeasuredWidth() + lp.leftMargin + lp.rightMargin;
    return size;
  }

  /**
   * 獲取childView實際占用高度
   * @param child
   * @return 實際占用高度需要考慮上下margin
   */
  private int getChildRealHeightSize(View child) {
    LayoutParams lp = getChildLayoutParams(child);
    int size = child.getMeasuredHeight() + lp.topMargin + lp.bottomMargin;
    return size;
  }

  /**
   * 獲取LayoutParams屬性
   * @param child
   * @return
   */
  private LayoutParams getChildLayoutParams(View child) {
    LayoutParams lp;
    if (child.getLayoutParams() instanceof LayoutParams) {
      lp = (LayoutParams) child.getLayoutParams();
    } else {
      lp = (LayoutParams) generateLayoutParams(child.getLayoutParams());
    }

    return lp;
  }


  @Override
  public ViewGroup.LayoutParams generateLayoutParams(AttributeSet attr) {
    return new LayoutParams(getContext(), attr);
  }

  @Override
  protected ViewGroup.LayoutParams generateLayoutParams(ViewGroup.LayoutParams p) {
    return new LayoutParams(p);
  }

  public static class LayoutParams extends MarginLayoutParams {

    public LayoutParams(Context c, AttributeSet attrs) {
      super(c, attrs);
    }

    public LayoutParams(int width, int height) {
      super(width, height);
    }

    public LayoutParams(MarginLayoutParams source) {
      super(source);
    }

    public LayoutParams(ViewGroup.LayoutParams source) {
      super(source);
    }

    public void marginLeft(int left) {
      this.leftMargin = left;
    }

    public void marginRight(int r) {
      this.rightMargin = r;
    }

    public void marginTop(int t) {
      this.topMargin = t;
    }

    public void marginBottom(int b) {
      this.bottomMargin = b;
    }
    public void margin(int m){
      this.leftMargin = m;
      this.rightMargin = m;
      this.topMargin = m;
      this.bottomMargin = m;
    }
  }


  private class GTObserver extends DataSetObserver {
    @Override
    public void onChanged() {
      removeAllViews();
      List<View> list = mAdapter.getViews();
      for (int i = 0; i < list.size(); i++) {
        addView(list.get(i));
      }
    }
    @Override
    public void onInvalidated() {
      Log.d("Mrz","fd");
    }
  }
}
MainActivity
package humoursz.gridtag.test;

import android.support.v7.app.AppCompatActivity;
import android.os.Bundle;
import android.view.View;

import java.util.List;

import humoursz.gridtag.test.adapter.MyGridTagAdapter;
import humoursz.gridtag.test.util.ListUtil;
import humoursz.gridtag.test.widget.GridTagView;

public class MainActivity extends AppCompatActivity {

  MyGridTagAdapter adapter;
  GridTagView mGridTag;
  List<String> mList;
  @Override
  protected void onCreate(Bundle savedInstanceState) {
    super.onCreate(savedInstanceState);
    setContentView(R.layout.activity_main);
    mGridTag = (GridTagView)findViewById(R.id.grid_tags);
    mList = ListUtil.getGridTagsList(20);
    adapter = new MyGridTagAdapter(this,mList);
    mGridTag.setAdapter(adapter);
  }

  public void onClick(View v){
    mList.removeAll(mList);
    mList.addAll(ListUtil.getGridTagsList(20));
    adapter.notification();
  }
}
XML 文件
<?xml version="1.0" encoding="utf-8"?>
<RelativeLayout xmlns:android="http://schemas.android.com/apk/res/android"
  xmlns:tools="http://schemas.android.com/tools"
  android:layout_width="match_parent"
  android:layout_height="match_parent"
  tools:context="humoursz.gridtag.test.MainActivity">

  <humoursz.gridtag.test.widget.GridTagView
    android:id="@+id/grid_tags"
    android:layout_width="match_parent"
    android:layout_height="wrap_content">
  </humoursz.gridtag.test.widget.GridTagView>
  <Button
    android:layout_centerInParent="true"
    android:layout_width="wrap_content"
    android:layout_height="wrap_content"
    android:onClick="onClick"
    android:text="換一批"/>
</RelativeLayout>
以上就是Android中標簽容器控件的全部實現過程,這樣一個簡單的控件就寫好了,主要需要注意measure和layout否則很多效果都會失效,安卓中的LinearLayout之類的控件實際實現起來要復雜的很多,因為支持的屬性實在的太多了,多動手實踐可以幫助理解,希望本文能幫助到在Android開發中的大家。
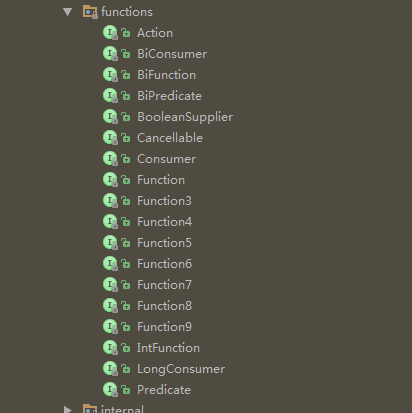 RxJava2 淺析
前段時間閱讀了RxJava1.x的源碼,剛好RxJava2.x也發布了RC版,為了迎接10月底的正式版,趁熱打鐵,本篇將對RxJava2.x進行一個簡單的剖析。Obser
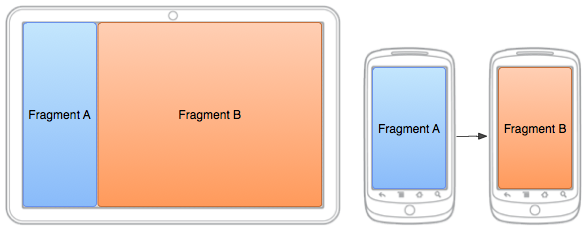 Android fragment(片段)構建靈活的UI
在以支持多種屏幕尺寸為目標設計應用時,您可以在不同的布局配置中重復使用您的fragment從而根據可用的屏幕空間優化用戶體驗。例如,在手機設備上,由於采用單窗格用戶界面,
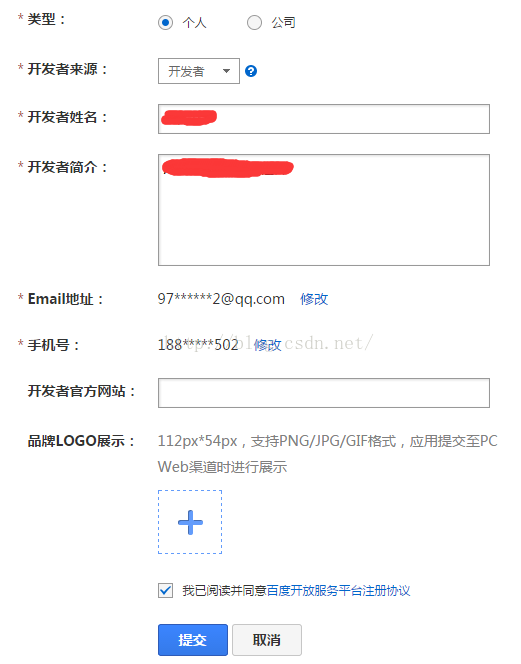 Android中實現百度地圖
現在許多APP應用都需要實現地圖功能,能夠很好的對自己所在的位置進行定位。因此,我嘗試著使用下百度地圖實現將自己的位置顯示出來。這裡我使用百度為我們提供的“百
 android產品研發(八)--)App數據統計
上一篇文章中我們介紹了android社區中比較火的熱修復功能,並介紹了目前的幾個比較流行的熱修復框架,以及各自的優缺點,同時也介紹了一下自身項目中對熱修復功能的實踐。目前