編輯:關於Android編程
本文實例為大家分享了在Android中如何實現下拉導航選擇菜單效果的全過程,供大家參考,具體內容如下
關於下拉導航選擇菜單效果在新聞客戶端中用的比較多,當然也可以用在其他的項目中,這樣可以很方便的選擇更多的菜單。我們可以讓我們的應用頂部有左右滑動或進行切換的導航菜單,也可以為了增強用戶體驗在應用中添加這樣的下拉導航選擇菜單效果。
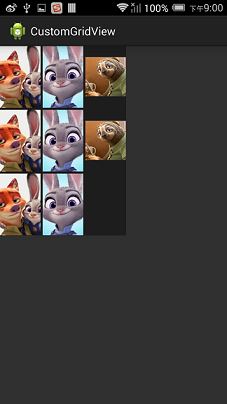
關於它的實現原理,其實也是挺簡單的,就是使用PopupWindow來進行展現,在顯示時控制其高度並配置以相應的動畫效果。在PopupWindow中我使用GridView來控制裡面的菜單項,每個菜單項對應相應的圖片和文字。當然了,也有其他的實現方式。為了大家能夠清楚的理解,讓我們先看下效果圖,如下所示:

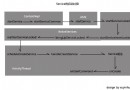
以上就是我實現的示例圖,大家已經看到了,就是點擊應用頂部中間的文字時展現出來,在我們點擊其中一項菜單時隱藏並加載相應菜單的內容,同時該菜單處於選中狀態。好了,下面就讓我們開始我們的實現過程,還是先看下程序結構圖吧:
在程序結構圖中,PulldownMenuView是對PopupWindow進行的封裝類,PulldownMenuItem是菜單項類,這是兩個重要的類。在我們點擊應用頂部中間的文字時,要進行展現,展現的同時,要實現對菜單的初始化工作,首先是初始化數據,其主要代碼如下:
  /**
 * 初始化數據,將數據加載到對應的View中
 */
 private void initData(){
 PulldownMenuItem item = new PulldownMenuItem(context);
 item.setMenuAlign(menuAlign);
 item.setMenuTextColor(menuTextColor);
 item.setMenuTextSize(menuTextSize);
 int txtLength = menuTexts.length;
 int imgLength = menuImageRes.length;

 if (txtLength != 0 && imgLength != 0){
  for (int i = 0; i < imgLength; i++){
  PulldownMenuItem menuItem = new PulldownMenuItem(context, item);

  if(!currentItem.equals(menuTexts[i])){
   menuItem.setImageRes(menuImageRes[i]);
   menuItem.setMenuText(menuTexts[i]);
  }else{
   menuItem.setMenuText(menuTexts[i]);
   menuItem.setMenuTextColor(Color.parseColor("#4FA7F9"));
   menuItem.setImageRes(ConstantCategoryMenu.newsImageResPress[i]);
  }

  menuMenuItems.add(menuItem);
  }
 } else{
  if (txtLength != 0){
  for (int i = 0; i < txtLength; i++){
   PulldownMenuItem menuItem = new PulldownMenuItem(context, item);

   if(!currentItem.equals(menuTexts[i])){
   menuItem.setMenuText(menuTexts[i]);
   }else{
   menuItem.setMenuText(menuTexts[i]);
   menuItem.setMenuTextColor(Color.parseColor("#4FA7F9"));
   }

   menuMenuItems.add(menuItem);
  }
  }else if (imgLength != 0){
  for (int i = 0; i < imgLength; i++){
   PulldownMenuItem menuItem = new PulldownMenuItem(context, item);
   menuItem.setImageRes(menuImageRes[i]);
   menuMenuItems.add(menuItem);
  }
  }
 }
 }
currentItem代表當前的選擇項,在初始化數據過程中,需要檢測哪項菜單被選中了,如果某項菜單被選中,則在展開時需要將該項菜單圖片和文字顏色設置成相應狀態,表示該項菜單被選中。在初始化過程中分為三種情況:第一種是菜單項既有圖片也有文字;第二種是菜單項只有文字;第三種是菜單項只有圖片;所以在上面代碼中需要進行相應判斷。上面是初始化菜單中的數據,下面是初始化菜單中的內容:
 /**
 * 初始化菜單內容
 * @param context
 * @param columns 菜單的列數
 * @return
 */
 private GridView getMenuGirdView(Context context, int columns){
 if (menuMenuItems.isEmpty()){
  // 初始化菜單數據
  initData();
 }

 if (null != menuGridView){
  return menuGridView;
 }

 GridView gridView = new GridView(context);
 gridView.setLayoutParams(new LinearLayout.LayoutParams(
  ViewGroup.LayoutParams.MATCH_PARENT,
  ViewGroup.LayoutParams.MATCH_PARENT));
 // 設置數據適配器
 gridView.setAdapter(new PulldownMenuAdapter(menuMenuItems));
 gridView.setVerticalSpacing(1);
 gridView.setNumColumns(columns);
 gridView.setGravity(Gravity.CENTER);
 gridView.setVerticalScrollBarEnabled(false);

 if (menuBackground != 0){
  gridView.setBackgroundResource(menuBackground);
 }

 if (menuSelector != -1){
  gridView.setSelector(menuSelector);
 }

 gridView.setHorizontalScrollBarEnabled(false);
 setMenuListener(gridView);

 return gridView;
 }
初始化菜單之後,就需要我們菜單中相應的數據,設置數據比較容易,只需要三個數組即可:第一個數組代表菜單項文字內容;第二個數組代表菜單項圖片資源,第三個數組代表菜單項被選中的圖片資源。如下代碼:
 /**
 * 新聞菜單項圖片資源
 */
 public final static int[] newsImageRes = {
 R.drawable.ic_menu_toutiao,R.drawable.ic_menu_gn,
 R.drawable.ic_menu_gj,R.drawable.ic_menu_sh,
 R.drawable.ic_menu_sport,R.drawable.ic_menu_nba,
 R.drawable.ic_menu_blog,R.drawable.ic_menu_book,
 R.drawable.ic_menu_yule,R.drawable.ic_menu_mil,
 R.drawable.ic_menu_cj,R.drawable.ic_menu_tech,
 R.drawable.ic_menu_mobile,R.drawable.ic_menu_women,
 R.drawable.ic_menu_car,R.drawable.ic_menu_house
 };

 /**
 * 新聞菜單項選中圖片資源
 */
 public final static int[] newsImageResPress = {
 R.drawable.ic_menu_toutiao_press,R.drawable.ic_menu_gn_press,
 R.drawable.ic_menu_gj_press,R.drawable.ic_menu_sh_press,
 R.drawable.ic_menu_sport_press,R.drawable.ic_menu_nba_press,
 R.drawable.ic_menu_blog_press,R.drawable.ic_menu_book_press,
 R.drawable.ic_menu_yule_press,R.drawable.ic_menu_mil_press,
 R.drawable.ic_menu_cj_press,R.drawable.ic_menu_tech_press,
 R.drawable.ic_menu_mobile_press,R.drawable.ic_menu_women_press,
 R.drawable.ic_menu_car_press,R.drawable.ic_menu_house_press
 };

 /**
 * 新聞菜單項文字
 */
 public final static String[] newsMenuTexts = {
 "今日頭條","國內","國際","社會","體育","NBA","博客","讀書",
 "娛樂","軍事","財經","科技","手機","女性","汽車","房產"
 };
菜單項使用GridView實現,我們還需要設置每個菜單項的監聽事件,在選中一項菜單後或是點擊返回鍵或點擊菜單鍵時實現隱藏,代碼如下:
 /**
 * 設置菜單項監聽事件
 * @param gridView
 */
 private void setMenuListener(GridView gridView){
 if (null == gridView.getOnItemClickListener()){
  gridView.setOnItemClickListener(new OnItemClickListener(){
  @Override
  public void onItemClick(
   AdapterView<?> parent,
   View view,
   int position,
   long id){
   if (null != menuItemListener){
   menuItemListener.onMenuItemClick(parent, view, position);
   }

   hide();
  }
  });
 }

 // 按返回鍵或菜單鍵隱藏菜單
 gridView.setOnKeyListener(new OnKeyListener(){
  @Override
  public boolean onKey(View v, int keyCode, KeyEvent event){
  if (event.getAction() == KeyEvent.ACTION_DOWN){
   switch (keyCode){
   case KeyEvent.KEYCODE_BACK:
   case KeyEvent.KEYCODE_MENU:
   hide();
   break;
   }
  }

  return false;
  }
 });
 }
在PulldownMenuView類中的show()和hide()方法中,主要是實現菜單的顯示與隱藏。在show()方法中,要計算每行存放的菜單數、設置相應的高度、菜單整體的背景、動畫效果、菜單顯示的位置等效果。具體不再詳述。
我們在顯示下拉導航選擇菜單前還需要配置菜單相應的參數,比如顯示位置、背景圖片、高度等。這就是在MenuUtility類中要實現的,代碼如下:
package com.navigation.utility;

import com.navigation.acitvity.R;
import com.navigation.control.PulldownMenuView;

import android.content.Context;
import android.view.View;

/**
 * PulldownMenuView基本操作類
 * @Description: PulldownMenuView基本操作類

 * @File: PulldownMenuUtility.java

 * @Package com.navigation.utility

 * @Author Hanyonglu

 * @Date 2012-7-30 上午11:41:04

 * @Version V1.0
 */
public class MenuUtility {
 private Context context = null;
 // PulldownMenuView對象
 private PulldownMenuView menu = null;
 // 圖片資源
 private int[] imageRes = null;
 // 文字內容
 private String[] texts = null;
 // 菜單高度
 private int height = 0;
 private View anchorView = null;

 /**
 * 默認的構造器
 */
 public MenuUtility() {
 // TODO Auto-generated constructor stub
 }

 /**
 * 帶Context的構造器
 * @param context
 */
 public MenuUtility(Context context) {
 // TODO Auto-generated constructor stub
 this(context,null,null,0,null);
 }

 /**
 * 帶多參的構造器
 * @param context
 * @param imageRes
 * @param texts
 */
 public MenuUtility(Context context,int[] imageRes,String[] texts,int height,View anchorView){
 this.context = context;
 this.imageRes = imageRes;
 this.texts = texts;
 this.height = height;
 this.anchorView = anchorView;
 }

 /**
 * 設置圖片資源
 * @param imageRes
 */
 public void setImageRes(int[] imageRes){
 this.imageRes = imageRes;
 }

 /**
 * 設置文字內容
 * @param texts
 */
 public void setTexts(String[] texts){
 this.texts = texts;
 }

 /**
 * 設置高度
 * @param height
 */
 public void setHeight(int height){
 this.height = height;
 }

 /**
 * 設置顯示的位置
 * @param anchor
 */
 public void setAnchorView(View anchor){
 anchorView = anchor;
 }

 /**
 * 獲取PulldownMenuView對象
 * 以下拉的形式展現出來菜單
 * @return
 */
 public PulldownMenuView getPulldownMenuView(String currentItem){
 PulldownMenuView menu = new PulldownMenuView(context);
 menu.setImageRes(imageRes);
 menu.setMenuText(texts);
 menu.setHeight(height);
 menu.setAnchorView(anchorView);
 menu.setCurrentItem(currentItem);
 menu.setBackground(R.drawable.navigation_bg);

 return menu;
 }

 /**
 * 獲取PulldownMenuView對象
 * 以向上彈出的方式展現出來菜單
 * @return
 */
 public PulldownMenuView getPopupMenuView(){
 PulldownMenuView menu = new PulldownMenuView(context);
 menu.setImageRes(imageRes);
 menu.setMenuText(texts);
 // menu.setLocation(Gravity.BOTTOM | Gravity.CENTER);
 menu.setAnimStyle(R.style.pulldown_in_out);
 menu.setBackground(R.drawable.navigation_bg);

 return menu;
 }
}
既然是使用PopupWindow實現我們的效果,當然了,它也可以以向上彈出的方式展現。在我這個示例中,需要它展現的位置是在頂部橫條下面展現,所以設置:
menu.setAnchorView(anchorView);
另外,在MainActivity中需要設置它的顯示高度,在這裡高度需要在頂部橫條和底部RadioGroup之間,這就需要我們獲取手機屏幕的高度減去頂部橫條的高度,再減去底部RadioGroup的高度,最後減去手機菜單欄的高度。在點擊某項菜單後,還需要將頂部中間文字和右邊三角圖片進行相應的變換。代碼如下所示:
package com.navigation.acitvity;

import com.navigation.constant.ConstantCategoryMenu;
import com.navigation.control.PulldownMenuView;
import com.navigation.control.PulldownMenuView.OnMenuItemClickListener;
import com.navigation.utility.DeviceUtility;
import com.navigation.utility.MenuUtility;

import android.app.Activity;
import android.os.Bundle;
import android.view.View;
import android.view.View.OnClickListener;
import android.widget.AdapterView;
import android.widget.FrameLayout;
import android.widget.ImageView;
import android.widget.LinearLayout;
import android.widget.RelativeLayout;
import android.widget.TextView;

/**
 * Android實現下拉導航選擇菜單效果
 * @Description: Android實現下拉導航選擇菜單效果

 * @File: MainActivity.java

 * @Package com.navigation.acitvity

 * @Author Hanyonglu

 * @Date 2012-7-28 下午06:08:27

 * @Version V1.0
 */
public class MainActivity extends Activity {
 // 今日頭條LinearLayout
 private LinearLayout linearLayoutTopic = null;
 // 界面布局
 private RelativeLayout layoutHeader = null;
 private LinearLayout layoutBottom = null;
 private FrameLayout layoutBody = null;
 // PulldownMenuView基本操作類
 private MenuUtility menuUtility = null;
 // PulldownMenuView對象
 private PulldownMenuView pullDownMenu = null;
 private TextView tvTopic = null;
 private ImageView ivTopic = null;

 private int height = 0;

 /** Called when the activity is first created. */
 @Override
 public void onCreate(Bundle savedInstanceState) {
 super.onCreate(savedInstanceState);
 setContentView(R.layout.main);

 // 初始化
 initViews();
 }

 /**
 * 初始化
 */
 protected void initViews(){
 ivTopic = (ImageView) findViewById(R.id.imageViewTopic);
 tvTopic = (TextView) findViewById(R.id.textViewTopic);

 linearLayoutTopic = (LinearLayout)findViewById(R.id.linearLayoutTopic);
 linearLayoutTopic.setOnClickListener(TopicOnClickListener);
 layoutHeader = (RelativeLayout) findViewById(R.id.layout_top_header);
 layoutBottom = (LinearLayout) findViewById(R.id.layout_bottom);
 layoutBody = (FrameLayout) findViewById(R.id.layout_body);

 height = DeviceUtility.getScreenSize(this)[1] -
   layoutHeader.getLayoutParams().height -
   layoutBottom.getLayoutParams().height -
   DeviceUtility.getStatusBarHeight(this);

 menuUtility = new MenuUtility(
  MainActivity.this,
  ConstantCategoryMenu.newsImageRes,
  ConstantCategoryMenu.newsMenuTexts,
  height,layoutHeader);
 }

 /**
 * 顯示PulldownMenuView
 */
 protected void showPulldownMenu(){
 pullDownMenu = menuUtility.getPulldownMenuView((String)tvTopic.getText());
 ivTopic.setImageResource(R.drawable.ic_menu_trangle_up);
 }

 /**
 * 隱藏PulldownMenuView
 */
 protected void hidePulldownMenu(){
 pullDownMenu.releasePopupMenuView();
 ivTopic.setImageResource(R.drawable.ic_menu_trangle_down);
 }

 // 頂部今日頭條事件監聽器
 private OnClickListener TopicOnClickListener = new OnClickListener() {
 @Override
 public void onClick(View v) {
  // 開始顯示下拉菜單
  showPulldownMenu();

  // TODO Auto-generated method stub
  pullDownMenu.setOnMenuItemClickListener(new OnMenuItemClickListener() {
  @Override
  public void onMenuItemClick(AdapterView<?> parent, View view, int position) {
   // TODO Auto-generated method stub
   tvTopic.setText(ConstantCategoryMenu.newsMenuTexts[position]);
   layoutBody.setBackgroundResource(ConstantCategoryMenu.newsBodyRes[position]);
  }

  @Override
  public void hideMenu() {
   // TODO Auto-generated method stub
   hidePulldownMenu();
  }
  });

  pullDownMenu.show();
 }
 };
}
我們在獲取MainActivity中頂部橫條和底部RadioGroup的高度時需要注意在布局文件中設置其相應的layout_height,否則,我們是獲取不到其高度的。程序中間的主體部分是截取了幾張圖片,這個大家可以根據自己的需要設置成自己的數據格式。這點知道就可以了。
以上便是Android中實現下拉導航選擇菜單效果的實現過程,是在PopupWindow中嵌入GridView實現,當然也可以在PopupWindow中嵌入ListView等各種控件實現相應的效果,也可以對PopupWindow實現各種和樣的變幻效果,具體過程這裡就不再詳述了,有興趣的朋友我們可以一起探討。
源碼下載:下拉導航選擇菜單
原文地址:http://www.cnblogs.com/hanyonglu/archive/2012/07/31/2617488.html
以上就是本文的全部內容,希望對大家的學習有所幫助,也希望大家多多支持本站。
 Android應用開發中Fragment的靜態加載與動態加載實例
1、Fragment的靜態使用Fragment是作為Activity的UI的一部分,它內嵌在Activity中,多個Fragment可以把一個Activity分成多個部分
 Android 實現控件懸浮效果
隨著移動互聯網的快速發展,它已經和我們的生活息息相關了,在公交地鐵裡面都能看到很多人的人低頭看著自己的手機屏幕,從此“低頭族”一詞就產生了,作為一
 chromium for android 硬件渲染流程總結
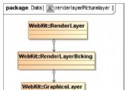
render進程中 一.webkit模塊 webkit引擎會為網頁內容同時創建Dom tree, Render tree和RenderLayer tree. 這三棵樹之間
 Android Fragment與Activity之間的數據交換(Fragment從Activity獲取數據)
Fragment與Activity之間的數據交換,大體上包括三種: 一、Fragment從Activity獲取數據(本文章只介紹第一種); 二、Activity從Frag