編輯:關於Android編程
多線程下載是加快下載速度的一種方式,通過開啟多個線程去執行一個任務..可以使任務的執行速度變快..多線程的任務下載時常都會使用得到..比如說我們手機內部應用寶的下載機制..一定是通過使用了多線程創建的下載器..並且這個下載器可以實現斷點下載..在任務被強行終止之後..下次可以通過觸發按鈕來完成斷點下載...那麼如何實現斷點下載這就是一個問題了..
首先我們需要明確一點就是多線程下載器通過使用多個線程對同一個任務進行下載..但是這個多線程並不是線程的數目越多,下載的速度就越快..當線程增加的很多的時候,單個線程執行效率也會變慢..因此線程的數目需要有一個限度..經過樓主親自測試..多線程下載同一個任務時,線程的數目5-8個算是比較高效的..當線程的數量超過10個之後,那麼多線程的效率反而就變慢了(前提:網速大體相同的時候..)
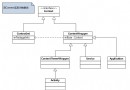
那麼在實現多線程下載同一個任務的時候我們需要明白其中的道理..下面先看一張附加圖..

這個圖其實就很簡單的說明了其中的原理..我們將一個任務分成多個部分..然後開啟多個線程去下載對應的部分就可以了..那麼首先要解決的問題就是如何使各自的線程去下載各自對應的任務,不能越界..那麼我們來看看具體的實現過程..首先我們使用普通Java代碼去實現..最後將Java代碼移植到Android就可以了..
public class Download {

  public static int threadCount = 5;  //線程開啟的數量..
  public static void main(String[] args) {
    // TODO Auto-generated method stub

    String path = "http://192.168.199.172:8080/jdk.exe";
    try {
      URL url = new URL(path);
      HttpURLConnection conn = (HttpURLConnection) url.openConnection();
      conn.setRequestMethod("GET");
      conn.setConnectTimeout(5000);
      int status = conn.getResponseCode();

      if(status == 200){
        int length = conn.getContentLength();

        System.out.println(length);

        int blocksize = length/threadCount; //將文件長度進行平分..

        for(int threadID=1; threadID<=threadCount;threadID++){

          int startIndex = (threadID-1)*blocksize; //開始位置的求法..
          int endIndex = threadID*blocksize -1;   //結束位置的求法..

          /**
           * 如果一個文件的長度無法整除線程數..
           * 那麼最後一個線程下載的結束位置需要設置文件末尾..
           * */
          if(threadID == threadCount){
            endIndex = length;
          }

          System.out.println("線程下載位置:"+startIndex+"---"+endIndex);
        }
      }


    } catch (Exception e) {
      // TODO Auto-generated catch block
      e.printStackTrace();
    }
  }
}
這樣只是實現了通過連接服務器來獲取文件的長度..然後去設置每一個線程下載的開始位置和結束位置..這裡只是完成了這些步驟..有了下載的開始位置和結束位置..我們就需要開啟線程來完成下載了...因此我們需要自己定義下載的過程...
首先我們需要明確思路:既然是斷點下載..那麼如果一旦發生了斷點情況..我們在下一次進行下載的時候需要從原來斷掉的位置進行下載..已經下載過的位置我們就不需要進行下載了..因此我們需要記載每一次的下載記錄..那麼有了記錄之後..一旦文件下載完成之後..這些記錄就需要被清除掉...因此明確了這兩個地方的思路就很容易書寫了..
//下載線程的定義..
public static class DownLoadThread implements Runnable{

    private int threadID;
    private int startIndex;
    private int endIndex;
    private String path;

    public DownLoadThread(int threadID,int startIndex,int endIndex,String path){

      this.threadID = threadID;
      this.startIndex = startIndex;
      this.endIndex = endIndex;
      this.path = path;

    }

    @Override
    public void run() {
      // TODO Auto-generated method stub

      try {

        //判斷上一次是否下載完畢..如果沒有下載完畢需要繼續進行下載..這個文件記錄了上一次的下載位置..
        File tempfile =new File(threadID+".txt");
        if(tempfile.exists() && tempfile.length()>0){

          FileInputStream fis = new FileInputStream(tempfile);
          byte buffer[] = new byte[1024];
          int leng = fis.read(buffer);
          int downlength = Integer.parseInt(new String(buffer,0,leng));//從上次下載後的位置開始下載..重新擬定開始下載的位置..
          startIndex = downlength;
          fis.close();
        }

        URL url = new URL(path);
        HttpURLConnection conn =(HttpURLConnection) url.openConnection();
        conn.setRequestMethod("GET");
        conn.setConnectTimeout(5000);
        conn.setRequestProperty("Range", "bytes="+startIndex+"-"+endIndex);

        int status = conn.getResponseCode();
        //206也表示服務器響應成功..
        if(status == 206){

          //獲取服務器返回的I/O流..然後將數據寫入文件當中..
          InputStream in = conn.getInputStream();

          //文件寫入開始..用來保存當前需要下載的文件..
          RandomAccessFile raf = new RandomAccessFile("jdk.exe", "rwd");
          raf.seek(startIndex);


          int len = 0;
          byte buf[] =new byte[1024];

          //記錄已經下載的長度..
          int total = 0;

          while((len = in.read(buf))!=-1){

            //用於記錄當前下載的信息..
            RandomAccessFile file =new RandomAccessFile(threadID+".txt", "rwd");
            total += len;
            file.write((total+startIndex+"").getBytes());
            file.close();
            //將數據寫入文件當中..
            raf.write(buf, 0, len);

          }
          in.close();
          raf.close();


        }

      } catch (Exception e) {
        // TODO Auto-generated catch block
        e.printStackTrace();
      }finally{
        //如果所有的線程全部下載完畢後..也就是任務完成..清除掉所有原來的記錄文件..
        runningThread -- ;
        if(runningThread==0){
          for(int i=1;i<threadCount;i++){
            File file = new File(i+".txt");
            file.delete();
          }
        }
      }
    }
  }
這樣就完成了文件的數據信息的下載..經過測試..一個13M的文件在5個線程共同作用下下載的時間差不多是12秒左右(網速穩定在300k的情況下..帶寬越寬..速度就會更快)單個線程下載的時間差不多是15秒左右..這裡才縮短了兩秒鐘的時間..但是我們不要忘記..如果文件過大的話呢?因此樓主親測了一下一個90M的文件在5個線程同時作用下時間差不多1分20秒左右..而使用一個線程進行下載差不多2分鐘左右..這裡還是縮短了大量的時間..
因此根據對比,還是使用多個線程來進行下載更加的好一些..雖然Android裡的一般應用不會超過50M左右..但是游戲的話一般差不多能達到100-200M左右..因此使用多線程還是能夠提高下載的進度和效率..同樣我們可以通過使用線程池的方式去開啟線程..最後這些線程交給線程池去管理就可以了..
在正常的Java項目中我們書寫好了下載代碼..就可以移植到我們的Android應用程序當中..但是還是有一些地方需要注意..因此在這裡去強調一下..
package com.example.mutithread;

import java.io.File;
import java.io.FileInputStream;
import java.io.InputStream;
import java.io.RandomAccessFile;
import java.net.HttpURLConnection;
import java.net.URL;
import android.os.Bundle;
import android.os.Handler;
import android.os.Message;
import android.app.Activity;
import android.text.TextUtils;
import android.view.Menu;
import android.view.View;
import android.widget.EditText;
import android.widget.ProgressBar;
import android.widget.TextView;
import android.widget.Toast;

public class MainActivity extends Activity {

  private EditText et;
  private ProgressBar pb;
  public static int threadCount = 5;
  public static int runningThread=5;
  public int currentProgress=0; //當前進度值..
  private TextView tv;


  private Handler handler = new Handler(){

    @Override
    public void handleMessage(Message msg){
      switch (msg.what) {
      case 1:
        Toast.makeText(getApplicationContext(), msg.obj.toString(), 0).show();
        break;
      case 2:
        break;
      case 3:
        tv.setText("當前進度:"+(pb.getProgress()*100)/pb.getMax());
      default:
        break;
      }
    }
  };
  @Override
  protected void onCreate(Bundle savedInstanceState) {
    super.onCreate(savedInstanceState);
    setContentView(R.layout.activity_main);
    et = (EditText) findViewById(R.id.et);
    pb =(ProgressBar) findViewById(R.id.pg);
    tv= (TextView) findViewById(R.id.tv);
  }

  public void downLoad(View v){
    final String path = et.getText().toString().trim();
    if(TextUtils.isEmpty(path)){
      Toast.makeText(this, "下載路徑錯誤", Toast.LENGTH_LONG).show();
      return ;
    }

    new Thread(){
//      String path = "http://192.168.199.172:8080/jdk.exe";
      public void run(){
        try {
          URL url = new URL(path);
          HttpURLConnection conn = (HttpURLConnection) url.openConnection();
          conn.setRequestMethod("GET");
          conn.setConnectTimeout(5000);
          int status = conn.getResponseCode();

          if(status == 200){
            int length = conn.getContentLength();
            System.out.println("文件總長度"+length);
            pb.setMax(length);


            RandomAccessFile raf = new RandomAccessFile("/sdcard/setup.exe","rwd");
            raf.setLength(length);
            raf.close();


            //開啟5個線程來下載當前資源..
            int blockSize = length/threadCount ;

            for(int threadID=1;threadID<=threadCount;threadID++){

              int startIndex = (threadID-1)*blockSize;
              int endIndex = threadID*blockSize -1;

              if(threadID == threadCount){
                endIndex = length;
              }
              System.out.println("線程"+threadID+"下載:---"+startIndex+"--->"+endIndex);
              new Thread(new DownLoadThread(threadID, startIndex, endIndex, path)).start() ;
            }
          }


        } catch (Exception e) {
          // TODO Auto-generated catch block
          e.printStackTrace();
        }
      };

    }.start();
  }
  /**
   * 下載線程..
   * */
  public class DownLoadThread implements Runnable{

    private int ThreadID;
    private int startIndex;
    private int endIndex;
    private String path;

    public DownLoadThread(int ThreadID,int startIndex,int endIndex,String path){
      this.ThreadID = ThreadID;
      this.startIndex = startIndex;
      this.endIndex = endIndex;
      this.path = path;
    }
    @Override
    public void run() {
      // TODO Auto-generated method stub
      URL url;
      try {
        //檢查是否存在還未下載完成的文件...
        File tempfile = new File("/sdcard/"+ThreadID+".txt");
        if(tempfile.exists() && tempfile.length()>0){
          FileInputStream fis = new FileInputStream(tempfile);
          byte temp[] =new byte[1024];
          int leng = fis.read(temp);
          int downlength = Integer.parseInt(new String(temp,0,leng));

          int alreadydown = downlength -startIndex;

          currentProgress += alreadydown;//發生斷點之後記錄下載的文件長度..

          startIndex = downlength;
          fis.close();
        }


        url = new URL(path);
        HttpURLConnection conn = (HttpURLConnection) url.openConnection();
        conn.setRequestMethod("GET");
        conn.setRequestProperty("Range", "bytes="+startIndex+"-"+endIndex);
        conn.setConnectTimeout(5000);

        //獲取響應碼..
        int status =conn.getResponseCode();

        if(status == 206){
          InputStream in = conn.getInputStream();
          RandomAccessFile raf =new RandomAccessFile("/sdcard/jdk.exe", "rwd");

          //文件開始寫入..
          raf.seek(startIndex);

          int len =0;
          byte[] buffer =new byte[1024];

          //已經下載的數據長度..
          int total = 0;


          while((len = in.read(buffer))!=-1){
            //記錄當前數據下載的長度...
            RandomAccessFile file = new RandomAccessFile("/sdcard/"+ThreadID+".txt", "rwd");

            raf.write(buffer, 0, len);
            total += len;
            System.out.println("線程"+ThreadID+"total:"+total);
            file.write((total+startIndex+"").getBytes());
            file.close();

            synchronized (MainActivity.this) {
              currentProgress += len; //獲取當前總進度...
               //progressBar progressDialog可以直接在子線程內部更新UI..由於源碼內部進行了特殊的處理..
               pb.setProgress(currentProgress); //更改界面上的進度條進度..
               Message msg =Message.obtain(); //復用以前的消息..避免多次new...
               msg.what = 3;
               handler.sendMessage(msg);

            }
          }
          raf.close();
          in.close();
          System.out.println("線程:"+ThreadID+"下載完畢");
        }else{
          System.out.println("線程:"+ThreadID+"下載失敗");
        }

      } catch (Exception e) {
        // TODO Auto-generated catch block
        e.printStackTrace();
        Message msg = new Message();
        msg.what = 1;
        msg.obj = e;
        handler.sendMessage(msg);
      }finally{
        synchronized (MainActivity.this) {
          runningThread--;

          if(runningThread == 0){
            for(int i=1;i<=threadCount;i++){
              File file = new File("/sdcard/"+i+".txt");
              file.delete();
            }
            Message msg =new Message();
            msg.what = 2;
            msg.obj ="下載完畢";
            handler.sendMessage(msg);
          }
        }

      }

    }

  }
  @Override
  public boolean onCreateOptionsMenu(Menu menu) {
    // Inflate the menu; this adds items to the action bar if it is present.
    getMenuInflater().inflate(R.menu.main, menu);
    return true;
  }

}
源代碼如上..優化的事情我就不做了..為了方便直接就貼上了..這裡定義了一個ProgressBar進度條..一個TextView來同步進度條的下載進度..在Android中我們自然不能夠在主線程中去調用耗時間的操作..因此這些耗時的操作我們就通過開啟子線程的方式去使用..但是子線程是不能夠更新UI界面的..因此我們需要使用到Handler Message機制來完成主界面UI更新的操作.
但是上面的代碼當中我們會發現一個問題..在子線程內部居然更新了ProgressBar操作..其實ProgressBar和ProgressDialog是兩個特例..我們可以在子線程內部去更新他們的屬性..我們來看一下源代碼的實現過程..
 private synchronized void refreshProgress(int id, int progress, boolean fromUser) {
    if (mUiThreadId == Thread.currentThread().getId()) { //如果當前運行的線程和主線程相同..那麼更新進度條..
      doRefreshProgress(id, progress, fromUser, true);
    } else { //如果不滿足上面說的情況..
      if (mRefreshProgressRunnable == null) {
        mRefreshProgressRunnable = new RefreshProgressRunnable();//那麼新建立一個線程..然後執行下面的過程..
      }

      final RefreshData rd = RefreshData.obtain(id, progress, fromUser); //獲取消息隊列中的消息..
      mRefreshData.add(rd);
      if (mAttached && !mRefreshIsPosted) {
        post(mRefreshProgressRunnable); //主要是這個地方..調用了post方法..將當前運行的線程發送到消息隊列當中..那麼這個線程就可以在UI中運行了..因此這一步是決定因素..
        mRefreshIsPosted = true;
      }
    }
  }
正是由於源碼內部調用了post方法..將當前的線程放入到消息隊列當中..那麼UI中的Looper線程就會對這個線程進行處理,那麼就表示這個線程是可以被執行在UI當中的..也正是這個因素導致了我們可以在子線程內部更新ProgressBar..但是我們可以看到如果我們想要去更新TextView的時候..我們就需要調用Handler Message機制來完成UI界面的更新了..因此這一塊需要我們去注意。
移植之後代碼其實並沒有發生太大的變化,這樣就可以完成一個在Android中的多線程斷點下載器了。
以上就是本文的全部內容,希望對大家學習Android軟件編程有所幫助。
 Android:使用ZXing生成二維碼(支持添加Logo圖案)
ZXing是谷歌的一個開源庫,可以用來生成二維碼、掃描二維碼。本文所介紹的是第一部分。首先上效果圖:ZXing相關各種文件官方下載地址:https://github.co
 Android自定義日歷Calender代碼實現
產品要做簽到功能,簽到功能要基於一個日歷來進行,所以就根據 要求自定義了一個日歷自定義控件相信做android都知道:(1)首先創建一個類,繼承一個容器類或者是一個控件&
 Android支付寶支付集成,同時支持無客戶端H5支付
支付寶支付在app項目中非常常見,現在把集成步驟提出了,雖然非常簡單,但是,希望對第一次集成支付的同學有幫助。要集成別人的東西,第一步當然是去看他的開發文檔,支付寶支付以
 Android 百度地圖 SDK v3.0.0 (一)
最近公司要把百度地圖集成的項目中,於是我就研究了一天百度地圖的SDK,當前的版本:Android SDK v3.0.0 。 雖然百度地圖網上相關代碼比較多,