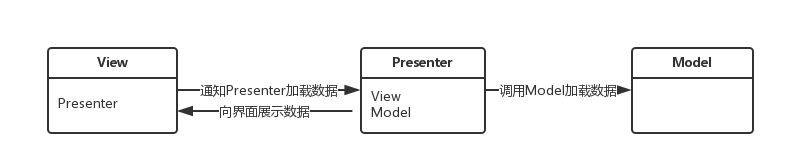
編輯:關於Android編程
Android 7.1.1 鎖屏界面啟動流程。前幾天遇到一個低概率復現鎖屏界面不顯示,只顯示狀態欄的問題,跟了下鎖屏界面啟動顯示的流程,在這分享下,也方便以後自己查看。前面簡單介紹了下Zygote啟動流程,Zygote進程啟動後會首先創建一個SystemServer進程,SystemServer進程在調用startOtherServices同時也會調用WindowManagerService的systemReady()方法
  //frameworks/base/services/java/com/android/server/SystemServer.java
  private void startOtherServices() {
       ...
       wm = WindowManagerService.main(context, inputManager,
                    mFactoryTestMode != FactoryTest.FACTORY_TEST_LOW_LEVEL,
                    !mFirstBoot, mOnlyCore);
        ...
        try {
            wm.systemReady();
            Slog.i("jason11", "SystemServer wm.systemReady");
        } catch (Throwable e) {
            reportWtf("making Window Manager Service ready", e);
        }
        ...
    }
在WindowManagerService中直接調用了PhoneWindowManager裡的systemReady()
  //frameworks/base/services/core/java/com/android/server/wm/WindowManagerService.java
  //final WindowManagerPolicy mPolicy = new PhoneWindowManager();
    public void systemReady() {
        mPolicy.systemReady();
    }
在PhoneWindowManager的systemReady()會根據一個Boolean值bindKeyguardNow來決定是否綁定keyguard service
  //frameworks/base/services/core/java/com/android/server/policy/PhoneWindowManager.java
  /** {@inheritDoc} */
    @Override
    public void systemReady() {
        mKeyguardDelegate = new KeyguardServiceDelegate(mContext);
        mKeyguardDelegate.onSystemReady();

        readCameraLensCoverState();
        updateUiMode();
        boolean bindKeyguardNow;
        synchronized (mLock) {
            updateOrientationListenerLp();
            mSystemReady = true;
            mHandler.post(new Runnable() {
                @Override
                public void run() {
                    updateSettings();
                }
            });

            bindKeyguardNow = mDeferBindKeyguard;
            if (bindKeyguardNow) {
                // systemBooted ran but wasn't able to bind to the Keyguard, we'll do it now.
                mDeferBindKeyguard = false;
            }
        }
        if (bindKeyguardNow) {
            mKeyguardDelegate.bindService(mContext);
            mKeyguardDelegate.onBootCompleted();
        }
        mSystemGestures.systemReady();
    }
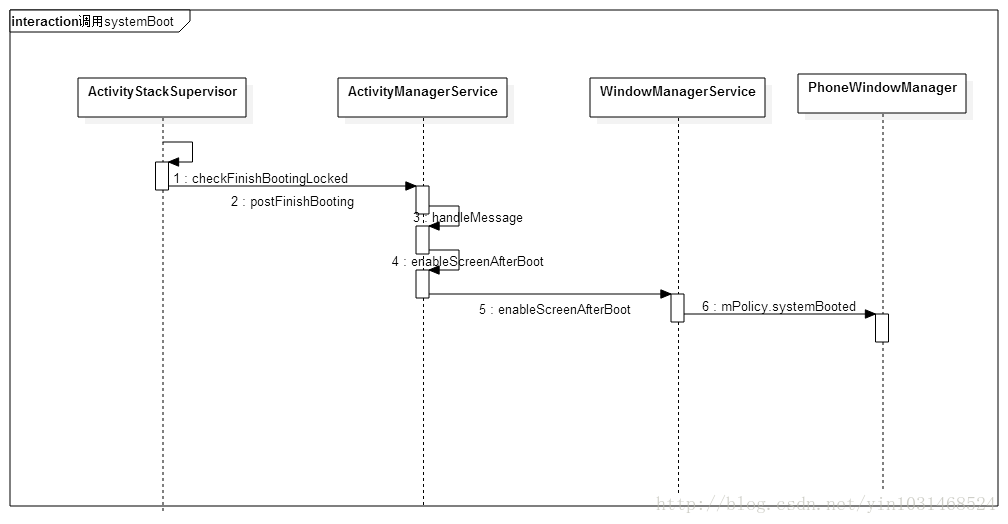
看到這裡,可能會想到如果bindKeyguardNow為false就會不綁定,後面通過繼續跟蹤發現在PhoneWindowManager的systemBooted()裡也會去綁定keyguard service,如果在systemBooted裡綁定了就不在systemReady裡再去綁定,自己測試的時候是在systemBooted綁定的
  //frameworks/base/services/core/java/com/android/server/policy/PhoneWindowManager.java
     /** {@inheritDoc} */
    @Override
    public void systemBooted() {
        boolean bindKeyguardNow = false;
        synchronized (mLock) {
            // Time to bind Keyguard; take care to only bind it once, either here if ready or
            // in systemReady if not.
            if (mKeyguardDelegate != null) {
                bindKeyguardNow = true;
            } else {
                // Because mKeyguardDelegate is null, we know that the synchronized block in
                // systemReady didn't run yet and setting this will actually have an effect.
                mDeferBindKeyguard = true;
            }
        }
        if (bindKeyguardNow) {
            mKeyguardDelegate.bindService(mContext);
            mKeyguardDelegate.onBootCompleted();
        }
        synchronized (mLock) {
            mSystemBooted = true;
        }
        startedWakingUp();
        screenTurningOn(null);
        screenTurnedOn();
    }
下面就通過如下的時序圖看看是如何調用到systemBooted的,就不在一步步跟了
通過上面的分析知道,無論是在systemReady或systemBooted,都調用了KeyguardServiceDelegate對象的bindService方法,下面就以這個方法開始,看看鎖屏界面是怎麼顯示出來的,先看看下面的時序圖,再來分步講解
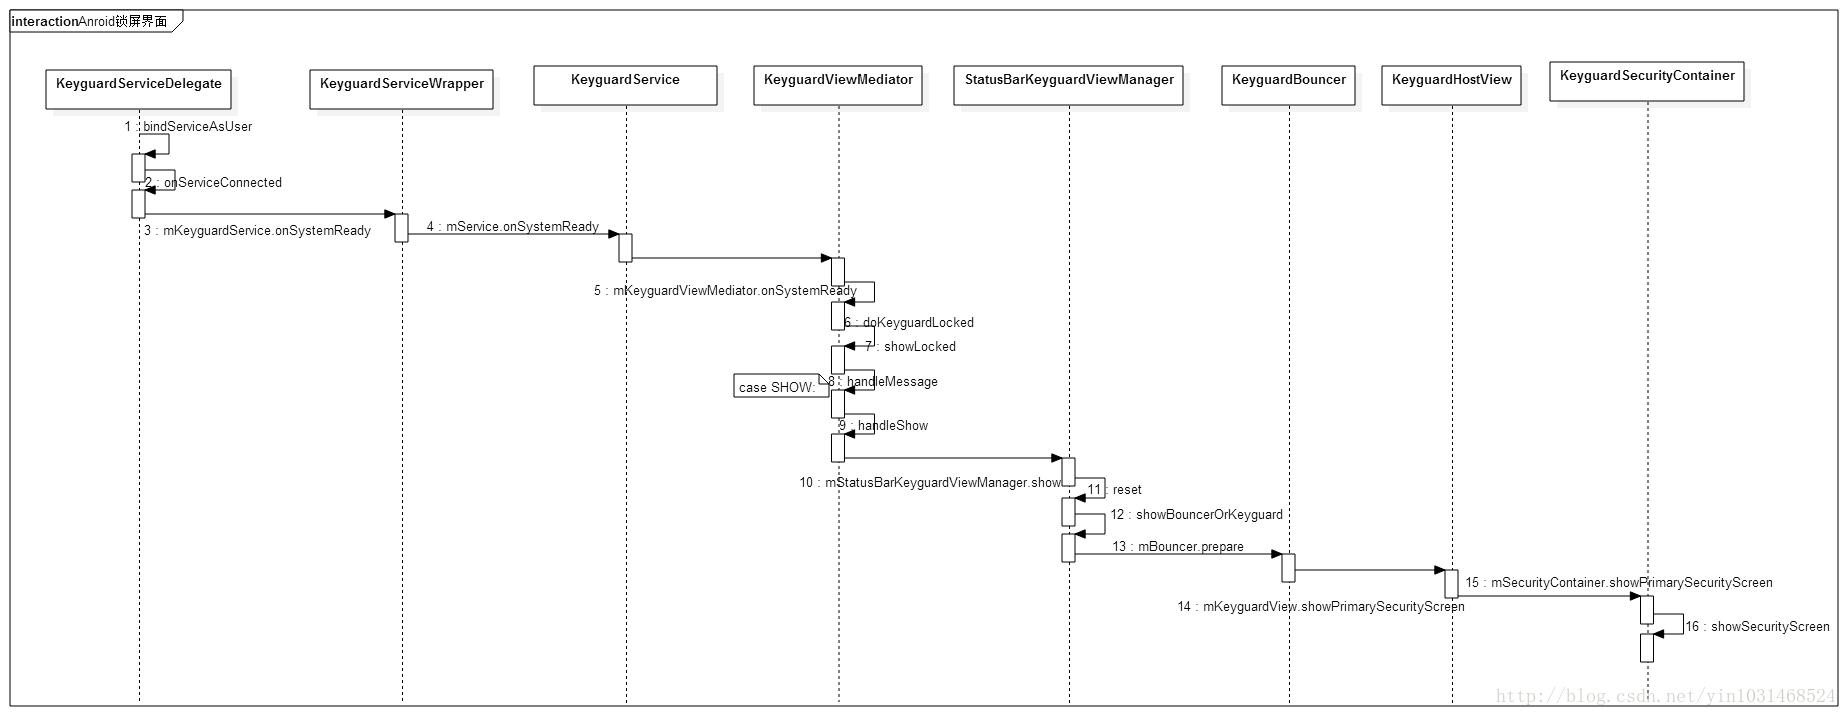
1、先來看看在KeyguardServiceDelegate如何綁定KeyguardService的
//frameworks/base/services/core/java/com/android/server/policy/keyguard/KeyguardServiceDelegate.java
public class KeyguardServiceDelegate {
    ...
    public void bindService(Context context) {
        Intent intent = new Intent();
        final Resources resources = context.getApplicationContext().getResources();

        final ComponentName keyguardComponent = ComponentName.unflattenFromString(
                resources.getString(com.android.internal.R.string.config_keyguardComponent));
        intent.setComponent(keyguardComponent);

        if (!context.bindServiceAsUser(intent, mKeyguardConnection,
                Context.BIND_AUTO_CREATE, UserHandle.OWNER)) {
            Log.v(TAG, "*** Keyguard: can't bind to " + keyguardComponent);
            mKeyguardState.showing = false;
            mKeyguardState.showingAndNotOccluded = false;
            mKeyguardState.secure = false;
            synchronized (mKeyguardState) {
                // TODO: Fix synchronisation model in this class. The other state in this class
                // is at least self-healing but a race condition here can lead to the scrim being
                // stuck on keyguard-less devices.
                mKeyguardState.deviceHasKeyguard = false;
                hideScrim();
            }
        } else {
            if (DEBUG) Log.v(TAG, "*** Keyguard started");
        }
    }
    ...
}
在bindService中調用了bindServiceAsUser綁定指定intent的service,config_keyguardComponent的定義如下
//frameworks/base/core/res/res/values/config.xml

    com.android.systemui/com.android.systemui.keyguard.KeyguardService
當綁定成功後會調用mKeyguardConnection裡的onServiceConnected方法
//frameworks/base/services/core/java/com/android/server/policy/keyguard/KeyguardServiceDelegate.java
public class KeyguardServiceDelegate {
    ...
      private final ServiceConnection mKeyguardConnection = new ServiceConnection() {
        @Override
        public void onServiceConnected(ComponentName name, IBinder service) {
            if (DEBUG) Log.v(TAG, "*** Keyguard connected (yay!)");
            mKeyguardService = new KeyguardServiceWrapper(mContext,
                    IKeyguardService.Stub.asInterface(service));
            if (mKeyguardState.systemIsReady) {
                // If the system is ready, it means keyguard crashed and restarted.
                mKeyguardService.onSystemReady();
                // This is used to hide the scrim once keyguard displays.
                if (mKeyguardState.interactiveState == INTERACTIVE_STATE_AWAKE) {
                    mKeyguardService.onStartedWakingUp();
                }
                if (mKeyguardState.screenState == SCREEN_STATE_ON
                        || mKeyguardState.screenState == SCREEN_STATE_TURNING_ON) {
                    mKeyguardService.onScreenTurningOn(
                            new KeyguardShowDelegate(mDrawnListenerWhenConnect));
                }
                if (mKeyguardState.screenState == SCREEN_STATE_ON) {
                    mKeyguardService.onScreenTurnedOn();
                }
                mDrawnListenerWhenConnect = null;
            }
            if (mKeyguardState.bootCompleted) {
                mKeyguardService.onBootCompleted();
            }
            if (mKeyguardState.occluded) {
                mKeyguardService.setOccluded(mKeyguardState.occluded);
            }
        }

        @Override
        public void onServiceDisconnected(ComponentName name) {
            if (DEBUG) Log.v(TAG, "*** Keyguard disconnected (boo!)");
            mKeyguardService = null;
        }

    };
    ...
}
 詳解Android應用開發中Scroller類的屏幕滑動功能運用
今天給大家介紹下Android中滑屏功能的一個基本實現過程以及原理初探,最後給大家重點講解View視圖中scrollTo 與scrollBy這兩個函數的區別 。
 ANDROID L——Material Design詳解(動畫篇)
Android L: Google已經確認Android L就是Android Lollipop(5
 Android程序 依賴庫引用Gson 報java.lang.NoClassDefFoundError: com/google/gson/Gson 解決方法
Android 程序所依賴一個Library程序B , B 程序中用到格式化json串,轉換成標准json串的要求 public static Strin
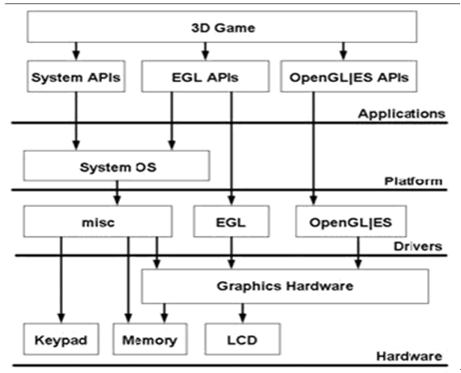 Android開發 OpenGL ES繪制3D 圖形實例詳解
OpenGL ES是 OpenGL三維圖形API 的子集,針對手機、PDA和游戲主機等嵌入式設備而設計。 Ophone目前支持OpenGL ES 1.0 ,OpenGL