編輯:關於Android編程
作為移動終端,電量是一種稀缺資源,需要盡可能的節省。於是,Android系統在空閒時,會主動進入到休眠狀態。
我們知道整個Android系統中運行著很多個進程,因此必須有一種機制能夠知道每個進程是否正在進行重要的工作,只有這樣Android系統才能對整個終端當前的狀態做出判斷。
顯然我們不能啟動一個進程,去主動監管其它所有進程的工作狀態,這樣CPU開銷太大,反而加劇了電量的消耗。為此Android引入了基於WakeLock的電量管理機制,而PMS就是專門負責管理WakeLock的進程。
個人覺得WakeLock機制的思想,有點類似於早期通信領域局域網中的令牌環機制。當局域網中有設備需要發送數據時,需要申請令牌(Token),申請到令牌才能發送數據;設備發送完數據後,再釋放掉令牌。
與此相似,Android設備中運行的進程需要使用電量資源時,也需要向PMS申請一個WakeLock;當工作完成後,就釋放掉申請的WakeLock。PMS通過判斷當前是否還有進程持有WakeLock,就能得出系統是否空閒的結論。
從這裡也可以看出,當我們寫一個永不停止工作的線程,但不申請WakeLock時,系統仍然可以休眠。在休眠時,CPU不會再耗費資源去調度該線程,於是“永不停止工作”被打上了引號。
接下來,我們就來看看PMS中的WakeLock。
一、創建WakeLock
我們以RIL.java為例,看看一般情況下,PMS以外的其它進程如何使用WakeLock。
在RIL.java的構造函數中:
public RIL(Context context, int preferredNetworkType,
        int cdmaSubscription, Integer instanceId) {
    .............
    PowerManager pm = (PowerManager)context.getSystemService(Context.POWER_SERVICE);
    //獲取WakeLock,第一個參數決定了WakeLock的等級和flag
    mWakeLock = pm.newWakeLock(PowerManager.PARTIAL_WAKE_LOCK, RILJ_LOG_TAG);

    //默認WakeLocked會ReferenceCounted,即一次申請對應一次釋放
    //設為false後,一次釋放就可以對應所有的申請
    mWakeLock.setReferenceCounted(false);
    ...........
    //RIL.java中自己維護了WakeLockCount
    mWakeLockCount = 0;
    ...........
}
從上面的代碼,可以看出調用PowerManager的newWakeLock函數,可以創建出WakeLock。
我們看看newWakeLock函數定義:
public WakeLock newWakeLock(int levelAndFlags, String tag) {
    //檢查參數有效性,即levelAndFlags必須對應於PowerManager中定義的WakeLock級別和flag,tag不能為空
    validateWakeLockParameters(levelAndFlags, tag);

    //此WakeLock為PowerManager定義的內部類
    return new WakeLock(levelAndFlags, tag, mContext.getOpPackageName());
}
1、WakeLock Level
newWakeLock中的第一個參數對應於WakeLock的級別和標志位構成的位圖。
目前,在PowerManger中一共為WakeLock定義了7種level。
/**
* Wake lock level: Ensures that the CPU is running; the screen and keyboard
* backlight will be allowed to go off.
*
* If the user presses the power button, then the screen will be turned off
* but the CPU will be kept on until all partial wake locks have been released.
* /
public static final int PARTIAL_WAKE_LOCK = 0x00000001;

/**
* Wake lock level: Ensures that the screen is on (but may be dimmed);
* the keyboard backlight will be allowed to go off.
*
* If the user presses the power button, then the SCREEN_DIM_WAKE_LOCK will be
* implicitly released by the system, causing both the screen and the CPU to be turned off.
*/
@Deprecated
public static final int SCREEN_DIM_WAKE_LOCK = 0x00000006;

/**
* Wake lock level: Ensures that the screen is on at full brightness;
* the keyboard backlight will be allowed to go off.
*
*If the user presses the power button, then the SCREEN_BRIGHT_WAKE_LOCK will be
* implicitly released by the system, causing both the screen and the CPU to be turned off.
*/
@Deprecated
public static final int SCREEN_BRIGHT_WAKE_LOCK = 0x0000000a;

/**
* Wake lock level: Ensures that the screen and keyboard backlight are on at
* full brightness.
*
*If the user presses the power button, then the FULL_WAKE_LOCK will be
* implicitly released by the system, causing both the screen and the CPU to be turned off.
*/
@Deprecated
public static final int FULL_WAKE_LOCK = 0x0000001a;

/**
* Wake lock level: Turns the screen off when the proximity sensor activates.
* If the proximity sensor detects that an object is nearby, the screen turns off
* immediately.  Shortly after the object moves away, the screen turns on again.
*
* A proximity wake lock does not prevent the device from falling asleep
* unlike link FULL_WAKE_LOCK, SCREEN_BRIGHT_WAKE_LOCK and SCREEN_DIM_WAKE_LOCK.
* If there is no user activity and no other wake locks are held, then the device will fall asleep (and lock) as usual.
* However, the device will not fall asleep while the screen has been turned off
* by the proximity sensor because it effectively counts as ongoing user activity.
*
* Cannot be used with ACQUIRE_CAUSES_WAKEUP (WakeLock的flag).
*/
//例如撥號,打通後接聽電話,屏幕變黑
public static final int PROXIMITY_SCREEN_OFF_WAKE_LOCK = 0x00000020;

/**
* Wake lock level: Put the screen in a low power state and allow the CPU to suspend
* if no other wake locks are held.
*
* This is used by the dream manager to implement doze mode.  It currently
* has no effect unless the power manager is in the dozing state.
* /
public static final int DOZE_WAKE_LOCK = 0x00000040;

/**
* Wake lock level: Keep the device awake enough to allow drawing to occur.
*
* This is used by the window manager to allow applications to draw while the
* system is dozing.  It currently has no effect unless the power manager is in
* the dozing state.
* /
public static final int DRAW_WAKE_LOCK = 0x00000080;
從上面的代碼注釋可以看出,WakeLock主要用於控制CPU、屏幕和鍵盤三大部分(當然,現在的Anroid中基本沒有鍵盤了)。
對於PARTIAL_WAKE_LOCK、SCREEN_DIM_WAKE_LOCK、SCREEN_BRIGHT_WAKE_LOCK和FULL_WAKE_LOCK而言,不考慮Power鍵的話,隨著等級的提高,權限也相應增大,即持有高等級的鎖,能夠激活的部分越多;如果考慮Power鍵的話,PARTIAL_WAKE_LOCK可以保證CPU不休眠,反而是權限最大的。
PROXIMITY_SCREEN_OFF_WAKE_LOCK、DOZE_WAKE_LOCK和DRAW_WAKE_LOCK都是和具體場景相關的鎖。
2、WakeLock Flag
PowerManager定義的WakeLock Flag很多,無法一一列舉,就看一下比較常用的:
/**
* Wake lock flag: Turn the screen on when the wake lock is acquired.
*
* Normally wake locks don't actually wake the device, they just cause
* the screen to remain on once it's already on.  Think of the video player
* application as the normal behavior.  Notifications that pop up and want
* the device to be on are the exception; use this flag to be like them.
*
* Cannot be used with PARTIAL_WAKE_LOCK.
* /
public static final int ACQUIRE_CAUSES_WAKEUP = 0x10000000;

/**
* Wake lock flag: When this wake lock is released, poke the user activity timer
* so the screen stays on for a little longer.
*
* Will not turn the screen on if it is not already on.
*
* Cannot be used with PARTIAL_WAKE_LOCK.
* /
public static final int ON_AFTER_RELEASE = 0x20000000;

..................
總結一下上面的內容,如下所示:
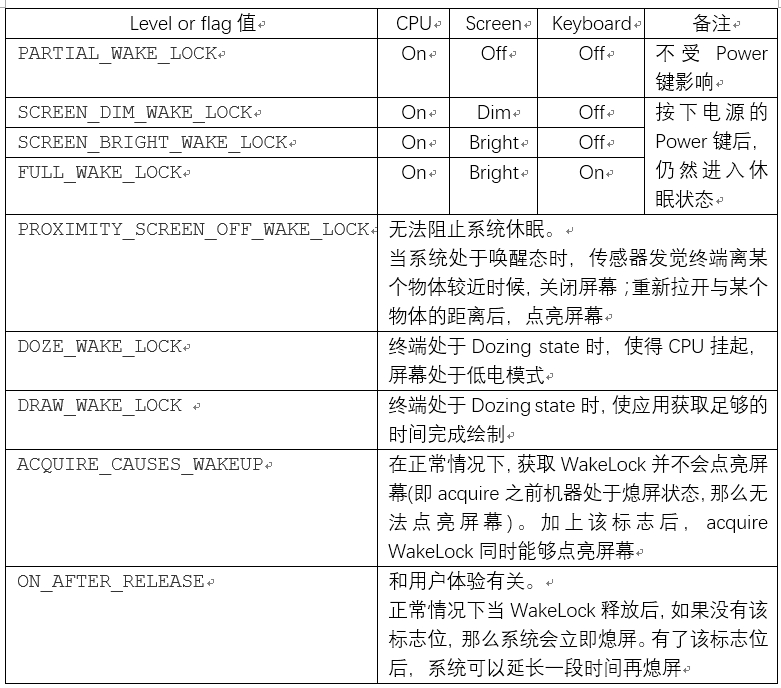
WakeLock Flag一般與WakeLock Level組合使用,使用的時候參照一下注釋即可。
3、WakeLock的構造函數
最後,我們來看看WakeLock的構造函數:
WakeLock(int flags, String tag, String packageName) {
    //level and flag
    mFlags = flags;

    //創建類對應的打印Tag
    mTag = tag;

    //創建類的類名
    mPackageName = packageName;

    //創建一個Binder對象
    //PMS將作為該Binder的客戶端監聽對應進程是否死亡
    mToken = new Binder();
    mTraceName = "WakeLock (" + mTag + ")";
}
WakeLock的構造函數中需要注意的地方是,創建了一個Binder對象。
回憶一下RIL.java中創建WakeLock的過程,我們就知道這個Binder對象應該是創建在RIL.java所在的Phone進程中。
二、Acquire WakeLock
從上面的分析,我們知道一個進程創建的WakeLock,實際上表明了該進程執行某個工作時對電量的需求,例如聲明該工作需要保持屏幕處於點亮狀態,或該工作需要CPU處於喚醒態等。
因此,進程創建了WakeLock後,需要將WakeLock發送到PMS中,讓PMS明白該進程的需求。
這種將WakeLock通知到PMS的過程,就被稱為acquire WakeLock。
同樣,我們還是以RIL.java中的使用過程舉例:
private void send(RILRequest rr) {
    Message msg;

    if (mSocket == null) {
        rr.onError(RADIO_NOT_AVAILABLE, null);
        rr.release();
        return;
    }

    msg = mSender.obtainMessage(EVENT_SEND, rr);
    //重點在這裡
    acquireWakeLock(rr, FOR_WAKELOCK);
    msg.sendToTarget();
}
當AP側向modem發送請求時,將要調用RIL.java的send函數。send函數將會發送消息給RILSender,後者利用socket將消息發送給rild進程。
從上面的代碼可以看出,在發送消息給RILSender之前,調用了acquireWakeLock函數:
private void acquireWakeLock(RILRequest rr, int wakeLockType) {
    synchronized(rr) {
        .............
        switch(wakeLockType) {
            case FOR_WAKELOCK:
                synchronized (mWakeLock) {
                    //調用acquire函數
                    mWakeLock.acquire();
                    mWakeLockCount++;
                    mWlSequenceNum++;
                    ............
            }
            break;
            .........
        }
        rr.mWakeLockType = wakeLockType;
    }
}
我們跟進一下PowerManager中WakeLock的acquire函數:
public void acquire() {
    synchronized (mToken) {
        acquireLocked();
    }
}

private void acquireLocked() {
    //前面已經提過,RIL.java中已經將mRefCounted置為false
    //如果不將mRefCounted置為false,意味著acquire和release必須一一對應
    //那麼每個WakeLock只能acquire一次
    if (!mRefCounted || mCount++ == 0) {
        ........
        try {
            mService.acquireWakeLock(mToken, mFlags, mTag, mPackageName, mWorkSource,
                    mHistoryTag);
        } catch (RemoteException e) {
            throw e.rethrowFromSystemServer();
        }
        mHeld = true;
    }
}
容易看出實際的工作流程將通過Binder通信進入到PMS中:
public void acquireWakeLock(IBinder lock, int flags, String tag, String packageName,
        WorkSource ws, String historyTag) {
    //參數和權限檢查
    ............
    final int uid = Binder.getCallingUid();
    final int pid = Binder.getCallingPid();
    final long ident = Binder.clearCallingIdentity();
    try {
        acquireWakeLockInternal(lock, flags, tag, packageName, ws, historyTag, uid, pid);
    } finally {
        Binder.restoreCallingIdentity(ident);
    }
}

private void acquireWakeLockInternal(IBinder lock, int flags, String tag, String packageName,
        WorkSource ws, String historyTag, int uid, int pid) {
    synchronized (mLock) {
        ...........
        //PMS中也定義了WakeLock內部類
        WakeLock wakeLock;

        //PMS中維持了一個ArrayList,記錄當前已申請的WakeLock
        //findWakeLockIndexLocked查找ArrayList,判斷參數對應的WakeLock,是否在之前被申請過
        int index = findWakeLockIndexLocked(lock);
        boolean notifyAcquire;
        if (index >= 0) {
            //如果index大於0,說明此時Acquire的是一個舊的WakeLock
            //例如RIL會多次調用send函數,於是除第一次外,都會進入這個分支
            wakeLock = mWakeLocks.get(index);

            //這是判斷WakeLock對應的成員變量是否發生改變
            if (!wakeLock.hasSameProperties(flags, tag, ws, uid, pid)) {
                // Update existing wake lock.  This shouldn't happen but is harmless.
                notifyWakeLockChangingLocked(wakeLock, flags, tag, packageName,
                        uid, pid, ws, historyTag);
                //若wakelock屬性發生了變化,更新該屬性
                wakeLock.updateProperties(flags, tag, packageName, ws, historyTag, uid, pid);
            }
            notifyAcquire = false;
        } else {
            //創建一個新的WakeLock,例如RIL第一次調用send就會進入該分支
            wakeLock = new WakeLock(lock, flags, tag, packageName, ws, historyTag, uid, pid);
            try {
                //1、監控申請WakeLock的進程是否死亡
                lock.linkToDeath(wakeLock, 0);
            } catch (RemoteException ex) {
                throw new IllegalArgumentException("Wake lock is already dead.");
            }
            //添加到wakelock列表
            mWakeLocks.add(wakeLock);

            //2、特殊處理PARTIAL_WAKE_LOCK
            //實際上,根據Doze模式的白名單更新wakelock的disabled變量
            setWakeLockDisabledStateLocked(wakeLock);
            notifyAcquire = true;
        }

        //3、處理WakeLock對應的Flag
        //實際上判斷WakeLock是否有ACQUIRE_CAUSES_WAKEUP,在必要時喚醒屏幕
        applyWakeLockFlagsOnAcquireLocked(wakeLock, uid);
        mDirty |= DIRTY_WAKE_LOCKS;

        //更新電源狀態,以後單獨分析
        updatePowerStateLocked();
        if (notifyAcquire) {
            // This needs to be done last so we are sure we have acquired the
            // kernel wake lock.  Otherwise we have a race where the system may
            // go to sleep between the time we start the accounting in battery
            // stats and when we actually get around to telling the kernel to
            // stay awake.
            //通知wakeLock發生變化
            //電量統計服務做相關統計
            notifyWakeLockAcquiredLocked(wakeLock);
        }
    }
}
如上代碼中標注的注釋,acquireWakeLockInternal中有幾處比較重要的地方,我們一起來分析一下。
1、監聽客戶端進程死亡
上面的代碼中,第一次創建WakeLock後,調用了:
.........
lock.linkToDeath(wakeLock, 0);
.........
我們將acquire WakeLock的進程定義為PMS的客戶端進程,那麼上面代碼的lock,就是客戶端進程中創建的Binder對象的代理。對於RIL而言,就是存在於Phone進程中的Binder的代理。
PMS調用Binder代理的linkToDeath,實際上使得PMS成為了對應進程Binder的客戶端。於是,當對應進程死亡後,將通知PMS。
linkToDeath傳入的必須是繼承IBinder.DeathRecipient的對象,作為進程死亡的”訃告”接收者。
我們看看PMS中WakeLock與此相關的定義:
private final class WakeLock implements IBinder.DeathRecipient {
    ...........
    @Override
    public void binderDied() {
        //發現客戶端進程死亡後,調用PMS的handleWakeLockDeath進行處理,傳入的參數為WakeLock自己
        PowerManagerService.this.handleWakeLockDeath(this);
    }
    .......
}
我們看看PMS的handleWakeLockDeath函數:
private void handleWakeLockDeath(WakeLock wakeLock) {
    synchronized (mLock) {
        ..........
        int index = mWakeLocks.indexOf(wakeLock);
        if (index < 0) {
            return;
        }

        removeWakeLockLocked(wakeLock, index);
    }
}
跟進removeWakeLockLocked函數:
private void removeWakeLockLocked(WakeLock wakeLock, int index) {
    mWakeLocks.remove(index);
    //通知到BatteryStatsService
    notifyWakeLockReleasedLocked(wakeLock);

    //處理WakeLock對應的flag,與後文applyWakeLockFlagsOnAcquireLocked一起分析
    //實際上是判斷是否需要立即息屏
    applyWakeLockFlagsOnReleaseLocked(wakeLock);
    mDirty |= DIRTY_WAKE_LOCKS;
    //鎖移除後,還是利用updatePowerStateLocked更新電源狀態
    updatePowerStateLocked();
}
2、特殊處理PARTIAL_WAKE_LOCK
PMS處理第一次創建的WakeLock時,還會調用setWakeLockDisabledStateLocked函數進行處理:
private boolean setWakeLockDisabledStateLocked(WakeLock wakeLock) {
    //僅會特殊處理PARTIAL_WAKE_LOCK,畢竟PARTIAL_WAKE_LOCK要求按Power鍵後CPU依然可以工作
    if ((wakeLock.mFlags & PowerManager.WAKE_LOCK_LEVEL_MASK)
            == PowerManager.PARTIAL_WAKE_LOCK) {
        boolean disabled = false;

        //設備處於Doze定義的device idle模式時
        if (mDeviceIdleMode) {
            final int appid = UserHandle.getAppId(wakeLock.mOwnerUid);

            // If we are in idle mode, we will ignore all partial wake locks that are
            // for application uids that are not whitelisted.

            //判斷是否為非系統應用
            if (appid >= Process.FIRST_APPLICATION_UID &&
                    //白名單search
                    Arrays.binarySearch(mDeviceIdleWhitelist, appid) < 0 &&
                    Arrays.binarySearch(mDeviceIdleTempWhitelist, appid) < 0 &&
                    //判斷進程的類型
                    //ActivityManager中定義的數字最小的為:常駐的操作UI的系統進程
                    //因此大概可理解為:數字越大,對處理事件的時效性要求越低
                    mUidState.get(wakeLock.mOwnerUid,
                            ActivityManager.PROCESS_STATE_CACHED_EMPTY)
                            > ActivityManager.PROCESS_STATE_FOREGROUND_SERVICE) {
                disabled = true;
            }
        }
        if (wakeLock.mDisabled != disabled) {
            wakeLock.mDisabled = disabled;
            return true;
        }
    }
    return false;
}
上面代碼大致的含義就是:
在Android Doze模式下,當終端處於device Idle Mode時,
對於一個非系統應用而言,如果該應用不在系統定義的白名單中,
並且該應用所在進程的類型表明,該進程對事件處理的時效性要求不高,
那麼即使該應用申請了PARTIAL_WAKE_LOCK,也不能阻止系統進入休眠狀態。
有些設備商,為了優化系統的功耗,就修改了這個地方。
例如,有些系統應用其實也很耗電,因此可以去掉該函數中對非系統應用的限制,對系統應用也進行管控。
3、處理WakeLock對應的Flag
前面的代碼已經提到,當acquire WakeLock時,將調用applyWakeLockFlagsOnAcquireLocked處理WakeLock對應的flag;
當由於進程死亡,釋放WakeLock時,會調用applyWakeLockFlagsOnReleaseLocked處理WakeLock對應的flag。
從函數命名來看,這兩個函數應該有相似的地方。
3.1 applyWakeLockFlagsOnAcquireLocked
我們先看看applyWakeLockFlagsOnAcquireLocked:
private void applyWakeLockFlagsOnAcquireLocked(WakeLock wakeLock, int uid) {
    //僅處理ACQUIRE_CAUSES_WAKEUP flag,同時要求WakeLock的level是與screen有關的,
    //即FULL_WAKE_LOCK、SCREEN_BRIGHT_WAKE_LOCK和SCREEN_DIM_WAKE_LOCK
    if ((wakeLock.mFlags & PowerManager.ACQUIRE_CAUSES_WAKEUP) != 0
            && isScreenLock(wakeLock)) {
        ..............
        wakeUpNoUpdateLocked(SystemClock.uptimeMillis(), wakeLock.mTag, opUid,
                opPackageName, opUid);
    }
}

private boolean wakeUpNoUpdateLocked(long eventTime, String reason, int reasonUid,
        String opPackageName, int opUid) {
    ............
    //不滿足以下條件,沒有喚醒屏幕的必要
    if (eventTime < mLastSleepTime || mWakefulness == WAKEFULNESS_AWAKE
            || !mBootCompleted || !mSystemReady) {
        return false;
    }

    try {
        mLastWakeTime = eventTime;
        //修改PMS的一些成員變量,並進行通知
        //其中主要的是將mDirty變量的DIRTY_WAKEFULNESS位置為了1
        //PMS根據mDirty的位信息管理電源狀態,同時喚醒屏幕
        setWakefulnessLocked(WAKEFULNESS_AWAKE, 0);

        //通知給電源統計服務
        mNotifier.onWakeUp(reason, reasonUid, opPackageName, opUid);

        //調用userActivityNoUpdateLocked函數
        userActivityNoUpdateLocked(
                eventTime, PowerManager.USER_ACTIVITY_EVENT_OTHER, 0, reasonUid);
    } .....
    return true;
}
3.1.1 setWakefulnessLocked
我們看看喚醒屏幕相關的操作:
private void setWakefulnessLocked(int wakefulness, int reason) {
    if (mWakefulness != wakefulness) {
        mWakefulness = wakefulness;
        mWakefulnessChanging = true;
        mDirty |= DIRTY_WAKEFULNESS;
        //定義於frameworks/base/services/core/java/com/android/server/power/Notifier.java中
        mNotifier.onWakefulnessChangeStarted(wakefulness, reason);
    }
}
public void onWakefulnessChangeStarted(final int wakefulness, int reason) {
    final boolean interactive = PowerManagerInternal.isInteractive(wakefulness);
    .......
    // Tell the activity manager about changes in wakefulness, not just interactivity.
    mHandler.post(new Runnable() {
        @Override
        public void run() {
            mActivityManagerInternal.onWakefulnessChanged(wakefulness);
        }
    });

    // Handle any early interactive state changes.
    // Finish pending incomplete ones from a previous cycle.
    if (mInteractive != interactive) {
        // Finish up late behaviors if needed.
        if (mInteractiveChanging) {
            handleLateInteractiveChange();
        }

        // Start input as soon as we start waking up or going to sleep.
        mInputManagerInternal.setInteractive(interactive);
        mInputMethodManagerInternal.setInteractive(interactive);

        // Notify battery stats.
        try {
            mBatteryStats.noteInteractive(interactive);
        } catch (RemoteException ex) { }

        // Handle early behaviors.
        mInteractive = interactive;
        mInteractiveChangeReason = reason;
        mInteractiveChanging = true;
        //重點在這個位置
        handleEarlyInteractiveChange();
    }
}

/**
* Handle early interactive state changes such as getting applications or the lock
* screen running and ready for the user to see (such as when turning on the screen).
*/
private void handleEarlyInteractiveChange() {
    synchronized (mLock) {
        if (mInteractive) {
            // Waking up...
            mHandler.post(new Runnable() {
                @Override
                public void run() {
                    EventLog.writeEvent(EventLogTags.POWER_SCREEN_STATE, 1, 0, 0, 0);
                    //mPolicy對應於PhoneWindowManager
                    mPolicy.startedWakingUp();
                }
            });

            // Send interactive broadcast.
            mPendingInteractiveState = INTERACTIVE_STATE_AWAKE;
            mPendingWakeUpBroadcast = true;
            updatePendingBroadcastLocked();
        } else {
            // Going to sleep...
            // Tell the policy that we started going to sleep.
            final int why = translateOffReason(mInteractiveChangeReason);
            mHandler.post(new Runnable() {
                @Override
                public void run() {
                    mPolicy.startedGoingToSleep(why);
                }
            });
        }
    }
}
從上面的代碼來看,應該是PhoneWindowManager完成亮屏前的初始化工作,然後回調到PowerManager的wakeUp函數。
整個過程還是比較復雜的,需要單獨進行分析,此處不做進一步說明。
3.2 applyWakeLockFlagsOnReleaseLocked
現在我們再看看applyWakeLockFlagsOnReleaseLocked函數:
private void applyWakeLockFlagsOnReleaseLocked(WakeLock wakeLock) {
    //僅處理ON_AFTER_RELEASE,同樣要求WakeLock的level是與screen有關的
    //ON_AFTER_RELEASE並不會立即息屏
    if ((wakeLock.mFlags & PowerManager.ON_AFTER_RELEASE) != 0
            && isScreenLock(wakeLock)) {
        userActivityNoUpdateLocked(SystemClock.uptimeMillis(),
                PowerManager.USER_ACTIVITY_EVENT_OTHER,
                PowerManager.USER_ACTIVITY_FLAG_NO_CHANGE_LIGHTS,
                wakeLock.mOwnerUid);
    }
}
可以看出applyWakeLockFlagsOnAcquireLocked和applyWakeLockFlagsOnReleaseLocked最後均會調用userActivityNoUpdateLocked函數,只是參數不同。
3.3 userActivityNoUpdateLocked
我們一起來看一下userActivityNoUpdateLocked:
private boolean userActivityNoUpdateLocked(long eventTime, int event, int flags, int uid) {
    .............
    //過時的事件不需要處理
    if (eventTime < mLastSleepTime || eventTime < mLastWakeTime
            || !mBootCompleted || !mSystemReady) {
        return false;
    }

    ...........
    try {
        if (eventTime > mLastInteractivePowerHintTime) {
            //調用native加載的動態庫的powerHint函數,具體意義不是很清楚
            powerHintInternal(POWER_HINT_INTERACTION, 0);
            mLastInteractivePowerHintTime = eventTime;
        }

        //調用BatteryStatsService的noteUserActivity函數,看代碼好像是做一些記錄
        mNotifier.onUserActivity(event, uid);

        //根據參數信息修改mDirty的一些變量
        .............
    } finally {
        ........
    }
}
從以上代碼來看,acquire WakeLock將申請信息遞交給PMS統一進行處理。
PMS根據WakeLock的level和flag,完成修改一些變量、通知BatteryStatsService等工作後,
最終還是依賴於updatePowerStateLocked函數來進行實際的電源狀態更新操作。
PMS類中有很多***NoUpdateLocked()方法,這些方法都有一些共性,就是僅更新狀態,不負責具體的執行。因為PMS中具體的執行邏輯都是在updatePowerStateLocked方法中。
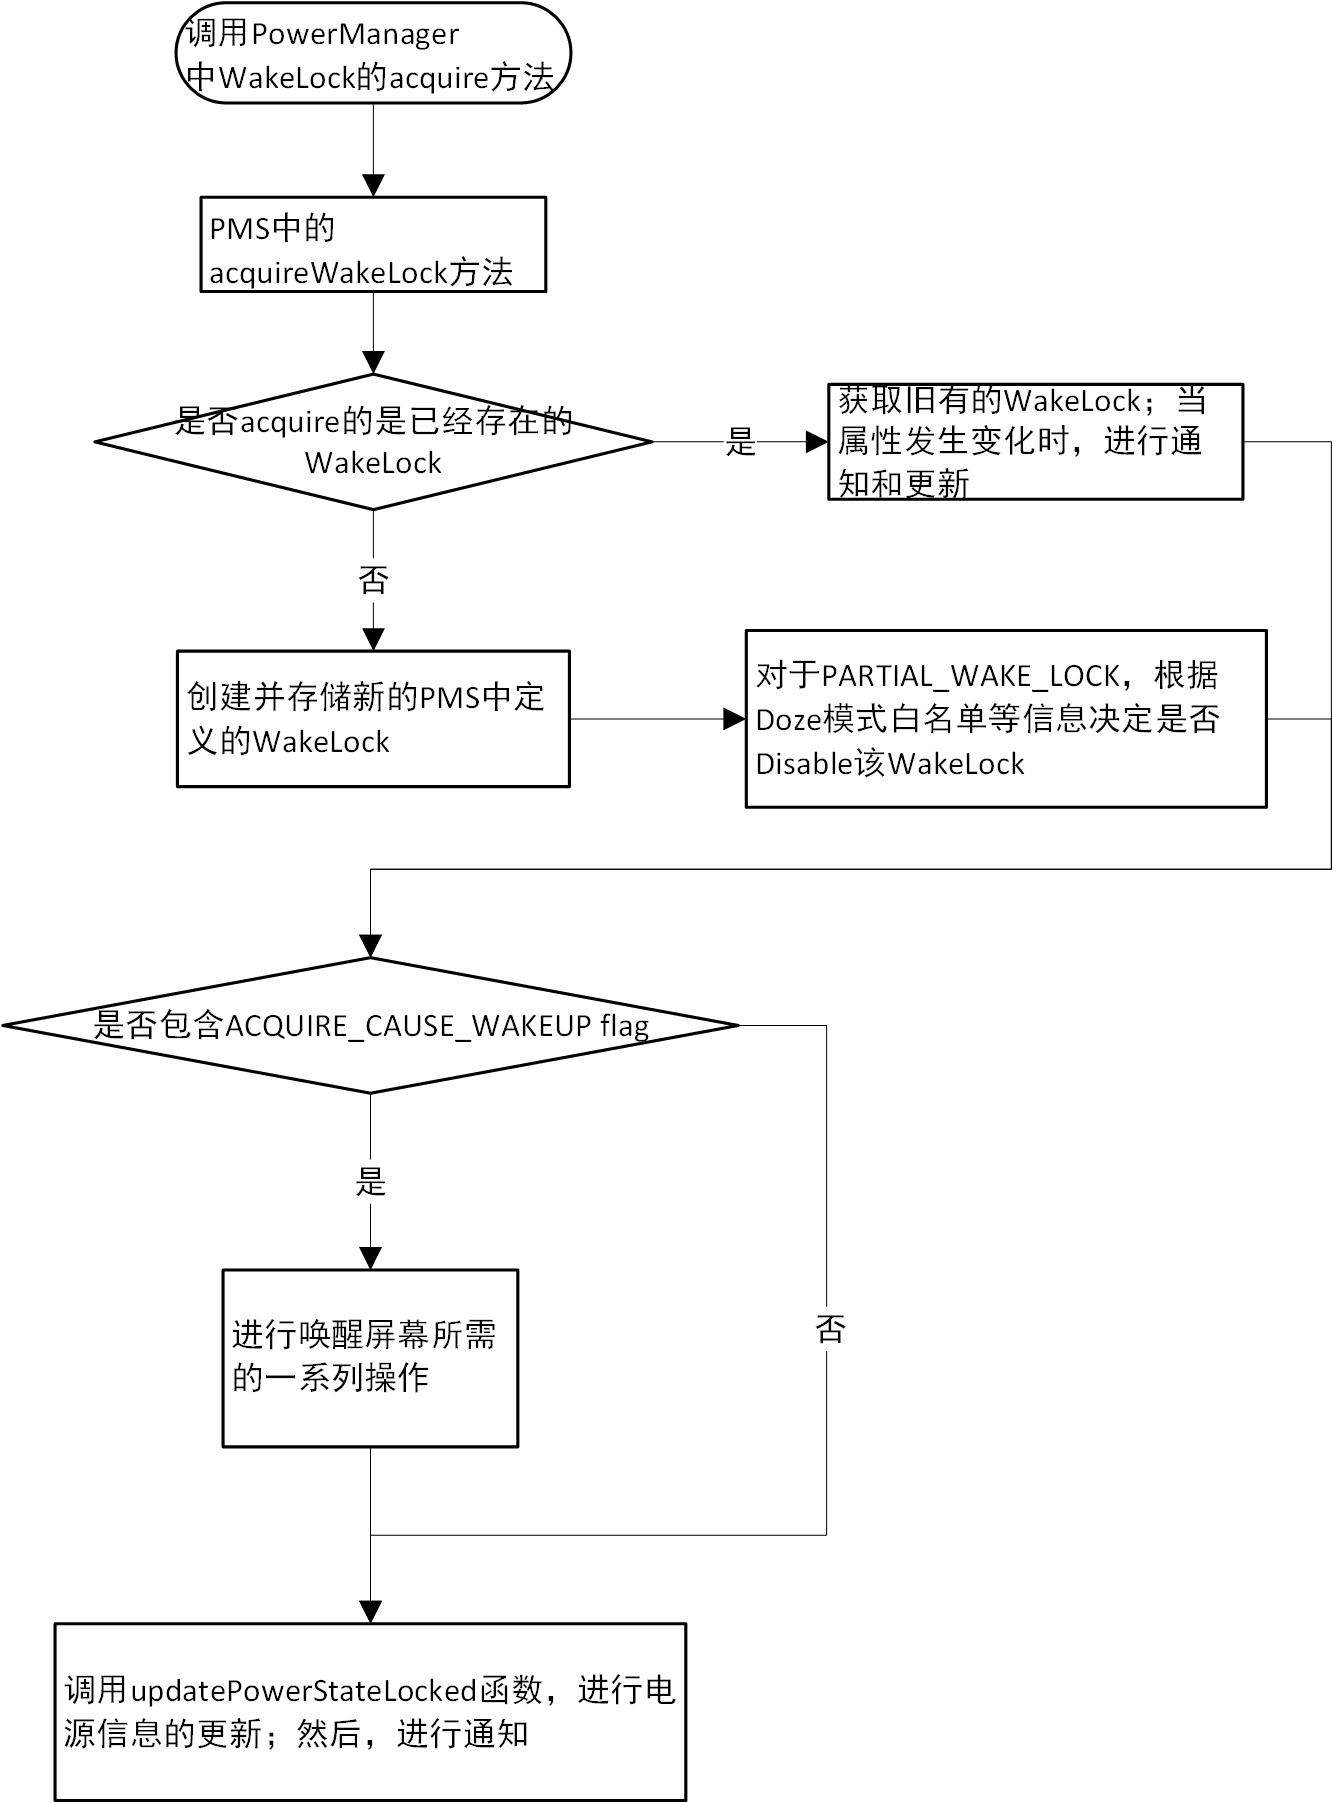
上述acquire WakeLock主要的工作大致可以總結為下圖:
三、釋放WakeLock
當進程完成工作後,需要釋放之前申請的WakeLock。我們同樣以RIL.java中的操作為例:
private void processResponse (Parcel p) {
    int type;

    type = p.readInt();

    if (type == RESPONSE_UNSOLICITED || type == RESPONSE_UNSOLICITED_ACK_EXP) {
        ...........
    } else if (type == RESPONSE_SOLICITED || type == RESPONSE_SOLICITED_ACK_EXP) {
        //處理請求對應的回復信息
        RILRequest rr = processSolicited (p, type);

        if (rr != null) {
            if (type == RESPONSE_SOLICITED) {
                //重點在這裡
                decrementWakeLock(rr);
            }
            rr.release();
            return;
        }
    } else if (type == RESPONSE_SOLICITED_ACK) {
        ...........
    }
}
我們跟進decrementWakeLock函數:
private void decrementWakeLock(RILRequest rr) {
    synchronized(rr) {
        switch(rr.mWakeLockType) {
            case FOR_WAKELOCK:
                synchronized (mWakeLock) {
                    //前面已經提到過,RIL.java多個請求復用同一個WakeLock
                    //並且利用mWakeLockCount記錄復用的次數
                    //這麼設計的目的是:RIL發送請求的數量非常多,復用WakeLock可以避免多次構造釋放
                    //同時減少與PMS之間Binder通信的次數
                    if (mWakeLockCount > 1) {
                        mWakeLockCount--;
                    } else {
                        mWakeLockCount = 0;
                        //所有請求均得到了處理,調用PowerManager中WakeLock的release函數
                        mWakeLock.release();
                    }
                }
                break;
            ........
        }
    }
    ........
}
現在我們跟進PowerManager中WakeLock定義的release函數:
/**
* Releases the wake lock with flags to modify the release behavior.
*
* This method releases your claim to the CPU or screen being on.
* The screen may turn off shortly after you release the wake lock, or it may
* not if there are other wake locks still held.
*
*/
public void release(int flags) {
    synchronized (mToken) {
        if (!mRefCounted || --mCount == 0) {
            mHandler.removeCallbacks(mReleaser);
            if (mHeld) {
                .......
                try {
                    //還是會調用到PMS中的函數
                    mService.releaseWakeLock(mToken, flags);
                } catch (RemoteException e) {
                    throw e.rethrowFromSystemServer();
                }
                mHeld = false;
            }

        }
        ....
    }
}
最後一起來看看PMS中釋放WakeLock的函數:
public void releaseWakeLock(IBinder lock, int flags) {
    //參數和權限檢查
    .............
    final long ident = Binder.clearCallingIdentity();
    try {
        releaseWakeLockInternal(lock, flags);
    } finally {
        Binder.restoreCallingIdentity(ident);
    }
}

private void releaseWakeLockInternal(IBinder lock, int flags) {
    synchronized (mLock) {
        //根據Binder代理,從存儲的ArrayList中找到對應WakeLock的序號
        int index = findWakeLockIndexLocked(lock);
        ...........
        WakeLock wakeLock = mWakeLocks.get(index);
        ...........
        //RELEASE_FLAG_WAIT_FOR_NO_PROXIMITY,表示當sensor判斷終端離物體較遠時,
        //才真正釋放PROXIMITY_SCREEN_OFF_WAKE_LOCK等級的WakeLock
        if ((flags & PowerManager.RELEASE_FLAG_WAIT_FOR_NO_PROXIMITY) != 0) {
            mRequestWaitForNegativeProximity = true;
        }

        //PMS不再關注客戶端進程是否死亡
        wakeLock.mLock.unlinkToDeath(wakeLock, 0);
        removeWakeLockLocked(wakeLock, index);
    }
}

private void removeWakeLockLocked(WakeLock wakeLock, int index) {
    mWakeLocks.remove(index);
    //通知BatteryStatsService
    notifyWakeLockReleasedLocked(wakeLock);

    //之前分析過,會做一些記錄信息等
    applyWakeLockFlagsOnReleaseLocked(wakeLock);
    mDirty |= DIRTY_WAKE_LOCKS;
    //依然靠updatePowerStateLocked函數更新終端的電源狀態
    updatePowerStateLocked();
}
整個release的過程大致可以總結為下圖:
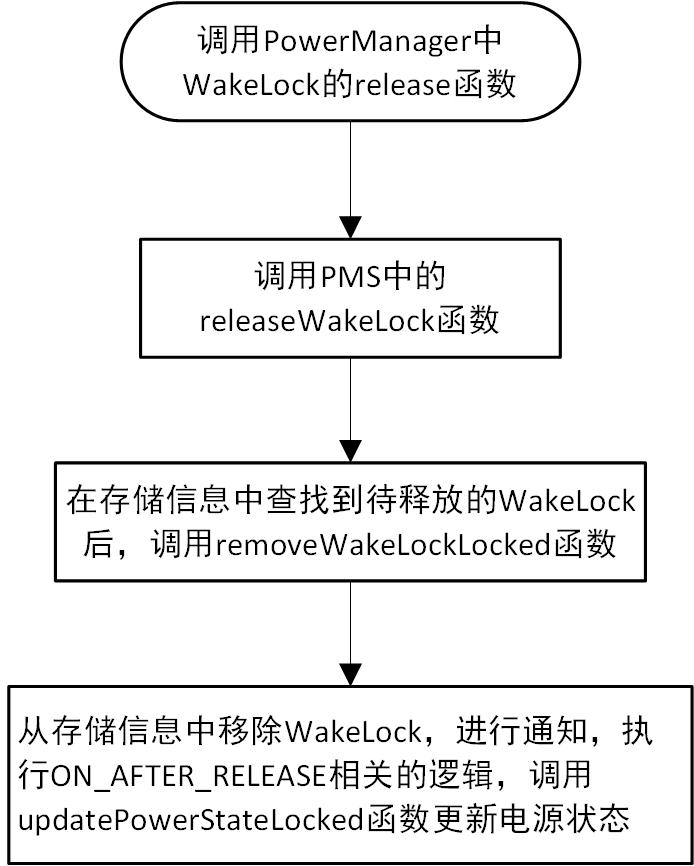
四、總結
通過前面的分析,我們知道了向PMS申請電量的基本用法類似於:
........
//1、創建
PowerManager pm = (PowerManager)context.getSystemService(Context.POWER_SERVICE);
mWakeLock = pm.newWakeLock(PowerManager.PARTIAL_WAKE_LOCK, RILJ_LOG_TAG);
......
//2、acquire
mWakeLock.acquire();
.........
//3、release
mWakeLock.release();
...........
當申請發送到PMS後,PMS將針對WakeLock的level和flag信息進行一些處理。
無論是acquire還是release WakeLock,PMS最終將利用updatePowerStateLocked函數對終端的電源狀態進行調整。
我們將單獨分析一下PMS核心的updatePowerStateLocked函數。
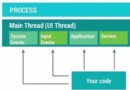 Android性能優化典范之多線程篇
本文涉及的內容有:多線程並發的性能問題,介紹了 AsyncTask,HandlerThread,IntentService 與 ThreadPool 分別適合的使用場景
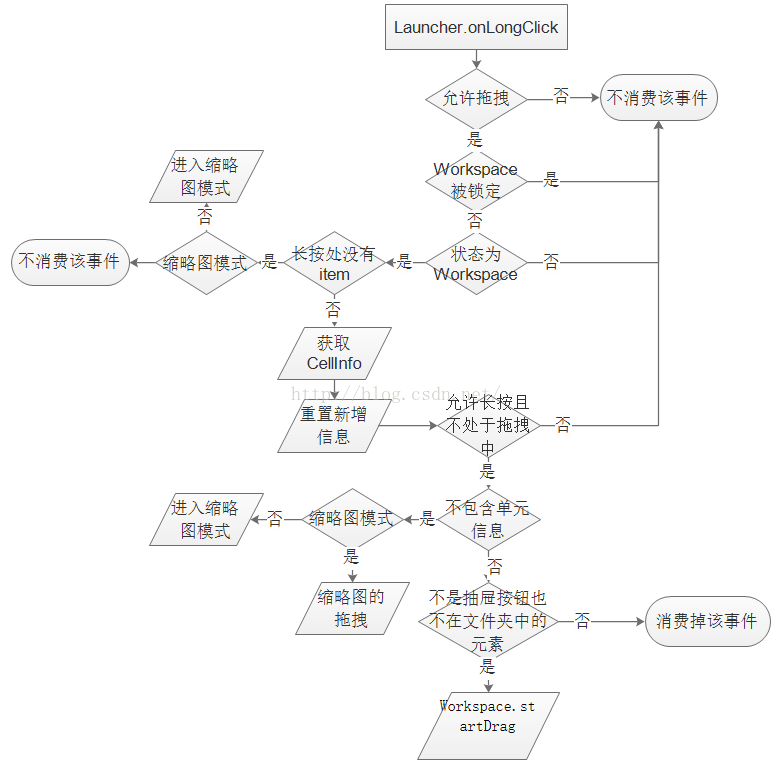 Launcher3--拖拽
在Launcher3中,有三處長按拖拽處理:主屏幕(Workspace)上的圖標和小部件文件夾中的圖標抽屜中的圖標和小部件這三種情況的拖拽處理是相似的的,我們只需知道其中
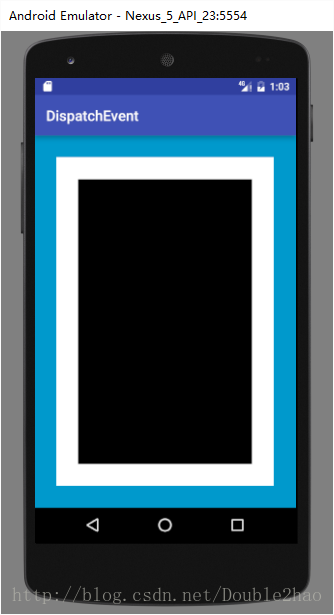 完全理解android事件分發機制
前言現在看來其實更像是一篇知識概括,多處可能未講清楚,於是打算重寫事件分發,用一篇文章大致講清楚。首先,形式上筆者最先思考的是使用源碼,此者能從原理上講解分發機制,比起侃
 Android編程之OpenGL繪圖技巧總結
本文實例講述了Android編程之OpenGL繪圖技巧。分享給大家供大家參考,具體如下:很久不用OpenGL ES繪圖,怕自己忘記了,於是重新復習一遍,順便原理性的東西總