編輯:關於Android編程
下面給大家詳細介紹android中自定義頂部標題欄的思路及實現方式
先來圖:
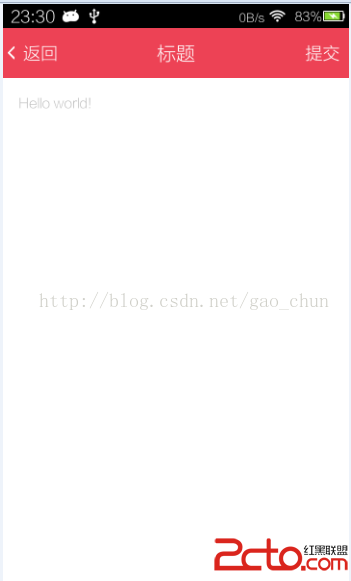
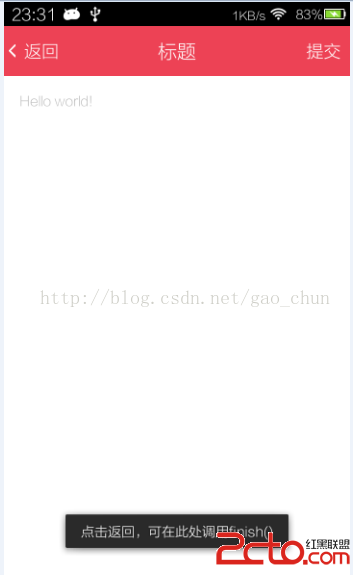
思路及實現步驟
1.定義標題欄布局
2.自定義TitleActivity控制標題欄按鈕監聽
3.在TitleActivity中實現標題欄以下內容切換首先定義標題欄
定義控制標題欄按鈕和標題欄以下內容的布局
    <framelayout android:background="#fff" android:id="@+id/layout_content" android:layout_height="match_parent" android:layout_width="match_parent">
    </framelayout>
定義TitleActivity控制按鈕及布局
package org.gaochun.widget;

import org.gaochun.ui.R;

import android.app.Activity;
import android.os.Bundle;
import android.view.View;
import android.view.View.OnClickListener;
import android.view.ViewGroup.LayoutParams;
import android.widget.Button;
import android.widget.FrameLayout;
import android.widget.TextView;
import android.widget.Toast;


/**
 * @author gao_chun
 * 自定義標題欄
 */
public class TitleActivity extends Activity implements OnClickListener{

    //private RelativeLayout mLayoutTitleBar;
    private TextView mTitleTextView;
    private Button mBackwardbButton;
    private Button mForwardButton;
    private FrameLayout mContentLayout;


    @Override
    protected void onCreate(Bundle savedInstanceState) {
        super.onCreate(savedInstanceState);
        setupViews();   //加載 activity_title 布局 ,並獲取標題及兩側按鈕
    }


    private void setupViews() {
        super.setContentView(R.layout.activity_title);
        mTitleTextView = (TextView) findViewById(R.id.text_title);
        mContentLayout = (FrameLayout) findViewById(R.id.layout_content);
        mBackwardbButton = (Button) findViewById(R.id.button_backward);
        mForwardButton = (Button) findViewById(R.id.button_forward);
    }

    /**
     * 是否顯示返回按鈕
     * @param backwardResid  文字
     * @param show  true則顯示
     */
    protected void showBackwardView(int backwardResid, boolean show) {
        if (mBackwardbButton != null) {
            if (show) {
                mBackwardbButton.setText(backwardResid);
                mBackwardbButton.setVisibility(View.VISIBLE);
            } else {
                mBackwardbButton.setVisibility(View.INVISIBLE);
            }
        } // else ignored
    }

    /**
     * 提供是否顯示提交按鈕
     * @param forwardResId  文字
     * @param show  true則顯示
     */
    protected void showForwardView(int forwardResId, boolean show) {
        if (mForwardButton != null) {
            if (show) {
                mForwardButton.setVisibility(View.VISIBLE);
                mForwardButton.setText(forwardResId);
            } else {
                mForwardButton.setVisibility(View.INVISIBLE);
            }
        } // else ignored
    }

    /**
     * 返回按鈕點擊後觸發
     * @param backwardView
     */
    protected void onBackward(View backwardView) {
        Toast.makeText(this, 點擊返回,可在此處調用finish(), Toast.LENGTH_LONG).show();
        //finish();
    }

    /**
     * 提交按鈕點擊後觸發
     * @param forwardView
     */
    protected void onForward(View forwardView) {
        Toast.makeText(this, 點擊提交, Toast.LENGTH_LONG).show();
    }


    //設置標題內容
    @Override
    public void setTitle(int titleId) {
        mTitleTextView.setText(titleId);
    }

    //設置標題內容
    @Override
    public void setTitle(CharSequence title) {
        mTitleTextView.setText(title);
    }

    //設置標題文字顏色
    @Override
    public void setTitleColor(int textColor) {
        mTitleTextView.setTextColor(textColor);
    }


    //取出FrameLayout並調用父類removeAllViews()方法
    @Override
    public void setContentView(int layoutResID) {
        mContentLayout.removeAllViews();
        View.inflate(this, layoutResID, mContentLayout);
        onContentChanged();
    }

    @Override
    public void setContentView(View view) {
        mContentLayout.removeAllViews();
        mContentLayout.addView(view);
        onContentChanged();
    }

    /* (non-Javadoc)
     * @see android.app.Activity#setContentView(android.view.View, android.view.ViewGroup.LayoutParams)
     */
    @Override
    public void setContentView(View view, LayoutParams params) {
        mContentLayout.removeAllViews();
        mContentLayout.addView(view, params);
        onContentChanged();
    }


    /* (non-Javadoc)
     * @see android.view.View.OnClickListener#onClick(android.view.View)
     * 按鈕點擊調用的方法
     */
    @Override
    public void onClick(View v) {

        switch (v.getId()) {
            case R.id.button_backward:
                onBackward(v);
                break;

            case R.id.button_forward:
                onForward(v);
                break;

            default:
                break;
        }
    }
}
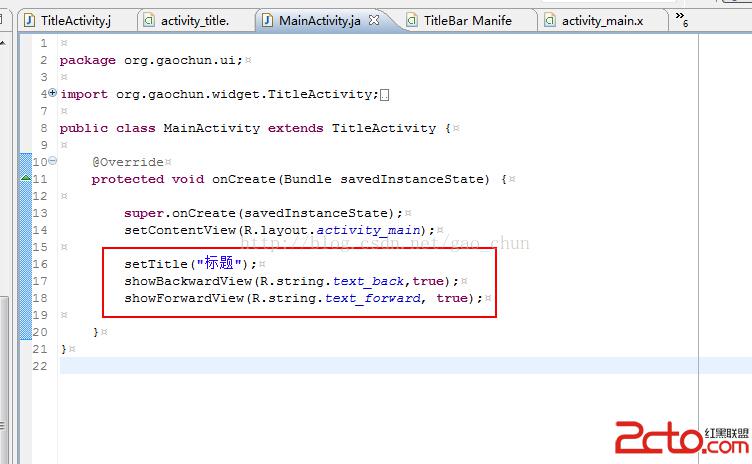
MainActivity中調用時直接 extends TitleActivity 使用之前在TitleActivity中定義的方法
 Android中獲得正在運行的程序和系統服務的方法
ActivityManager.RunningAppProcessInfo類與獲取正在運行的應用程序每一個應用程序都會運行在它獨立的進程裡,但是為了節省資源或者這些應用程
 Android 性能優化工具
1. Allocation TrackerAllocation Tracker是android studio自帶的一個功能,我們可以在MemoryMonitor中打開使用
 Android高手之路之Android中的自定義屬性attr.xml、TypedArray的使用
一般我們都是使用android:xxx=...這樣的android的屬性。但有時我們需要使用自定義的屬性,尤其是自定義view的時候尤其需要。 一般需要以下幾個步驟: 1
 android---粒子雨效果的實現
剛學習了自定義view,就按照極客學院的教程做了粒子雨效果,主要用到繪畫線條和多線程,其中的抽象類設計方法值得學習,1.baseview主要是設定雨滴要實現的動作,只是先