編輯:關於Android編程
JNI: Java Native Interface, 實現Java和C/C++的互通.
在Android上使用JNI的方法. 時間:2014.9.3
環境: 必須使用標准Eclipse, 安裝Android的環境, 才可以使用NDT插件.
Eclipse Standard/SDK Version: Luna Release (4.4.0);
Android: ADT-23.0.3.zip; NDT: GNU Make 3.81;
基礎安裝略過.
方法:
首先新建JNI的接口類, 包含使用的靜態方法. 位置: 項目->src->[package]->JniClient.java

/**
 *
 */
package com.example.hellomyjni;

/**
 * @author Administrator
 *
 */
public class JniClient {
	static public native String sayName();
}
進入項目文件夾, 生成JNI的頭文件, 使用命令:
javah -classpath bin/classes -d jni com.example.hellomyjni.JniClient
命令解析:
javah 生成頭文件;
-classpath 使用類的位置(bin/classes), 都是.class文件;
-d jni 需要生成JNI的類(com.example.hellomyjni.JniClient), 包括[package].[classname].

按F5刷新項目, 項目會自動生成jni文件夾, 並包含一個頭文件com_example_hellomyjni_JniClient.h.

/* DO NOT EDIT THIS FILE - it is machine generated */ #include/* Header for class com_example_hellomyjni_JniClient */ #ifndef _Included_com_example_hellomyjni_JniClient #define _Included_com_example_hellomyjni_JniClient #ifdef __cplusplus extern C { #endif /* * Class: com_example_hellomyjni_JniClient * Method: sayName * Signature: ()Ljava/lang/String; */ JNIEXPORT jstring JNICALL Java_com_example_hellomyjni_JniClient_sayName (JNIEnv *, jclass); #ifdef __cplusplus } #endif #endif
右鍵點擊項目在Android Tools裡面點擊Add NativeSupport, 就會自動生成: HelloMyJni.cpp和Android.mk.

Android.mk不需要修改:
LOCAL_PATH := $(call my-dir)

include $(CLEAR_VARS)

LOCAL_MODULE    := HelloMyJni
LOCAL_SRC_FILES := HelloMyJni.cpp

include $(BUILD_SHARED_LIBRARY)
即修改HelloMyJni.cpp.
首先, 添加頭文件, 即JNI生成的頭文件, #include com_example_hellomyjni_JniClient.h; 此時頭文件的報錯消失.
其次, 復制JNIEXPORT函數, 並填寫參數名稱.
在函數寫程序, 並調用其他C++程序. 注意的是此時的編譯環境自動為C++.
#include#include com_example_hellomyjni_JniClient.h JNIEXPORT jstring JNICALL Java_com_example_hellomyjni_JniClient_sayName (JNIEnv *env, jclass) { return env->NewStringUTF(I'm Spike!); }
默認為輸出為HelloWorld.
在res->layout->activity_main.xml中, 為TextView添加id, 則可以調用, 如android:id=@+id/text_view. 其他不做修改.
首先修改輸出字符, 即重新指定字符:
	@Override
	protected void onCreate(Bundle savedInstanceState) {
		super.onCreate(savedInstanceState);
		setContentView(R.layout.activity_main);
		TextView tv = (TextView) findViewById(R.id.text_view);
		tv.setText(JniClient.sayName());

	}
	static {
		System.loadLibrary(HelloMyJni);
	}
全部:
package com.example.hellomyjni;

import android.app.Activity;
import android.os.Bundle;
import android.view.Menu;
import android.view.MenuItem;
import android.widget.TextView;

public class MainActivity extends Activity {

	@Override
	protected void onCreate(Bundle savedInstanceState) {
		super.onCreate(savedInstanceState);
		setContentView(R.layout.activity_main);
		TextView tv = (TextView) findViewById(R.id.text_view);
		tv.setText(JniClient.sayName());

	}

	@Override
	public boolean onCreateOptionsMenu(Menu menu) {
		// Inflate the menu; this adds items to the action bar if it is present.
		getMenuInflater().inflate(R.menu.main, menu);
		return true;
	}

	@Override
	public boolean onOptionsItemSelected(MenuItem item) {
		// Handle action bar item clicks here. The action bar will
		// automatically handle clicks on the Home/Up button, so long
		// as you specify a parent activity in AndroidManifest.xml.
		int id = item.getItemId();
		if (id == R.id.action_settings) {
			return true;
		}
		return super.onOptionsItemSelected(item);
	}

	static {
		System.loadLibrary(HelloMyJni);
	}
}
此時項目應該沒有任何錯誤和警告. 輸出:

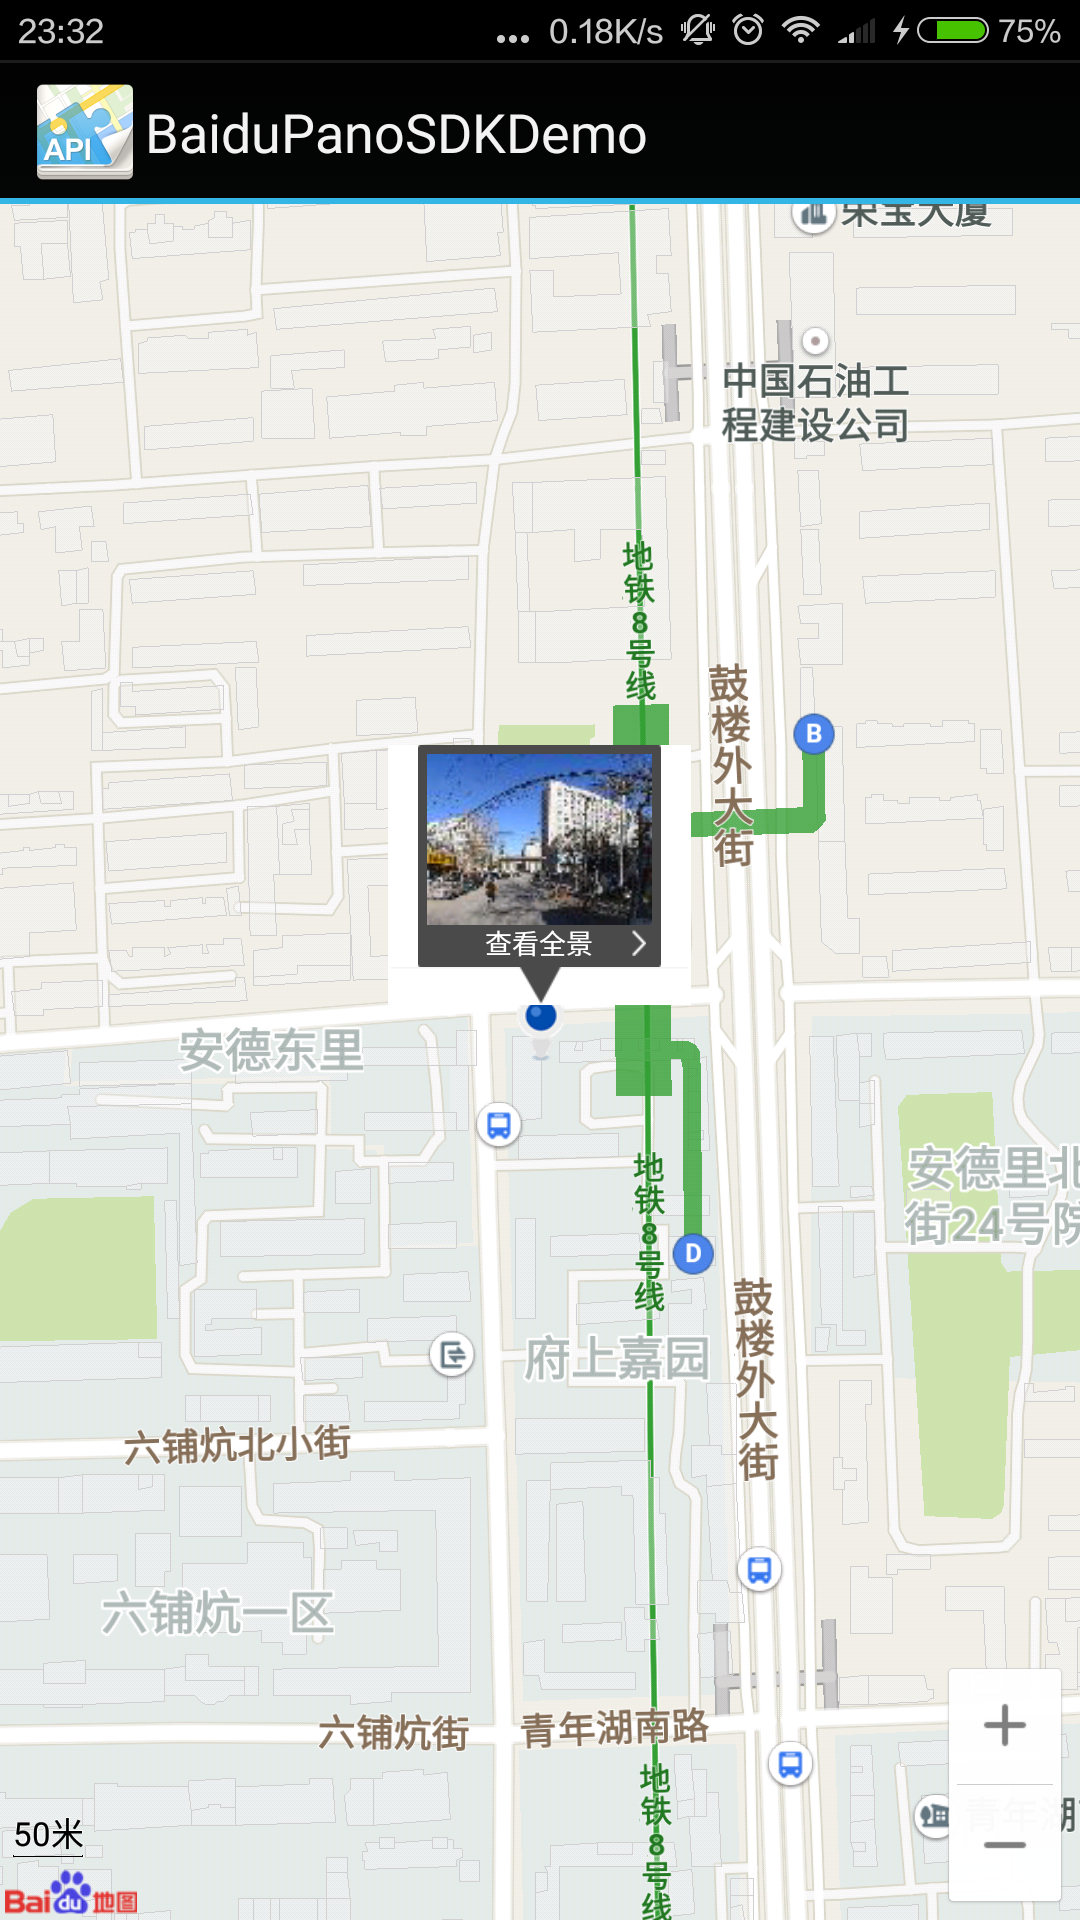
 Android百度地圖自定義公交路線導航
一、問題描述基於百度地圖實現檢索指定城市指定公交的交通路線圖,效果如圖所示二、通用組件Application類,主要創建並初始化BMapManagerpublic cla
 Android Activity 詳述
activity類處於android.app包中,繼承關系:extends ContextThemeWrapperimplements LayoutInflater.Fa
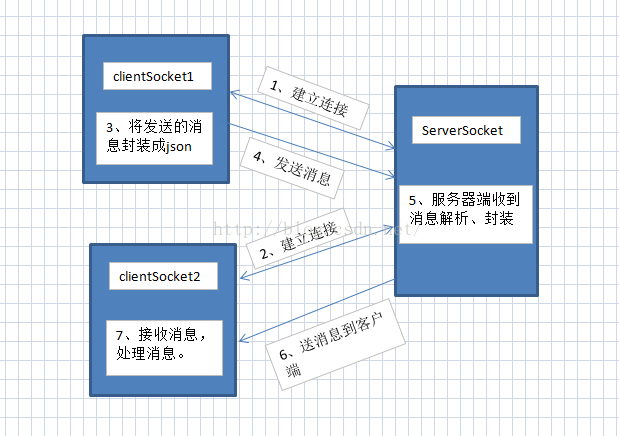 Android開發之實現兩個手機之間的通訊
Hello,大家好,今天又來寫博客了,項目終於搞完了最近又有時間寫寫博客了。在上上篇博客中我們學習了Android中網絡通訊,並用Socket實現了Android客戶端與
 Android App中實現簡單的刮刮卡抽獎效果的實例詳解
主要思想:將一個view設計成多層:背景層,含中獎信息等;遮蓋層,用於刮獎,使用關聯一個Bitmap的Canvas在該Bitmap上,使用它的canvas.drawPat